Difference between revisions of "Farm Maps"
Jump to navigation
Jump to search
Margotbean (talk | contribs) |
(→Map Types: document full forage item lists for Forest Farm; turn farm names into anchors) |
||
| Line 21: | Line 21: | ||
! Associated Skill | ! Associated Skill | ||
|- | |- | ||
| − | | style="text-align:center;" | [[File:Standard Farm Map Icon.png|link=]]<br>Standard Farm | + | | style="text-align:center;" | [[File:Standard Farm Map Icon.png|link=]]<br><span id="Standard Farm">Standard Farm</span> |
| style="text-align:center;" | [[File:Standard Farm_thumb.png|200px|link=File:Standard Farm.png]] | | style="text-align:center;" | [[File:Standard Farm_thumb.png|200px|link=File:Standard Farm.png]] | ||
| style="padding-left:0.4em;" | | | style="padding-left:0.4em;" | | ||
| Line 29: | Line 29: | ||
| style="padding-left:0.4em;" | [[File:Farming_Skill_Icon.png|24px|link=]] [[Skills#Farming|Farming]] | | style="padding-left:0.4em;" | [[File:Farming_Skill_Icon.png|24px|link=]] [[Skills#Farming|Farming]] | ||
|- | |- | ||
| − | | style="text-align:center;" id="Riverland"|[[File:Riverland Farm Map Icon.png|link=]]<br>Riverland Farm | + | | style="text-align:center;" id="Riverland"|[[File:Riverland Farm Map Icon.png|link=]]<br><span id="Riverland Farm">Riverland Farm</span> |
| style="text-align:center;" | [[File:Riverlands Farm_thumb.png|200px|link=File:Riverlands Farm.png]] | | style="text-align:center;" | [[File:Riverlands Farm_thumb.png|200px|link=File:Riverlands Farm.png]] | ||
| style="padding-left:0.4em;" | | | style="padding-left:0.4em;" | | ||
| Line 38: | Line 38: | ||
| style="padding-left:0.4em;" | [[File:Fishing_Skill_Icon.png|24px|link=]] [[Skills#Fishing|Fishing]] | | style="padding-left:0.4em;" | [[File:Fishing_Skill_Icon.png|24px|link=]] [[Skills#Fishing|Fishing]] | ||
|- | |- | ||
| − | | style="text-align:center;" id="Forest"|[[File:Forest Farm Map Icon.png|link=]]<br>Forest Farm | + | | style="text-align:center;" id="Forest"|[[File:Forest Farm Map Icon.png|link=]]<br><span id="ForestFarm">Forest Farm</span> |
| style="text-align:center;" | [[File:Forest Farm_thumb.png|200px|link=File:Forest Farm.png]] | | style="text-align:center;" | [[File:Forest Farm_thumb.png|200px|link=File:Forest Farm.png]] | ||
| style="padding-left:0.4em;" | | | style="padding-left:0.4em;" | | ||
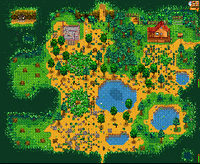
* The farm border is made of trees and foliage, just like in the [[Secret Woods]]. | * The farm border is made of trees and foliage, just like in the [[Secret Woods]]. | ||
* Many bushes can be found on this map, including berry bushes. | * Many bushes can be found on this map, including berry bushes. | ||
| − | * The western clearings spawn 8 renewable [[Large Stump]]s ([[Hardwood]]), Seasonal [[Foraging|forage]] items, and unique [[Weeds]] that always drops [[Mixed Seeds]]. | + | * The western clearings spawn 8 renewable [[Large Stump]]s ([[Hardwood]]), Seasonal [[Foraging|forage]] items, and unique [[Weeds]] that always drops [[Mixed Seeds]]. The possible forage items are: |
| + | ** In [[Spring]]: {{name|Dandelion|class=inline}} (25%), {{name|Leek|class=inline}} (25%), {{name|Morel|class=inline}} (25%), and {{name|Wild Horseradish|class=inline}} (25%) | ||
| + | ** In [[Summer]]: {{name|Common Mushroom|class=inline}} (25%), {{name|Grape|class=inline}} (25%), {{name|Spice Berry|class=inline}} (25%), and {{name|Sweet Pea|class=inline}} (25%) | ||
| + | ** In [[Fall]]: {{name|Chanterelle|class=inline}} (25%), {{name|Common Mushroom|class=inline}} (25%), {{name|Purple Mushroom|class=inline}} (25%), and {{name|Red Mushroom|class=inline}} (25%) | ||
* Players can catch pond [[fish]], ''i.e.'', [[fish]] that are found in the [[Cindersap Forest]] pond, but with higher chances for [[trash]]. Players can also catch the [[Woodskip]]. | * Players can catch pond [[fish]], ''i.e.'', [[fish]] that are found in the [[Cindersap Forest]] pond, but with higher chances for [[trash]]. Players can also catch the [[Woodskip]]. | ||
* Additional ponds and grass areas decrease the overall farming area. | * Additional ponds and grass areas decrease the overall farming area. | ||
| Line 49: | Line 52: | ||
| style="padding-left:0.4em;" | [[File:Foraging_Skill_Icon.png|24px|link=]] [[Skills#Foraging|Foraging]] | | style="padding-left:0.4em;" | [[File:Foraging_Skill_Icon.png|24px|link=]] [[Skills#Foraging|Foraging]] | ||
|- | |- | ||
| − | | style="text-align:center;" id="Hilltop"|[[File:Hilltop Farm Map Icon.png|link=]]<br>Hill-top Farm | + | | style="text-align:center;" id="Hilltop"|[[File:Hilltop Farm Map Icon.png|link=]]<br><span id="Hill-top Farm">Hill-top Farm</span> |
| style="text-align:center;" | [[File:Hilltop Farm_thumb.png|200px|link=File:Hilltop Farm.png]] | | style="text-align:center;" | [[File:Hilltop Farm_thumb.png|200px|link=File:Hilltop Farm.png]] | ||
| style="padding-left:0.4em;" | | | style="padding-left:0.4em;" | | ||
| Line 58: | Line 61: | ||
| style="padding-left:0.4em;" | [[File:Mining_Skill_Icon.png|24px|link=]] [[Skills#Mining|Mining]] | | style="padding-left:0.4em;" | [[File:Mining_Skill_Icon.png|24px|link=]] [[Skills#Mining|Mining]] | ||
|- | |- | ||
| − | | style="text-align:center;" id="Wilderness"|[[File:Wilderness Farm Map Icon.png|link=]]<br>Wilderness Farm | + | | style="text-align:center;" id="Wilderness"|[[File:Wilderness Farm Map Icon.png|link=]]<br><span id="Wilderness Farm">Wilderness Farm</span> |
| style="text-align:center;" | [[File:Wilderness Farm_thumb.png|200px|link=File:Wilderness Farm.png]] | | style="text-align:center;" | [[File:Wilderness Farm_thumb.png|200px|link=File:Wilderness Farm.png]] | ||
| style="padding-left:0.4em;" | | | style="padding-left:0.4em;" | | ||
| Line 67: | Line 70: | ||
| style="padding-left:0.4em;" | [[File:Combat_Skill_Icon.png|24px|link=]] [[Skills#Combat|Combat]] | | style="padding-left:0.4em;" | [[File:Combat_Skill_Icon.png|24px|link=]] [[Skills#Combat|Combat]] | ||
|- | |- | ||
| − | | style="text-align:center;" id="Four Corners"|[[File:Four Corners Farm Map Icon.png|link=]]<br>Four Corners Farm | + | | style="text-align:center;" id="Four Corners"|[[File:Four Corners Farm Map Icon.png|link=]]<br><span id="Four Corners Farm">Four Corners Farm</span> |
| style="text-align:center;" | [[File:Four Corners Farm.png|200px|link=File:Four Corners Farm.png]] | | style="text-align:center;" | [[File:Four Corners Farm.png|200px|link=File:Four Corners Farm.png]] | ||
| style="padding-left:0.4em;" | | | style="padding-left:0.4em;" | | ||
Revision as of 01:10, 11 July 2020
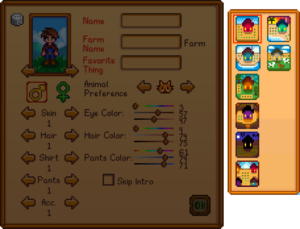
There are six different Farm Maps to choose from in Stardew Valley. Each map offers a unique layout of the Farm, offering different benefits and favoring specific skills. Only one map can be chosen when starting a new game, and cannot be changed once selected.
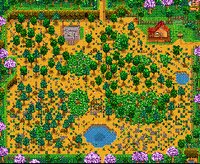
The Standard Farm offers the most space to plant crops and raise animals. The other five farms lack farming area, but offer special perks in comparison:
- The Standard Farm encourages Farming
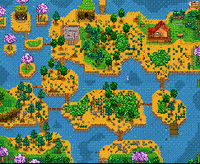
- The Riverland Farm encourages Fishing
- The Forest Farm encourages Foraging
- The Hill-top Farm encourages Mining
- The Wilderness Farm encourages Combat
- The Four Corners Farm offers perks from other maps and encourages Multiplayer
The interior of the farmhouse is decorated to match the theme of the chosen map. This includes furniture, wallpaper and flooring. The exterior of the house is the same regardless of map choice.
There is an abandoned building which can later be turned into your Greenhouse on all maps.
Map Types
| Name | Map | Description | Associated Skill |
|---|---|---|---|
Standard Farm |
|
||
Riverland Farm |
|
|
|
Forest Farm |
|
|
|
Hill-top Farm |
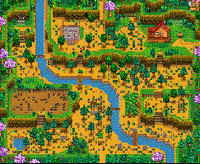
|
|
|
Wilderness Farm |
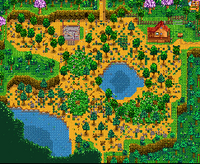
|
|
|
Four Corners Farm |
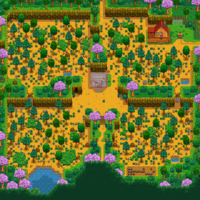
|
|
Multiplayer |
Bugs
- v1.3 and after: The player is prevented from placing any path covering (e.g. Cobblestone) on tiles (40,64) and (41,64) of the Standard Map, the southmost pair of tiles adjacent to Cindersap Forest. An attempt to do so causes the multiplayer chat window to appear, even in single player. That window can be dismissed by pressing the Escape key.
