Difference between revisions of "Modding:Maps"
Minervamaga (talk | contribs) (→Editing Maps: added info about using vanilla maps as base) |
MouseyPounds (talk | contribs) (→Custom tilesheet: missing a step in Tiled) |
||
| Line 161: | Line 161: | ||
:## In the ''Tilesets'' pane, click the [[File:Modding - creating an XNB mod - Tiled 'new tilesheet' button.png]] button. | :## In the ''Tilesets'' pane, click the [[File:Modding - creating an XNB mod - Tiled 'new tilesheet' button.png]] button. | ||
:## Give it a descriptive name (like 'cute bugs') and choose the image source. | :## Give it a descriptive name (like 'cute bugs') and choose the image source. | ||
| − | :## Keep the | + | :## Make sure that ''Embed in map'' is checked. |
| + | :## Keep the defaults for the other settings and click ''OK''. | ||
:# Add custom sprites to the map: | :# Add custom sprites to the map: | ||
:## In the ''Layers'' pane, click the layer you want to edit. | :## In the ''Layers'' pane, click the layer you want to edit. | ||
Revision as of 23:18, 17 June 2019
← Index
This page explains how to edit maps. This is an advanced guide for modders.
Intro
Basic concepts
- A map is the layout of the terrain (like water, cliffs, and land), terrain features (like bushes), buildings, paths, and triggers for a particular area. When you reach the edge of an area or enter a building, and the screen fades to black during the transition, you're moving between maps.
- Each map consists of several layers stacked one in front of the other. Objects in a layer closer to the front will hide objects in layers behind them. From back to front, the standard layers are...
layer name typical contents Back Terrain, water, and basic features (like permanent paths). Buildings Placeholders for buildings (like the farmhouse). Any tiles placed on this layer will act like a wall unless the tile property has a "Passable" "T". Paths Flooring, paths, grass, and debris (like stones, weeds, and stumps from the 'paths' tilesheet) which can be removed by the player. Front Objects that are drawn on top of things behind them, like most trees. These objects would also be drawn on top of the player. AlwaysFront Objects that are always drawn on top of other layers. This is typically used for foreground effects like foliage cover. - (Using Tiled) There are 2 different types of layers along with the 5 main layers, Objects Layer (cloud-like icon) and Tile Layer (grid icon). The Tile Layer is where you make map edits (placing and removing tiles) and the Objects Layers is where you add and edit tile data. Your layers must match the ones above. Note that depending on the map, they may be missing a Paths or AlwaysFront layer
- Each layer consists of many tiles, which are 16×16 pixel squares placed in a grid to form the visible map. Each tile can have properties (e.g. passable / blocked), special logic (e.g. an action to perform when the player steps on them), and a picture to show. The picture is represented by a sprite index (or tile index), which is its position in an associated spritesheet (see next).
- Each map has one or more spritesheets (also known as tilesheets when talking about mods), which contains the available tiles and images that are put together to form the visible map.

Tile coordinates
Each tile has an (x, y) coordinate which represents its position on the map, where (0, 0) is the top-left tile. The x value increases towards the right, and y increases downwards. For example:

Getting started
There are two main ways to edit a map.
Using SMAPI
Creating a SMAPI mod requires programming, but it's much more powerful and multiple SMAPI mods can edit the same map. If you want to use this approach:
- Create a SMAPI mod.
- See instructions below for map changes.
Using Tiled
Tiled is a popular map editor that can be used to edit Stardew Valley maps, no programming needed. You need to unpack the map's XNB, edit the map, and make a Content Patcher or SMAPI mod to load your map. If you want to use this approach:
- Install the latest version of Tiled.
- Once installed, at the top left, go to Edit > Preferences > Plugins and enable the tbin.dll plugin.
- Set the following settings:
setting value reason View > Snap to Grid ✓ enabled This is required to convert objects back into the game's format. Highlight Current Layer ✓ enabled This makes it more clear which tile you're editing. - See Modding:Editing XNB files for help unpacking & packing the map files.
- See instructions below for map changes.
Map edits
Editing Maps
Important note: When making custom maps, always start with a vanilla map and edit. Do not try to create a new map in Tiled.
Using Tiled
- Unpack the map you want to edit and the tilesheets that come with the map in the same folder (extremely important)
- Open the .tbin file via Tiled
- Do necessary edits to the map
- Delete the tilesheet png's (SMAPI handles vanilla tilesheet loading)
- Load your map via SMAPI or a different framework (eg. Content Patcher)
Custom map
You can add a new map and location to the game.
If you're using SMAPI:
public override void Entry(IModHelper helper)
{
   // the game clears locations when loading the save, so do it after the save loads
   helper.Events.GameLoop.SaveLoaded += this.OnSaveLoaded;
}

private void OnSaveLoaded(object sender, SaveLoadedEventArgs args)
{
   // load the map file from your mod folder
   this.Helper.Content.Load<Map>("assets/map.tbin", ContentSource.ModFolder);

   // get the internal asset key for the map file
   string mapAssetKey = this.Helper.Content.GetActualAssetKey("assets/map.tbin", ContentSource.ModFolder);

   // add the new location
   GameLocation location = new GameLocation(mapAssetKey, "YourLocationName") { IsOutdoors = false, IsFarm = false };
   Game1.locations.Add(location);
}
- Note:
- Your map has to be build in a certain pattern; look at the maps in the Content/Maps directory for an example on how a map has to be built.
- After loading your save file, you can use this command to jump to the map: debug warp YourLocationName X Y
If you're using Tiled:
- You can create the map in Tiled, but you need SMAPI to add it to the game.
Custom tilesheet
You can add custom sprites, tiles, or images to a map. Be sure to prefix custom tilesheet IDs with z, to avoid shifting the vanilla tilesheet indexes and potentially causing graphical corruption.
If you're using SMAPI:
public override void Entry(IModHelper helper)
{
   helper.Events.GameLoop.SaveLoaded += this.OnSaveLoaded;
}

private void OnSaveLoaded(object sender, SaveLoadedEventArgs args)
{
   // This gets the asset key for a tilesheet.png file from your mod's folder. You can also load a game tilesheet like
   // this: helper.Content.GetActualAssetKey("spring_town", ContentSource.GameContent).
   string tilesheetPath = this.Helper.Content.GetActualAssetKey("tilesheet.png", ContentSource.ModFolder);

   // Get an instance of the in-game location you want to patch. For the farm, use Game1.getFarm() instead.
   GameLocation location = Game1.getLocationFromName("Town");

   // Add the tilesheet.
   TileSheet tilesheet = new TileSheet(
      id: "z_your-custom-spritesheet", // a unique ID for the tilesheet
      map: location.map,
      imageSource: tilesheetPath,
      sheetSize: new xTile.Dimensions.Size(32, 64), // the tile size of your tilesheet image.
      tileSize: new xTile.Dimensions.Size(16, 16) // should always be 16x16 for maps
   );
   location.map.AddTileSheet(tilesheet);
   location.map.LoadTileSheets(Game1.mapDisplayDevice);
}
- To change tiles using the new tilesheet, see #Tiles below.
If you're using Tiled:
- Create your spritesheet and place it in the same folder as your tbin. This should be a PNG image with images divided into 16x16 tiles (see Modding:Editing XNB files#Intro for examples).
- Open the map in Tiled.
- Add the custom spritesheet:
- In the Tilesets pane, click the
 button.
 - Give it a descriptive name (like 'cute bugs') and choose the image source.
- Make sure that Embed in map is checked.
- Keep the defaults for the other settings and click OK.
- In the Tilesets pane, click the
- Add custom sprites to the map:
- In the Layers pane, click the layer you want to edit.
- In the Tilesets pane, click the tab for your custom spritesheet.
- In the Tilesets pane, click one tile to select it. To choose multiple, click and drag the cursor.
- Move the cursor to the map, and you'll see an overlay with the tiles you selected.
- Click the map to place those tiles on the selected layer.
Map properties
Each map can have multiple map properties, which define attributes and behaviour associated with the map like lighting, music, warp points, etc. Each property has a name (which defines the type of property) and value (which configures the property). See #Known properties below.
If you're using SMAPI:
public override void Entry(IModHelper helper)
{
   helper.Events.GameLoop.SaveLoaded += this.OnSaveLoaded;
}

private void OnSaveLoaded(object sender, SaveLoadedEventArgs args)
{
   // get the 'Music' value
   string currentMusic = Game1.currentLocation.map.Properties.TryGetValue("Music", out PropertyValue rawMusic)
      ? rawMusic.ToString()
      : null;

   // add or set the 'Music' value
   Game1.currentLocation.map.Properties["Music"] = "MarlonsTheme";

   // remove the 'Music' value
   Game1.currentLocation.map.Properties.Remove("Music");
}
If you're using Tiled:
- Click Map on the toolbar and choose Map Properties.
- View and edit properties using the GUI.
Tile properties
Tile properties are set on individual map tiles. They can change game behaviour (like whether the player can cross them), or perform actions when the player steps on or clicks the tile. Each property has a name and value.
If you're using SMAPI:
public override void Entry(IModHelper helper)
{
   helper.Events.GameLoop.SaveLoaded += this.OnSaveLoaded;
}

private void OnSaveLoaded(object sender, SaveLoadedEventArgs args)
{
    // example location & tile coordinate
    GameLocation location = Game1.currentLocation;
    int tileX = 10;
    int tileY = 20;

    // get property
    string value = location.doesTileHaveProperty(tileX, tileY, "Diggable", "Back");

    // add or set property
    location.setTileProperty(tileX, tileY, "Back", "Diggable", "T");

    // remove tile property
    Layer layer = location.map.GetLayer("Back");
    Tile tile = layer.PickTile(new xTile.Dimensions.Location(tileX, tileY) * Game1.tileSize, Game1.viewport.Size);
    tile.Properties.Remove("Diggable");
    //tile.TileIndexProperties.Remove("Diggable"); // NOTE: removing a tile index property will affect all tiles of this type
}
If you're using Tiled:
- In Tiled these are represented by two types: object properties only apply to the selected tile, while tile properties apply to every instance of that tile. In general you'll always set object properties, so we'll only cover those.
- Select the object layer in the Layers pane.
- Choose the
 select object tool in the toolbar.
 - Click the object whose properties you want to view. Objects are represented with a gray selection box on the map:
- The object properties will be shown in the Properties pane.
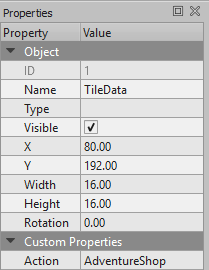


- To edit properties for an existing object:
- Change a value: click the value field and enter the new value.
- Change a name: select the property and click the
 icon.
icon. - Add a property: click the
 icon, enter the property name, make sure the selected type is "string", and click OK.
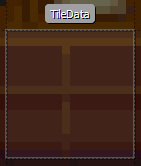
- To add a new object:
- Select the object layer in the Layers pane.
There should be one object layer for each tile layer. If the object layer is missing, create one with the same name as the right tile layer. - Choose the
 insert rectangle tool from the toolbar.
 - Click and drag the rectangle over the tile you want to edit . Make sure it snaps to the tile grid (see #Using Tiled), and only one tile is selected.
- Rename it TileData in Name
- See previous for how to edit its properties.
- Select the object layer in the Layers pane.
Tiles
You can edit the tiles for an existing map.
If you're using SMAPI:
public override void Entry(IModHelper helper)
{
   helper.Events.GameLoop.SaveLoaded += this.OnSaveLoaded;
}

private void OnSaveLoaded(object sender, SaveLoadedEventArgs args)
{
    // example location & tile coordinate
    GameLocation location = Game1.currentLocation;
    int tileX = 10;
    int tileY = 20;

    // remove tile from layer
    location.removeTile(tileX, tileY, "Back");

    // add tile
    Layer layer = location.map.GetLayer("Back");
    TileSheet tilesheet = location.map.GetTileSheet("tilesheet name");
    layer.Tiles[tileX, tileY] = new StaticTile(layer, tilesheet, BlendMode.Alpha, tileIndex: 100); // change tile index

    // toggle water tile behaviour
    location.waterTiles[tileX, tileY] = false; // true: water, false: not water
}
If you're using Tiled:
- See Tiled documentation.
Animated tiles

You can animate tiles to create effects like Gil in his rocking chair (see example at right).
If you're using SMAPI:
public override void Entry(IModHelper helper)
{
   helper.Events.GameLoop.SaveLoaded += this.OnSaveLoaded;
}

private void OnSaveLoaded(object sender, SaveLoadedEventArgs args)
{
   //add Animated Tile
   Layer layer = location.map.GetLayer("Buildings");
   TileSheet tilesheet = location.map.GetTilesheet("tilesheet name");
   layer.Tiles[tileX, tileY] = new AnimatedTile(
      layer,
      new StaticTile[] {
         new StaticTile(layer, tilesheet, BlendMode.Alpha, tileID),
         new StaticTile(layer, tilesheet, BlendMode.Alpha, tileID),
         new StaticTile(layer, tilesheet, BlendMode.Alpha, tileID),
         new StaticTile(layer, tilesheet, BlendMode.Alpha, tileID)
      },
      250 // interval in milliseconds
   );
}
If you're using Tiled:
- Click the edit button (wrench icon) for the tilesheet in the Tilesets pane.
- Select the tile you want to animate in the new view.
- Click Tileset > Tile Animation Editor in the toolbar to show that window.
- In the new window, drag tiles from the tilesheet into the box on the left to create a frame (one image in the sequence).
- Double-click the numbers to change how long each frame stays on the screen before the next one (in milliseconds). Make sure every frame has the same time; the game can't handle variable frame times. For example, here's the animation editor showing one of the tiles of Gil rocking:
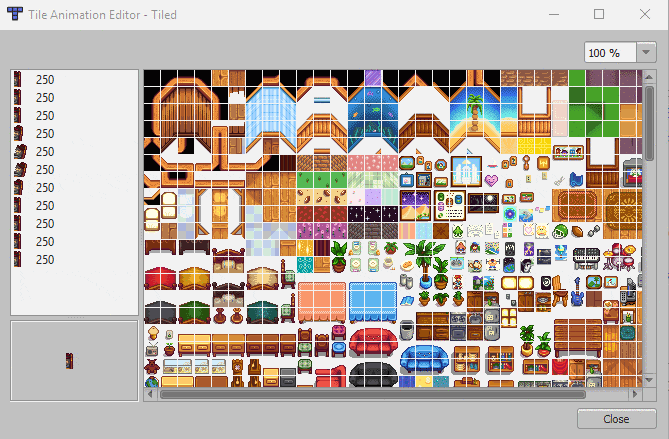
- When you're done, close the pane.
- The animated tiles in the Tilesets pane will now have a little symbol in the bottom-right corner:

The animation is now part of that tile. Every instance of that tile on the map will now have the same animation.


Known properties
Map properties
Known map properties:¹
| property | explanation |
|---|---|
AmbientLight <byte r> <byte g> <byte b>(valid in indoor locations and locations that ignore outdoor lighting) |
Sets the RGB colour that is subtracted from white (255,255,255) in order to create the ambient light. Example: AmbientLight 95 95 95 for a normal indoor daytime lighting. |
BrookSounds [<int x> <int y> <int type>](valid in outdoor locations) |
Adds sound sources. The <x> <y> fields are the tile coordinates, and <type> is the ambient sound ID. The <type> of sound can be one of...
|
DayTiles [<string layerName> <int x> <int y> <int tilesheetIndex>]+(valid in any location) |
Sets tiles to appear between 6AM to 7PM. Anytime before 7pm, this finds the tile at position (<x>, <y>) on the map layer matching <layerName>, changes its tilesheet index to the specified <tilesheetIndex>, and adds a glow to simulate daylight. The glow will only be added if the location is indoors and the <tilesheetIndex> is 256, 288, 405, 469, or 1224. The parameters can be repeated to affect multiple tiles.Example: DayTiles Front 3 1 256 Front 3 2 288. |
Doors <int x> <int y> <string sheetID> <int tileID>(valid in any location) |
Adds a door. The <x> <y> fields are the tile coordinates, <sheetID> is the name of the sheet containing the door sprite, and <tileID> is the tile index in the spritesheet.
|
| Fall_Objects T² Spring_Objects T² Summer_Objects T² Winter_Objects T² |
Whether to spawn seasonal objects on spawnable tiles based on the data in Data\Locations.xnb. Example: Fall_Objects. |
Light [<int x> <int y> <int type>]+(valid in any location) |
Adds light sources. The <type> field is the kind of light source (e.g. 4 for twin candles), and <x> <y> are the tile coordinates.The <type> of light source can be one of...
Any other value will crash the game. |
Music <string name>(valid in any location) |
Sets the music that plays when the player enters, where <name> is the cue name in the audio files.Example: Music MarlonsTheme. |
Music <int start> <int end> <string name>(valid in any location) |
Sets the music that plays when the player enters, where <name> is the cue name in the audio files, music will only play if the time is between <int start> (inclusive) and <int end> (exclusive).Example: Music 800 1200 MarlonsTheme. |
NightTiles [<string layerName> <int x> <int y> <int tilesheetIndex>]+(valid in any location) |
Changes the tile after 7pm. Outside, it works along DayTiles: set a DayTiles tile for the map to load between 6am to 7pm, then a NightTiles to load between 7pm to the end of the day. It is mostly used for lamps in the game. |
| Outdoors T² (valid in any location) |
Sets whether the location is outdoors. Example: Outdoors true. |
| TreatAsOutdoors T² (valid in any location) |
The location is treated as outdoors for the purposes of spawning debris and similar mechanics. |
Trees [<int x> <int y> <int type>]+
|
Adds trees to the map. The <x> <y> fields are the tile coordinates, and <type> is the tree type (1: oak, 2: maple, 3: pine, 6: palm, 7: mushroom tree).Example: Trees 17 18 2 20 31 2. |
UniquePortrait [<str name>]+(valid in any location) |
? |
UniqueSprite [<str name>]+(valid in any location) |
? |
| ViewportFollowPlayer T² (valid in any location) |
Forces the viewport to stay centered on the player. Example: ViewportFollowPlayer. |
Warp [<int fromX> <int fromY> <string toArea> <int toX> <int toY>]+(valid in any location) |
Sets the tiles which warp the player to another map (e.g. doors). The <fromX> <fromY> fields are the tile coordinates that initiate the warp, and <toArea> <toX> <toY> are the name of the in-game location to warp to and the tile coordinates within it.Example: 6 20 Mountain 76 9. |
The following properties are used but apparently have no effect: Arch, Debris, and Fish.
¹ Map properties are handled in GameLocation::resetForPlayerEntry and GameLocation::loadObjects.
² The T value (short for true) is conventional, but any non-empty value will work too.
Tile properties
Known tile properties (excluding specialised properties like TouchAction WomensLocker):¹
| layer | property | explanation |
|---|---|---|
| Back | Bed T² | If the player stands on this tile, they're considered in bed for the purposes of stamina regen (in multiplayer) and pass-out logic. |
| Back | Diggable T² | Marks the tile as diggable with the hoe and enables planting crops. |
| Back | NoFishing T² | Prevents the player from casting the line onto this tile when fishing. |
| Back | NoFurniture T² | Prevents the player from placing furniture on this tile. |
| Back | NoSpawn All NoSpawn True |
Combines NoSpawn Grass and NoSpawn Tree. |
| Back | NoSpawn Grass | Prevents debris (e.g. weeds or stones) from spawning on this tile. |
| Back | NoSpawn Tree | Prevents trees from spawning on this tile. Prevents the player from planting trees on this tile, except on the farm. If a tree is already on this tile, prevents it from growing. |
| Back | NPCBarrier T² | Prevents NPCs from crossing this tile. |
| Back | Passable T² | Lets players walk or place objects on this tile, even if they'd normally be blocked by a building tile or different property. Different from Buildings Passable T below. |
| Back | Type <str type>
|
Sets the tile type for various game logic (e.g. step sounds or planting crops), where <type> is one of Dirt, Stone, Grass, or Wood.
|
| Back | Water T² | Marks the tile as a water tile for various game logic (e.g. items splash into it, can refill watering can from it, can't walk on it, etc). |
| Back | WaterSource T² | Lets the player refill the watering can from this tile. |
| Buildings | Passable T² | When placed on a water tile, the game no longer considers it open water (e.g. if it's a bridge). Different from Back Passable T above. |
| Paths | Order <I>
|
To place on index 29 and 30 of the Paths tilsheet. Set the order the cabins will spawn at the creation of a Multiplayer save. |
The TouchAction property makes something happen when the player steps on the tile:
| layer | property | explanation |
|---|---|---|
| Back | TouchAction ChangeIntoSwimsuit | Changes the player into their swimsuit and disables running. |
| Back | TouchAction ChangeOutOfSwimsuit | Changes the player into their regular clothes and enables running. |
| Back | TouchAction Door <string npc>
|
If the player doesn't have 2+ friendship hearts with the villager named by the <npc> field: stops the player, marks the tile as impassible, and displays a door-locked message.
|
| Back | TouchAction Emote <string npc> <int emoteID>
|
Finds the NPC whose name matches the <npc> field, and causes them to show the given <emoteID> above their head (4: empty can, 8: question mark, 12: angry, 16: exclamation, 20: heart, 24: sleep, 28: sad, 32: happy, 36: x, 40: pause, 52: videogame, 56: music note, 60: blush).
|
| Back | TouchAction FacingDirection <string npc> <int direction>
|
Finds the NPC whose name matches the <npc> field, and make them face the given direction (0: up, 1: right, 2: down, 3: left).
|
| Back | TouchAction MagicWarp <string area> <int x> <int y> [string prerequisite]
|
Warps the player to the <x> <y> tile coordinates in the given <area> with a magic sound and effects. If the [prerequisite] field is specified, only occurs if that flag is set via Game1.player.mailReceived.
|
| Back | TouchAction PoolEntrance | Switches the player between swimming and walking mode. |
| Back | TouchAction Sleep | Ends the day if the player confirms. |
The Action property makes something happen when the player interacts (e.g. clicks) with the tile:
| layer | property | explanation |
|---|---|---|
| Buildings | Action AdventureShop | Shows the Adventurer's Guild shop screen. |
| Buildings | Action Arcade_Prairie | Shows the Journey of the Prairie King arcade game. |
| Buildings | Action Arcade_Minecart | Shows the Junimo Kart arcade game. |
| Buildings | Action BuyBackpack | Shows a menu which lets the player upgrade their backpack if an upgrade is available. |
| Buildings | Action Billboard | Shows the calendar menu. |
| Buildings | Action BuyQiCoins | Shows a dialogue which lets the player buy 100 Casino club coins. |
| Buildings | Action ColaMachine | Offers to let the player buy a Joja cola. |
| Buildings | Action ClubCards Action Blackjack |
Shows the casino blackjack minigame. |
| Buildings | Action ClubComputer Action FarmerFile |
Shows a dialogue with play stats (steps taken, gifts given, dirt hoed, etc). |
| Buildings | Action ClubSeller | Shows a dialogue which lets the player buy a Statue of Endless Fortune for one million gold. |
| Buildings | Action ClubShop | Shows the casino shop menu. |
| Buildings | Action ClubSlots | Shows the casino slots minigame. |
| Buildings | Action Dialogue <text>
|
Shows a generic dialogue box with the given text. See dialogue format. Example: Action Dialogue Hi there @! |
| Buildings | Action DivorceBook | Shows divorce options for the player's current marriage status (as if they clicked the divorce book). |
| Buildings | Action JojaShop | Shows the Joja shopping screen. |
| Buildings | Action Jukebox | Shows the jukebox menu to choose the ambient music. |
| Buildings | Action kitchen | Shows the cooking menu. |
| Buildings | Action Letter <string text>
|
Shows the letter menu on-screen with the given text, with the syntax used by Data\mail.xnb. Example: Action Letter Hey there!^I had some extra wood lying around... I thought maybe you could use it. Take care! ^ -Robin %item object 388 50 %% |
| Buildings | Action LockedDoorWarp [<int toX> <int toY> <string toArea> <int openTime> <int closeTime>]
|
Creates an activation warp normally used on doors with a time window for when it can be used. Note that you must use 24-hour times, i.e. 2000 for 8pm. Example: 6 29 SeedShop 900 2100 |
| Buildings | Action Mailbox | Shows the next letter from the player's mailbox (if any). |
| Buildings | Action Material | Shows a summary of the player's stockpiled wood and stone. |
| Buildings | Action Message <string messageKey>
|
Loads a message with the given key from the Content\Strings\StringsFromMaps.xnb file and displays it in a dialogue box. |
| Buildings | Action MessageOnce <int eventID> <string message>
|
If the player hasn't seen the event with ID <eventID>, marks that event seen and displays the given message text in a dialogue box. This does not parse dialogue format.
|
| Buildings | Action MineSign <string message>
|
Shows a mini-dialogue box with the given raw message text. This does not parse dialogue format. |
| Buildings | Action MinecartTransport | Shows the minecart destination menu (or a message if not unlocked). |
| Buildings | Action MineElevator | Shows the mine elevator menu (to warp to a mine level) if the player has reached mine level 5+, else a mine elevator not working message. |
| Buildings | Action NextMineLevel | Warps the player to the next mine level (or level 1 if they're not in the mine). |
| Buildings | Action Notes <int noteID>
|
If the player has found the specified lost book, displays its museum note text and marks it read. Example: Action Notes 17 |
| Buildings | Action NPCMessage <str name> "<str dialogueKey>"
|
If the named NPC is within 14 tiles of the player, reads dialogue with the given key from the string files and displays a dialogue box. See dialogue format. Example: Action NPCMessage Abigail "Strings\\StringsFromCSFiles:Event.cs.1022" |
| Buildings | Action playSound <str cueName>
|
Play the sound or music with the given name. |
| Buildings | Action QiCoins | Shows a dialogue which lets the player buy 10 Casino club coins if they have none, else shows how many they have. |
| Buildings | Action Warp <int x> <int y> <str area>
|
Warps the player to the <x> <y> tile coordinate in the <area> game location.Example: Action Warp 76 9 Mountain |
| Buildings | Action WarpCommunityCenter | Warps the player to the inside of the Community Center if they have access (else show an "it's locked" message). |
| Buildings | Action WarpGreenhouse | Warps the player to the inside of their greenhouse if they've unlocked it, else shows a message about the greenhouse ruins. |
| Buildings | Action WizardShrine | Shows the character customisation menu normally available from the Wizard's tower. |
¹ Tile properties are handled throughout the codebase using GameLocation::doesTileHaveProperty. Actions and touch actions are handled by GameLocation::performAction and GameLocation::performTouchAction respectively. Emote IDs are listed as Character constants.
² The T value (short for true) is conventional, but any non-empty value will work too.
Potential issues
The game makes some assumptions about maps which may break for modded maps. These are the known issues:
| affected maps | issue |
|---|---|
| Maps/Farm Maps/Farm_Combat Maps/Farm_Fishing Maps/Farm_Foraging Maps/Farm_Mining |
|
| Maps/FarmHouse |
|
| Maps/SpouseRooms |
|
Tiled does not handle "save as" correctly and messes up the path of the tilesheets properties. Current alternatve is to copy paste beforehand any maps you want to edit.
- ↑ The grass sound is set in Grass::loadSprite, which is called from GameLocation::loadObjects if the Paths layer has tile index 22. (The game spawns a grass for each such tile, and later removes them.)
Paths Tilesheet Explanation

| Image Index | Explanation |
|---|---|
| 0-7 | NPC Pathing (appears to be unused) |
| 8 | Light source |
| 9 | Oak tree |
| 10 | Maple tree |
| 11 | Pine tree |
| 12 | Palm tree |
| 13-15 | Weeds |
| 16-17 | Rocks |
| 18 | Twig debris |
| 19 | Large log |
| 20 | Boulder |
| 21 | Hardwood stump |
| 22 | Grass tufts |
| 23 | Common tree (stage 3) |
| 24 | Large bush |
| 25 | Small bush |
| 26 | Small plant |
| 27 | "BrookSounds" property |
| 28 | Mutant grub (Mutant Bug Lair only) |
| 29 | Farmhand cabin nearby (Multiplayer) |
| 30 | Farmhand cabin separate (Multiplayer) |