Difference between revisions of "Modding:Modder Guide/APIs/Content"
Pathoschild (talk | contribs) (→Edit an image: + ExtendImage in SMAPI 3.3) |
Pathoschild (talk | contribs) (→Edit an image: update PatchMode.Overlay for alpha blending in newer versions) |
||
| (41 intermediate revisions by 7 users not shown) | |||
| Line 5: | Line 5: | ||
==Intro== | ==Intro== | ||
===What's an 'asset'?=== | ===What's an 'asset'?=== | ||
| − | An ''asset'' is one image, map, or data structure provided to the game. The game stores its default assets in its < | + | An ''asset'' is one image, map, or data structure provided to the game. The game stores its default assets in its <samp>Content</samp> folder, though mods can have custom assets too. For example, all of Abigail's portraits are stored in one asset inside <samp>Content\Portraits\Abigail.xnb</samp>. If you [[Modding:Editing XNB files|unpack that file]], you'll see it contains an image file: |
[[File:Modding - creating an XNB mod - example portraits.png]] | [[File:Modding - creating an XNB mod - example portraits.png]] | ||
| Line 12: | Line 12: | ||
===What's an 'asset name'?=== | ===What's an 'asset name'?=== | ||
| − | An ''asset name'' identifies an asset. For a | + | An ''asset name'' identifies an asset. For a game asset, this is the file path relative to the game's <samp>Content</samp> folder ''without'' the <samp>.xnb</samp> extension. For example: |
| + | |||
| + | {| class="wikitable" | ||
| + | |- | ||
| + | ! content file | ||
| + | ! asset name | ||
| + | |- | ||
| + | | <samp>Content\Portraits\Abigail.xnb</samp> | ||
| + | | <samp>Portraits/Abigail</samp> | ||
| + | |- | ||
| + | | <samp>Content\Maps\Desert.ja-JA.xnb</samp> | ||
| + | | <samp>Maps/Desert.ja-JA</samp> | ||
| + | |} | ||
| + | |||
| + | For legacy reasons, the asset name in [[Modding:Content Patcher|Content Patcher content packs]] does not include the language code. That will change in the upcoming Content Patcher 2.0.0. | ||
===What does the content API do?=== | ===What does the content API do?=== | ||
SMAPI handles content loading for the game. This lets you... | SMAPI handles content loading for the game. This lets you... | ||
| − | * read data, images, or maps from your mod folder (with support for < | + | * read data, images, or maps from your mod folder (with support for <samp>.json</samp>, <samp>.png</samp>, <samp>.tbin</samp>, <samp>.tmx</samp>, and <samp>.xnb</samp> files); |
| − | * read assets from the game's < | + | * read assets from the game's <samp>Content</samp> folder; |
* make changes to game assets (without changing the actual files); | * make changes to game assets (without changing the actual files); | ||
* provide new assets to the game. | * provide new assets to the game. | ||
| Line 26: | Line 40: | ||
===Read mod assets=== | ===Read mod assets=== | ||
You can read custom assets from your mod folder by specifying its path (relative to your mod folder) and type. For example: | You can read custom assets from your mod folder by specifying its path (relative to your mod folder) and type. For example: | ||
| − | < | + | <syntaxhighlight lang="c#"> |
// read an image file | // read an image file | ||
| − | Texture2D texture = helper. | + | Texture2D texture = helper.ModContent.Load<Texture2D>("assets/texture.png"); |
| + | // alternatively | ||
| + | IRawTextureData texture = helper.ModContent.Load<IRawTextureData>("assets/texture.png"); | ||
// read a map file | // read a map file | ||
| − | Map map = helper. | + | Map map = helper.ModContent.Load<Map>("assets/map.tmx"); |
// read a data file | // read a data file | ||
| − | IDictionary<string, string> data = helper. | + | IDictionary<string, string> data = helper.ModContent.Load<Dictionary<string, string>>("assets/data.json"); |
| − | </ | + | </syntaxhighlight> |
The supported file types are... | The supported file types are... | ||
| Line 45: | Line 61: | ||
! notes | ! notes | ||
|- | |- | ||
| − | | < | + | | <samp>.xnb</samp> |
| ''any'' | | ''any'' | ||
| − | | A packed file, like those in the game's < | + | | A packed file, like those in the game's <samp>Content</samp> folder. Not recommended since it's harder to edit and maintain. |
|- | |- | ||
| − | | < | + | | <samp>.json</samp> |
| − | | < | + | | <samp>''any''</samp> |
| − | | A data file, typically used to store < | + | | A data file, typically used to store <samp>Dictionary<int, string></samp> or <samp>Dictionary<string, string></samp> data. |
|- | |- | ||
| − | | < | + | | <samp>.png</samp> |
| − | | < | + | | <samp>[https://docs.monogame.net/api/Microsoft.Xna.Framework.Graphics.Texture2D.html Texture2D]</samp> |
| An image file. You can use this to load textures, spritesheets, tilesheets, etc. | | An image file. You can use this to load textures, spritesheets, tilesheets, etc. | ||
|- | |- | ||
| − | | < | + | | <samp>.tbin</samp> or <samp>.tmx</samp> |
| − | | < | + | | <samp>xTile.Map</samp> |
| − | | A map file, which can be used to create or modify an in-game location. SMAPI will automatically match tilesheets to image files in the same folder as the map if they exist; otherwise the game will check the < | + | | A map file, which can be used to create or modify an in-game location. SMAPI will automatically match tilesheets to image files in the same folder as the map if they exist; otherwise the game will check the <samp>Content</samp> folders for them. |
|} | |} | ||
Some usage notes: | Some usage notes: | ||
| − | * The normal convention is to have them in an < | + | * The normal convention is to have them in an <samp>assets</samp> subfolder, though that's not required. |
| − | * Don't worry about which path separators you use; SMAPI will | + | * Don't worry about which path separators you use; SMAPI will normalize them automatically. |
| − | * To avoid performance issues, don't call < | + | * To avoid performance issues, don't call <samp>content.Load<T></samp> repeatedly in draw code. Instead, load your asset once and reuse it. |
===Get actual mod asset keys=== | ===Get actual mod asset keys=== | ||
When you load an asset from your mod folder, SMAPI stores it with an asset name that uniquely identifies it. If you need to pass the asset name to game code, you can retrieve the actual asset name: | When you load an asset from your mod folder, SMAPI stores it with an asset name that uniquely identifies it. If you need to pass the asset name to game code, you can retrieve the actual asset name: | ||
| − | < | + | <syntaxhighlight lang="c#"> |
| − | tilesheet.ImageSource = helper. | + | tilesheet.ImageSource = helper.ModContent.GetActualAssetKey("assets/tilesheet.png"); |
| − | </ | + | </syntaxhighlight> |
===Read content assets=== | ===Read content assets=== | ||
You can also read assets from the game folder: | You can also read assets from the game folder: | ||
| − | < | + | <syntaxhighlight lang="c#"> |
| − | Texture2D portraits = helper. | + | Texture2D portraits = helper.GameContent.Load<Texture2D>("Portraits/Abigail"); |
| − | </ | + | </syntaxhighlight> |
| − | Note that this requires the | + | Note that this requires the [[#What's an 'asset'?|asset name]], ''not'' a filename. |
==Replace a game asset== | ==Replace a game asset== | ||
===Basics=== | ===Basics=== | ||
| − | You can replace an asset entirely by providing the asset to SMAPI | + | You can replace an asset entirely by providing the asset through the [[Modding:Modder Guide/APIs/Events#Content.AssetRequested|<samp>AssetRequested</samp> event]] (see [[Modding:Modder Guide/APIs/Events#FAQs|how to use events]]). SMAPI will raise the event every time an asset is loaded (which may happen multiple times per asset), so you can replace the asset. If any mod provides the asset, the original file won't be read at all and won't be changed. |
| + | |||
| + | There are two important concepts when replacing assets: | ||
| + | |||
| + | :; Load priority | ||
| + | :: Logically there's only one initial version of an asset. If multiple mods want to load the same asset, SMAPI will use the load priority you specify in the load methods to choose one (like <samp>AssetLoadPriority.Medium</samp> in <code>e.LoadFromModFile<Map>("assets/Farm.tmx", AssetLoadPriority.Medium)</code>). If multiple mods have the same high priority, SMAPI will choose the one that was registered first. You can use one of the preset levels like <samp>AssetLoadPriority.Medium</samp>, or add arbitrary offsets like <samp>AssetLoadPriority.Medium + 1</samp> (which is higher-priority than <samp>AssetLoadPriority.Medium</samp> but lower than <samp>AssetLoadPriority.High</samp>. | ||
| + | |||
| + | :: <samp>AssetLoadPriority.Exclusive</samp> is a special case. This declares that your load operation is mandatory and shouldn't be skipped if another mod loads it too. This is discouraged since it reduces mod compatibility. If multiple mods specify <samp>AssetLoadPriority.Exclusive</samp>, SMAPI will log an error and apply ''none'' of them. | ||
| − | + | :; Deferred loads | |
| + | :: The load doesn't happen right away. When you call <samp>e.LoadFrom</samp> or <samp>e.LoadFromModFile</samp>, you're telling SMAPI how to load the asset when it's ready to do that. SMAPI will call every mod listening to the event first, then use the information provided to check if the asset exists or provide the asset (depending on which method the game called). | ||
| + | ===Replace an image file=== | ||
For example, here's a mod which replaces Abigail's portraits with a custom version from its mod folder: | For example, here's a mod which replaces Abigail's portraits with a custom version from its mod folder: | ||
| − | < | + | <syntaxhighlight lang="c#"> |
| − | + | internal sealed class ModEntry : Mod | |
{ | { | ||
| − | /// < | + | /// <inheritdoc/> |
| − | + | public override void Entry(IModHelper helper) | |
| − | public | ||
{ | { | ||
| − | + | helper.Events.Content.AssetRequested += this.OnAssetRequested; | |
| − | |||
| − | |||
| − | |||
| − | |||
| − | |||
} | } | ||
| − | /// < | + | /// <inheritdoc cref="IContentEvents.AssetRequested"/> |
| − | /// <param name=" | + | /// <param name="sender">The event sender.</param> |
| − | + | /// <param name="e">The event data.</param> | |
| + | private void OnAssetRequested(object sender, AssetRequestedEventArgs e) | ||
{ | { | ||
| − | if ( | + | if (e.Name.IsEquivalentTo("Portraits/Abigail")) |
{ | { | ||
| − | + | e.LoadFromModFile<Texture2D>("assets/abigail-portraits.png", AssetLoadPriority.Medium); | |
} | } | ||
| − | |||
| − | |||
} | } | ||
} | } | ||
| − | </ | + | </syntaxhighlight> |
| + | |||
| + | See IntelliSense on the <samp>e</samp> parameter for all the available options and usage. | ||
===Replace a map file=== | ===Replace a map file=== | ||
| − | You can use < | + | You can use the <samp>AssetRequested</samp> event to load custom maps too. When you load a map file, and an unpacked tilesheet is present in the mod folder (relative to the map file), SMAPI will automatically link the map to that file and handle loading it too. If the tilesheet filename starts with a season and underscore, the game will apply its normal seasonal logic to it too. |
For example, let's say you have a mod with this structure: | For example, let's say you have a mod with this structure: | ||
<pre> | <pre> | ||
| − | ExampleMapMod.dll | + | 📁 ExampleMod/ |
| − | manifest.json | + | 🗎 ExampleMapMod.dll |
| − | assets/ | + | 🗎 manifest.json |
| − | + | 📁 assets/ | |
| − | + | 🗎 Farm.tmx | |
| − | + | 🗎 fall_customTilesheet.png | |
| − | + | 🗎 spring_customTilesheet.png | |
| − | + | 🗎 summer_customTilesheet.png | |
| + | 🗎 winter_customTilesheet.png | ||
</pre> | </pre> | ||
You can load the custom map like this: | You can load the custom map like this: | ||
| − | < | + | <syntaxhighlight lang="c#"> |
| − | + | internal sealed class ModEntry : Mod | |
{ | { | ||
| − | /// < | + | /// <inheritdoc/> |
| − | + | public override void Entry(IModHelper helper) | |
| − | public | ||
{ | { | ||
| − | + | helper.Events.Content.AssetRequested += this.OnAssetRequested; | |
} | } | ||
| − | /// < | + | /// <inheritdoc cref="IContentEvents.AssetRequested"/> |
| − | /// <param name=" | + | /// <param name="sender">The event sender.</param> |
| − | + | /// <param name="e">The event data.</param> | |
| + | private void OnAssetRequested(object sender, AssetRequestedEventArgs e) | ||
{ | { | ||
| − | + | if (e.Name.IsEquivalentTo("Maps/Farm")) | |
| + | { | ||
| + | e.LoadFromModFile<Map>("assets/Farm.tmx", AssetLoadPriority.Medium); | ||
| + | } | ||
} | } | ||
} | } | ||
| − | </ | + | </syntaxhighlight> |
| − | That's it! SMAPI will detect a reference to < | + | That's it! SMAPI will detect a reference to <samp>spring_customTilesheet.png</samp>, find the file relative to the map file, and load it too. When the season changes in-game, SMAPI will automatically switch it to <samp>summer_customTilesheet.png</samp>, etc. The other tilesheet references will be left untouched (since there's no local file), and use the game asset files. |
===Add a new asset=== | ===Add a new asset=== | ||
| − | Providing a new asset is exactly like replacing an existing one (see previous | + | Providing a new asset is exactly like replacing an existing one (see previous sections). For example, this code adds a new dialogue file for a custom NPC: |
| − | < | + | <syntaxhighlight lang="c#"> |
| − | + | internal sealed class ModEntry : Mod | |
{ | { | ||
| − | /// < | + | /// <inheritdoc/> |
| − | + | public override void Entry(IModHelper helper) | |
| − | public | ||
{ | { | ||
| − | + | helper.Events.Content.AssetRequested += this.OnAssetRequested; | |
} | } | ||
| − | /// < | + | /// <inheritdoc cref="IContentEvents.AssetRequested"/> |
| − | /// <param name=" | + | /// <param name="sender">The event sender.</param> |
| − | + | /// <param name="e">The event data.</param> | |
| + | private void OnAssetRequested(object sender, AssetRequestedEventArgs e) | ||
{ | { | ||
| − | + | if (e.Name.IsEquivalentTo("Characters/Dialogue/John")) | |
{ | { | ||
| − | ["Introduction"] = "Hi there! My name is Jonathan." | + | e.LoadFrom( |
| − | } | + | () => { |
| + | return new Dictionary<string, string> | ||
| + | { | ||
| + | ["Introduction"] = "Hi there! My name is Jonathan." | ||
| + | }; | ||
| + | }, | ||
| + | AssetLoadPriority.Medium | ||
| + | ); | ||
| + | } | ||
} | } | ||
} | } | ||
| − | </ | + | </syntaxhighlight> |
| − | |||
| − | |||
| − | |||
==Edit a game asset== | ==Edit a game asset== | ||
===Basics=== | ===Basics=== | ||
| − | You can edit any game asset after it's loaded (but before it's provided to the game), without changing the original files. You do this by | + | You can edit any game asset after it's loaded (but before it's provided to the game), without changing the original files. You do this by adding your edits in the [[Modding:Modder Guide/APIs/Events#Content.AssetRequested|<samp>AssetRequested</samp> event]] (see [[Modding:Modder Guide/APIs/Events#FAQs|how to use events]]). SMAPI will raise the event every time an asset is loaded (which may happen multiple times per asset), so you can edit the asset. |
| + | |||
| + | There are two important concepts when replacing assets: | ||
| + | |||
| + | :; Edit order | ||
| + | :: When mods apply multiple edits to the same asset, they're applied sequentially in the order they were registered. You can optionally provide an edit priority when you call the <samp>e.Edit</samp> method, to apply your edit before or after other edits. You can use one of the preset levels like <samp>AssetEditPriority.Default</samp>, or add arbitrary offsets like <samp>AssetEditPriority.Default + 1</samp> (which is higher-priority than <samp>AssetEditPriority.Default</samp> but lower than <samp>AssetEditPriority.Late</samp>). | ||
| + | |||
| + | :; Deferred edits | ||
| + | :: The edit doesn't happen right away. When you call <samp>e.Edit</samp>, you're telling SMAPI how to apply your edit when it's ready to do that. SMAPI will call every mod listening to the event first, then use all the information provided to edit the asset when it's loaded. | ||
| + | ===Example data edit=== | ||
For example, here's a mod which doubles the sale price of all items: | For example, here's a mod which doubles the sale price of all items: | ||
| − | < | + | <syntaxhighlight lang="c#"> |
| − | + | internal sealed class ModEntry : Mod | |
{ | { | ||
| − | /// < | + | /// <inheritdoc/> |
| − | + | public override void Entry(IModHelper helper) | |
| − | public | ||
{ | { | ||
| − | + | helper.Events.Content.AssetRequested += this.OnAssetRequested; | |
| − | |||
| − | |||
| − | |||
| − | |||
| − | |||
} | } | ||
| − | /// < | + | /// <inheritdoc cref="IContentEvents.AssetRequested"/> |
| − | /// <param name=" | + | /// <param name="sender">The event sender.</param> |
| − | + | /// <param name="e">The event data.</param> | |
| + | private void OnAssetRequested(object sender, AssetRequestedEventArgs e) | ||
{ | { | ||
| − | if ( | + | if (e.NameWithoutLocale.IsEquivalentTo("Data/ObjectInformation")) |
{ | { | ||
| − | + | e.Edit(asset => | |
| − | |||
{ | { | ||
| − | string[] fields = | + | var data = asset.AsDictionary<int, string>().Data; |
| − | + | ||
| − | + | foreach ((int itemID, string itemData) in data) | |
| − | } | + | { |
| + | string[] fields = itemData.Split('/'); | ||
| + | fields[1] = (int.Parse(fields[1]) * 2).ToString(); | ||
| + | data[itemID] = string.Join('/', fields); | ||
| + | } | ||
| + | }); | ||
} | } | ||
} | } | ||
} | } | ||
| − | </ | + | </syntaxhighlight> |
| − | The < | + | The <samp>IAssetData asset</samp> argument from the <samp>Edit</samp> method has some helpers to make editing data easier, documented below. (See IntelliSense for more info.) |
===Edit any file=== | ===Edit any file=== | ||
| − | These fields/methods are available directly on the < | + | These fields/methods are available directly on the <samp>asset</samp> from the <samp>Edit</samp> method for any asset type, and also available through the helpers listed below. |
| − | ; Data | + | :; Data |
| − | : A reference to the loaded asset data. | + | :: A reference to the loaded asset data. |
| − | ; ReplaceWith | + | :; ReplaceWith |
| − | : Replace the entire asset with a new version. You shouldn't do that in most cases though; see ''[[#Replace a game asset|replace a game asset]]'' instead, or use one of the helpers below. | + | :: Replace the entire asset with a new version. You shouldn't do that in most cases though; see ''[[#Replace a game asset|replace a game asset]]'' instead, or use one of the helpers below. |
===Edit a dictionary=== | ===Edit a dictionary=== | ||
A ''dictionary'' is a key/value data structure, represented like this in JSON exports: | A ''dictionary'' is a key/value data structure, represented like this in JSON exports: | ||
| − | < | + | <syntaxhighlight lang="json"> |
{ | { | ||
"key A": "value A", | "key A": "value A", | ||
| Line 240: | Line 277: | ||
... | ... | ||
} | } | ||
| − | </ | + | </syntaxhighlight> |
| + | |||
| + | You can get a dictionary helper using <samp>asset.AsDictionary<TKey, string>()</samp>, where <samp>TKey</samp> is replaced with the key type (usually <samp>int</samp> or <samp>string</samp>). | ||
| − | + | :; Data | |
| + | :: A reference to the loaded data. For example, here's how to add or replace a specific entry to the above example: | ||
| + | :: <syntaxhighlight lang="C#"> | ||
| − | + | /// <inheritdoc cref="IContentEvents.AssetRequested"/> | |
| − | + | /// <param name="sender">The event sender.</param> | |
| − | + | /// <param name="e">The event data.</param> | |
| − | + | private void OnAssetRequested(object sender, AssetRequestedEventArgs e) | |
| − | { | + | { |
| − | + | if (e.NameWithoutLocale.IsEquivalentTo("Location/Of/The/Asset")) | |
| − | + | { | |
| − | } | + | e.Edit(asset => |
| − | </ | + | { |
| + | var editor = asset.AsDictionary<string, string>(); | ||
| + | editor.Data["Key C"] = "Value C"; | ||
| + | }); | ||
| + | } | ||
| + | } | ||
| + | </syntaxhighlight> | ||
===Edit an image=== | ===Edit an image=== | ||
| − | When editing an image file, you can get a helper using < | + | When editing an image file, you can get a helper using <samp>asset.AsImage()</samp>. |
| + | |||
| + | :; Data | ||
| + | :: A reference to the loaded image. You can directly edit each pixel in the image through this field, though that's rarely needed. | ||
| − | ; | + | :; PatchImage |
| − | : | + | :: Edit or replace part of the image. This is basically a copy & paste operation, so the source texture is applied over the loaded texture. For example: |
| + | :: <syntaxhighlight lang="C#"> | ||
| − | + | /// <inheritdoc cref="IContentEvents.AssetRequested"/> | |
| − | + | /// <param name="sender">The event sender.</param> | |
| − | + | /// <param name="e">The event data.</param> | |
| − | + | private void OnAssetRequested(object sender, AssetRequestedEventArgs e) | |
| − | { | + | { |
| − | + | if (e.NameWithoutLocale.IsEquivalentTo("Location/Of/The/Asset")) | |
| − | + | { | |
| − | + | e.Edit(asset => | |
| − | + | { | |
| − | } | + | var editor = asset.AsImage(); |
| − | </ | + | IRawTextureData sourceImage = this.Helper.ModContent.Load<IRawTextureData>("custom-texture.png"); |
| + | editor.PatchImage(sourceImage, targetArea: new Rectangle(300, 100, 200, 200)); | ||
| + | }); | ||
| + | } | ||
| + | } | ||
| + | </syntaxhighlight> | ||
| − | : Available method arguments: | + | :: Available method arguments: |
| − | : {| class="wikitable" | + | :: {| class="wikitable" |
|- | |- | ||
! argument | ! argument | ||
! usage | ! usage | ||
|- | |- | ||
| − | | < | + | | <samp>source</samp> |
| − | | The source image to copy & paste onto the loaded image. | + | | The source image to copy & paste onto the loaded image. May be a <samp>Texture2D</samp> or a <samp>IRawTextureData</samp> |
|- | |- | ||
| − | | < | + | | <samp>sourceArea</samp> |
| ''(optional)'' The pixel area within the source image to copy (or omit to use the entire source image). This must fit within the target image. | | ''(optional)'' The pixel area within the source image to copy (or omit to use the entire source image). This must fit within the target image. | ||
|- | |- | ||
| − | | < | + | | <samp>targetArea</samp> |
| ''(optional)'' The pixel area within the loaded image to replace (or omit to replace starting from the top-left corner up to the full source size). | | ''(optional)'' The pixel area within the loaded image to replace (or omit to replace starting from the top-left corner up to the full source size). | ||
|- | |- | ||
| − | | < | + | | <samp>patchMode</samp> |
| ''(optional)'' How the image should be patched. The possible values... | | ''(optional)'' How the image should be patched. The possible values... | ||
| − | * < | + | * <samp>PatchMode.Replace</samp> (default): erase the original content within the area before pasting in the new content; |
| − | * < | + | * <samp>PatchMode.Overlay</samp>: draw the new content over the original content, so the original content shows through transparent or semi-transparent pixels. |
|} | |} | ||
| − | + | :; ExtendImage | |
| − | ; ExtendImage | + | :: Extend the image if needed to fit the given size. Note that '''resizing the image is an expensive operation''', creates a new texture instance, and extending a spritesheet horizontally may cause game errors or bugs. For example: |
| − | : Extend the image if needed to fit the given size. Note that ''' | + | :: <syntaxhighlight lang="C#"> |
| − | : < | + | |
| − | + | e.Edit(asset => | |
{ | { | ||
var editor = asset.AsImage(); | var editor = asset.AsImage(); | ||
| Line 303: | Line 359: | ||
// make sure the image is at least 1000px high | // make sure the image is at least 1000px high | ||
editor.ExtendImage(minWidth: editor.Data.Width, minHeight: 1000); | editor.ExtendImage(minWidth: editor.Data.Width, minHeight: 1000); | ||
| − | } | + | }); |
| − | </ | + | </syntaxhighlight> |
| − | : Available method arguments: | + | :: Available method arguments: |
| − | : { | + | :: {| class="wikitable" |
| − | + | |- | |
| + | ! argument | ||
| + | ! usage | ||
| + | |- | ||
| + | | <samp>minWidth</samp> | ||
| + | | The minimum desired width. If the image width is less than this value, it'll be extended on the right up to that size. | ||
| + | |- | ||
| + | | <samp>minHeight</samp> | ||
| + | | The minimum desired height. If the image height is less than this value, it'll be extended from the bottom up to that size. | ||
| + | |} | ||
| + | |||
| + | ===Edit a map=== | ||
| + | When editing a map file, you can get a helper using <samp>asset.AsMap()</samp>. | ||
| + | |||
| + | :; Data | ||
| + | :: A reference to the loaded map. You can directly edit the map or tiles through this field. | ||
| + | |||
| + | :; PatchMap | ||
| + | :: Edit or replace part of the map. This is basically a copy & paste operation, so the source map is applied over the loaded map. For example: | ||
| + | :: <syntaxhighlight lang="C#"> | ||
| + | e.Edit(asset => | ||
| + | { | ||
| + | var editor = asset.AsMap(); | ||
| + | |||
| + | Map sourceMap = this.Helper.ModContent.Load<Map>("custom-map.tmx"); | ||
| + | editor.PatchMap(sourceMap, targetArea: new Rectangle(30, 10, 20, 20)); | ||
| + | }); | ||
| + | </syntaxhighlight> | ||
| + | |||
| + | :: Available method arguments: | ||
| + | :: {| class="wikitable" | ||
| + | |- | ||
| + | ! argument | ||
| + | ! usage | ||
| + | |- | ||
| + | | <samp>source</samp> | ||
| + | | The source map to copy & paste onto the loaded map. | ||
| + | |- | ||
| + | | <samp>sourceArea</samp> | ||
| + | | ''(optional)'' The tile area within the source map to copy (or omit to use the entire source map). This must fit within the target map. | ||
| + | |- | ||
| + | | <samp>targetArea</samp> | ||
| + | | ''(optional)'' The tile area within the loaded map to replace (or omit to replace starting from the top-left corner up to the full source size). | ||
| + | |- | ||
| + | | <samp>patchMode</samp> | ||
| + | | ''(optional)'' How to merge tiles into the target map. The default is <code>ReplaceByLayer</code>. | ||
| + | |||
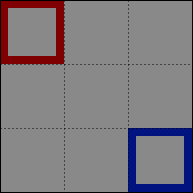
| + | For example, assume a mostly empty source map with two layers: <samp>Back</samp> (red) and <samp>Buildings</samp> (blue):<br />[[File:SMAPI content API - map patch mode - source.png]] | ||
| + | |||
| + | Here's how that would be merged with each patch mode (black areas are the empty void under the map): | ||
| + | <gallery> | ||
| + | File:SMAPI content API - map patch mode - overlay.png|<code>Overlay</code>: only matching tiles are replaced. The red tile replaces the ground on the <samp>Back</samp> layer, but the ground is visible under the blue <samp>Buildings</samp> tile. | ||
| + | File:SMAPI content API - map patch mode - replace by layer.png|<code>ReplaceByLayer</code> ''(default)'': all tiles are replaced, but only on layers that exist in the source map. | ||
| + | File:SMAPI content API - map patch mode - replace.png|<code>Replace</code>: all tiles are replaced. | ||
| + | </gallery> | ||
| + | |} | ||
| + | |||
| + | :; ExtendMap | ||
| + | :: Extend the map if needed to fit the given size. Note that '''this is an expensive operation''' and resizes the map in-place. For example: | ||
| + | :: <syntaxhighlight lang="C#"> | ||
| + | |||
| + | e.Edit(asset => | ||
| + | { | ||
| + | var editor = asset.AsMap(); | ||
| + | |||
| + | // make sure the map is at least 256 tiles high | ||
| + | editor.ExtendMap(minHeight: 256); | ||
| + | }); | ||
| + | </syntaxhighlight> | ||
| + | :: Available method arguments: | ||
| + | :: {| class="wikitable" | ||
| + | |- | ||
! argument | ! argument | ||
! usage | ! usage | ||
| − | + | |- | |
| − | + | | <samp>minWidth</samp> | |
| − | + | | The minimum desired width in tiles. If the map width is less than this value, it'll be extended on the right up to that size. | |
| − | + | |- | |
| − | + | | <samp>minHeight</samp> | |
| − | + | | The minimum desired height in tiles. If the map height is less than this value, it'll be extended from the bottom up to that size. | |
| − | + | |} | |
| − | |||
==Advanced== | ==Advanced== | ||
| + | ===Use <samp>IRawTextureData</samp>=== | ||
| + | When loading image data, creating a <samp>Texture2D</samp> instance or calling its <samp>GetData</samp>/<samp>SetData</samp> methods is very expensive and involves GPU calls. You can avoid that by loading images as SMAPI's <samp>IRawTextureData</samp> instead, which returns the data directly with no GPU calls. You can then pass it directly to other SMAPI APIs like [[Modding:Modder Guide/APIs/Content#Edit an image|<samp>PatchImage</samp>]]. | ||
| + | |||
| + | For example, this mod applies an image overlay to Abigail's portrait without loading the overlay as a <samp>Texture2D</samp> instance: | ||
| + | <syntaxhighlight lang="c#"> | ||
| + | public class ModEntry : Mod | ||
| + | { | ||
| + | public override void Entry(IModHelper helper) | ||
| + | { | ||
| + | helper.Events.Content.AssetRequested += this.OnAssetRequested; | ||
| + | } | ||
| + | |||
| + | private void OnAssetRequested(object sender, AssetRequestedEventArgs e) | ||
| + | { | ||
| + | if (e.NameWithoutLocale.IsEquivalentTo("Portraits/Abigail")) | ||
| + | { | ||
| + | e.Edit(asset => | ||
| + | { | ||
| + | var editor = asset.AsImage(); | ||
| + | |||
| + | IRawTextureData overlay = this.Helper.ModContent.Load<IRawTextureData>("assets/overlay.png"); | ||
| + | editor.PatchImage(overlay); | ||
| + | }); | ||
| + | } | ||
| + | } | ||
| + | } | ||
| + | </syntaxhighlight> | ||
| + | |||
| + | You can also edit the <samp>IRawTextureData</samp> data directly before passing it to other methods. For example, this converts the texture to grayscale: | ||
| + | <syntaxhighlight lang="c#"> | ||
| + | IRawTextureData image = this.Helper.ModContent.Load<IRawTextureData>("assets/image.png"); | ||
| + | |||
| + | int pixelCount = image.Width * image.Height; | ||
| + | for (int i = 0; i < pixelCount; i++) | ||
| + | { | ||
| + | Color color = image.Data[i]; | ||
| + | if (color.A == 0) | ||
| + | continue; // ignore transparent color | ||
| + | |||
| + | int grayscale = (int)((color.R * 0.3) + (color.G * 0.59) + (color.B * 0.11)); // https://stackoverflow.com/a/596282/262123 | ||
| + | image.Data[i] = new Color(grayscale, grayscale, grayscale, color.A); | ||
| + | } | ||
| + | </syntaxhighlight> | ||
| + | |||
| + | (Note: while SMAPI's implementation of IRawTextureData is exactly as long as it needs to be, this may not be the case for implementations of IRawTextureData from mods.) | ||
| + | |||
| + | ===Compare asset names=== | ||
| + | You can't use normal string comparison with asset names. For example, <samp>Characters/Abigail</samp> and <samp>CHARACTERS\ABIGAIL</samp> are the same asset name, but comparing them with C#'s <code>==</code> operator will return false. | ||
| + | |||
| + | You can use SMAPI's <samp>IAssetName</samp> type to compare asset names instead. For example, <code>assetName.IsEquivalentTo("Characters/Abigail")</code> will return true for both of the above names. There are two ways to get an <samp>IAssetName</samp> value: | ||
| + | <ul> | ||
| + | <li>In content events like <samp>AssetRequested</samp>, use the <samp>e.Name</samp> or <samp>e.NameWithoutLocale</samp> property.</li> | ||
| + | <li>You can parse a custom asset name string into an <samp>IAssetName</samp>: | ||
| + | <syntaxhighlight lang="c#"> | ||
| + | IAssetName assetName = this.Helper.GameContent.ParseAssetName("CHARACTERS/Abigail"); | ||
| + | if (assetName.StartsWith("Characters/")) { ... } | ||
| + | if (assetName.IsEquivalentTo("Characters/Abigail")) { ... } | ||
| + | </syntaxhighlight></li> | ||
| + | </ul> | ||
| + | |||
| + | If you ''really'' need to compare strings manually, you should normalize the asset names using [[Modding:Modder Guide/APIs/Utilities#File paths|<samp>PathUtilities</samp>]] and compare case-insensitively. For example: | ||
| + | <syntaxhighlight lang="c#"> | ||
| + | string assetName = "Characters/Dialogue/Abigail"; | ||
| + | string dialoguePrefix = PathUtilities.NormalizeAssetName("Characters/Dialogue/"); | ||
| + | bool isDialogue = assetName.StartsWith(dialoguePrefix, StringComparison.OrdinalIgnoreCase); | ||
| + | </syntaxhighlight> | ||
| + | |||
===Cache invalidation=== | ===Cache invalidation=== | ||
You can reload an asset by invalidating it from the cache. It will be reloaded next time the game requests it (and mods will have another chance to intercept it), and SMAPI will automatically update references to the asset in many cases. For example, this lets you change what clothes an NPC is wearing (by invalidating their cached sprites or portraits). | You can reload an asset by invalidating it from the cache. It will be reloaded next time the game requests it (and mods will have another chance to intercept it), and SMAPI will automatically update references to the asset in many cases. For example, this lets you change what clothes an NPC is wearing (by invalidating their cached sprites or portraits). | ||
| + | |||
| + | Please be aware that in some cases a localized version of the asset will be cached and simply invalidating the default asset will not work for any language other than english. | ||
Reloading assets is fairly expensive, so use this API judiciously to avoid impacting game performance. Definitely don't do this every update tick. | Reloading assets is fairly expensive, so use this API judiciously to avoid impacting game performance. Definitely don't do this every update tick. | ||
Typically you'll invalidate a specific asset key: | Typically you'll invalidate a specific asset key: | ||
| − | < | + | <syntaxhighlight lang="c#"> |
| − | helper. | + | helper.GameContent.InvalidateCache("Data/ObjectInformation"); |
| − | </ | + | </syntaxhighlight> |
You can also invalidate assets matching a lambda: | You can also invalidate assets matching a lambda: | ||
| − | < | + | <syntaxhighlight lang="c#"> |
| − | helper. | + | helper.GameContent.InvalidateCache(asset => asset.DataType == typeof(Texture2D) && asset.Name.IsEquivalentTo("Data/ObjectInformation")); |
| − | </source> | + | </syntaxhighlight> |
| + | |||
| + | ===Patch helper for custom assets=== | ||
| + | A patch helper provides utility methods for editing a given asset (''e.g.,'' to merge maps or resize an image). | ||
| + | |||
| + | You can get a patch helper for arbitrary data. For example, this loads two map files and merges them: | ||
| + | <syntaxhighlight lang="c#"> | ||
| + | Map farm = this.Helper.ModContent.Load<Map>("assets/farm.tmx"); | ||
| + | Map islands = this.Helper.ModContent.Load<Map>("assets/islands.tmx"); | ||
| + | |||
| + | this.Helper.ModContent | ||
| + | .GetPatchHelper(farm) | ||
| + | .AsMap() | ||
| + | .PatchMap(source: islands, targetArea: new Rectangle(0, 26, 56, 49)); | ||
| + | </syntaxhighlight> | ||
| + | |||
| + | See [[#Edit a game asset|''edit a game asset'']] for a description of the available patch helpers. | ||
| + | |||
| + | ===Let other mods edit your internal assets=== | ||
| + | Other mods can't edit your internal mod files (including data or texture files), but they ''can'' edit custom assets you provide through the content pipeline. This technique consists of three steps: | ||
| + | # Define a custom asset based on the internal file using the [[Modding:Modder Guide/APIs/Events#Content.AssetRequested|<samp>AssetRequested</samp> event]]. | ||
| + | # Detect when it's loaded/changed using the [[Modding:Modder Guide/APIs/Events#Content.AssetReady|<samp>AssetReady</samp> event]]. | ||
| + | # Load it through the content pipeline when you need it. | ||
| − | + | For example, this mod just loads a data asset (a dictionary of model entries): | |
| − | + | ||
| − | < | + | <syntaxhighlight lang="c#"> |
public class ModEntry : Mod | public class ModEntry : Mod | ||
{ | { | ||
| − | /// <summary>The | + | /// <summary>The loaded data.</summary> |
| − | /// < | + | private Dictionary<string, ExampleModel> Data; |
| + | |||
| + | /// <inheritdoc/> | ||
public override void Entry(IModHelper helper) | public override void Entry(IModHelper helper) | ||
{ | { | ||
| − | helper.Content. | + | helper.Events.Content.AssetRequested += this.OnAssetRequested; |
| − | + | helper.Events.Content.AssetReady += this.OnAssetReady; | |
| + | helper.Events.GameLoop.GameLaunched += this.OnGameLaunched; | ||
| + | } | ||
| + | |||
| + | private void OnAssetRequested(object sender, AssetRequestedEventArgs e) | ||
| + | { | ||
| + | // | ||
| + | // 1. define the custom asset based on the internal file | ||
| + | // | ||
| + | if (e.Name.IsEquivalentTo("Mods/Your.ModId/Data")) | ||
| + | { | ||
| + | e.LoadFromModFile<Dictionary<string, ExampleModel>>("assets/default-data.json", AssetLoadPriority.Medium); | ||
| + | } | ||
| + | } | ||
| + | |||
| + | private void OnAssetReady(object sender, AssetReadyEventArgs e) | ||
| + | { | ||
| + | // | ||
| + | // 2. update the data when it's reloaded | ||
| + | // | ||
| + | if (e.Name.IsEquivalentTo("Mods/Your.ModId/Data")) | ||
| + | { | ||
| + | this.Data = Game1.content.Load<Dictionary<string, ExampleModel>>("Mods/Your.ModId/Data"); | ||
| + | } | ||
| + | } | ||
| + | |||
| + | private void OnGameLaunched(object sender, GameLaunchedEventArgs e) | ||
| + | { | ||
| + | // | ||
| + | // 3. load the data | ||
| + | // (This doesn't need to be in OnGameLaunched, you can load it later depending on your mod logic.) | ||
| + | // | ||
| + | this.Data = Game1.content.Load<Dictionary<string, ExampleModel>>("Mods/Your.ModId/Data"); | ||
} | } | ||
} | } | ||
| − | </ | + | </syntaxhighlight> |
| + | |||
| + | This works for any asset type (e.g. maps or textures), and you can do this even without an internal file (e.g. using <code>e.LoadFrom(() => new Dictionary<string, ExampleModel>(), AssetLoadPriority.Medium)</code>). | ||
| − | + | [[ru:Модификации:Моддер гайд/APIs/Контент]] | |
Latest revision as of 15:49, 14 April 2024
Creating SMAPI mods ![]()
- Get started
- Game fundamentals
- Test & troubleshoot
- Release
- API reference
- Basic SMAPI APIs:
- Advanced SMAPI APIs:
- Specific guides
The content API lets you read custom assets, or read/edit/replace game assets.
Intro
What's an 'asset'?
An asset is one image, map, or data structure provided to the game. The game stores its default assets in its Content folder, though mods can have custom assets too. For example, all of Abigail's portraits are stored in one asset inside Content\Portraits\Abigail.xnb. If you unpack that file, you'll see it contains an image file:

See Editing XNB files for more info about asset files.
What's an 'asset name'?
An asset name identifies an asset. For a game asset, this is the file path relative to the game's Content folder without the .xnb extension. For example:
| content file | asset name |
|---|---|
| Content\Portraits\Abigail.xnb | Portraits/Abigail |
| Content\Maps\Desert.ja-JA.xnb | Maps/Desert.ja-JA |
For legacy reasons, the asset name in Content Patcher content packs does not include the language code. That will change in the upcoming Content Patcher 2.0.0.
What does the content API do?
SMAPI handles content loading for the game. This lets you...
- read data, images, or maps from your mod folder (with support for .json, .png, .tbin, .tmx, and .xnb files);
- read assets from the game's Content folder;
- make changes to game assets (without changing the actual files);
- provide new assets to the game.
The rest of this page explains each one in more detail.
Read assets
Read mod assets
You can read custom assets from your mod folder by specifying its path (relative to your mod folder) and type. For example:
// read an image file
Texture2D texture = helper.ModContent.Load<Texture2D>("assets/texture.png");
// alternatively
IRawTextureData texture = helper.ModContent.Load<IRawTextureData>("assets/texture.png");

// read a map file
Map map = helper.ModContent.Load<Map>("assets/map.tmx");

// read a data file
IDictionary<string, string> data = helper.ModContent.Load<Dictionary<string, string>>("assets/data.json");
The supported file types are...
| file extension | in-game type | notes |
|---|---|---|
| .xnb | any | A packed file, like those in the game's Content folder. Not recommended since it's harder to edit and maintain. |
| .json | any | A data file, typically used to store Dictionary<int, string> or Dictionary<string, string> data. |
| .png | Texture2D | An image file. You can use this to load textures, spritesheets, tilesheets, etc. |
| .tbin or .tmx | xTile.Map | A map file, which can be used to create or modify an in-game location. SMAPI will automatically match tilesheets to image files in the same folder as the map if they exist; otherwise the game will check the Content folders for them. |
Some usage notes:
- The normal convention is to have them in an assets subfolder, though that's not required.
- Don't worry about which path separators you use; SMAPI will normalize them automatically.
- To avoid performance issues, don't call content.Load<T> repeatedly in draw code. Instead, load your asset once and reuse it.
Get actual mod asset keys
When you load an asset from your mod folder, SMAPI stores it with an asset name that uniquely identifies it. If you need to pass the asset name to game code, you can retrieve the actual asset name:
tilesheet.ImageSource = helper.ModContent.GetActualAssetKey("assets/tilesheet.png");
Read content assets
You can also read assets from the game folder:
Texture2D portraits = helper.GameContent.Load<Texture2D>("Portraits/Abigail");
Note that this requires the asset name, not a filename.
Replace a game asset
Basics
You can replace an asset entirely by providing the asset through the AssetRequested event (see how to use events). SMAPI will raise the event every time an asset is loaded (which may happen multiple times per asset), so you can replace the asset. If any mod provides the asset, the original file won't be read at all and won't be changed.
There are two important concepts when replacing assets:
- Load priority
- Logically there's only one initial version of an asset. If multiple mods want to load the same asset, SMAPI will use the load priority you specify in the load methods to choose one (like AssetLoadPriority.Medium in
e.LoadFromModFile<Map>("assets/Farm.tmx", AssetLoadPriority.Medium)). If multiple mods have the same high priority, SMAPI will choose the one that was registered first. You can use one of the preset levels like AssetLoadPriority.Medium, or add arbitrary offsets like AssetLoadPriority.Medium + 1 (which is higher-priority than AssetLoadPriority.Medium but lower than AssetLoadPriority.High.
- AssetLoadPriority.Exclusive is a special case. This declares that your load operation is mandatory and shouldn't be skipped if another mod loads it too. This is discouraged since it reduces mod compatibility. If multiple mods specify AssetLoadPriority.Exclusive, SMAPI will log an error and apply none of them.
- Deferred loads
- The load doesn't happen right away. When you call e.LoadFrom or e.LoadFromModFile, you're telling SMAPI how to load the asset when it's ready to do that. SMAPI will call every mod listening to the event first, then use the information provided to check if the asset exists or provide the asset (depending on which method the game called).
Replace an image file
For example, here's a mod which replaces Abigail's portraits with a custom version from its mod folder:
internal sealed class ModEntry : Mod
{
    /// <inheritdoc/>
    public override void Entry(IModHelper helper)
    {
        helper.Events.Content.AssetRequested += this.OnAssetRequested;
    }

    /// <inheritdoc cref="IContentEvents.AssetRequested"/>
    /// <param name="sender">The event sender.</param>
    /// <param name="e">The event data.</param>
    private void OnAssetRequested(object sender, AssetRequestedEventArgs e)
    {
        if (e.Name.IsEquivalentTo("Portraits/Abigail"))
        {
            e.LoadFromModFile<Texture2D>("assets/abigail-portraits.png", AssetLoadPriority.Medium);
        }
    }
}
See IntelliSense on the e parameter for all the available options and usage.
Replace a map file
You can use the AssetRequested event to load custom maps too. When you load a map file, and an unpacked tilesheet is present in the mod folder (relative to the map file), SMAPI will automatically link the map to that file and handle loading it too. If the tilesheet filename starts with a season and underscore, the game will apply its normal seasonal logic to it too.
For example, let's say you have a mod with this structure:
📁 ExampleMod/
    🗎 ExampleMapMod.dll
    🗎 manifest.json
    📁 assets/
        🗎 Farm.tmx
        🗎 fall_customTilesheet.png
        🗎 spring_customTilesheet.png
        🗎 summer_customTilesheet.png
        🗎 winter_customTilesheet.png
You can load the custom map like this:
internal sealed class ModEntry : Mod
{
    /// <inheritdoc/>
    public override void Entry(IModHelper helper)
    {
        helper.Events.Content.AssetRequested += this.OnAssetRequested;
    }

    /// <inheritdoc cref="IContentEvents.AssetRequested"/>
    /// <param name="sender">The event sender.</param>
    /// <param name="e">The event data.</param>
    private void OnAssetRequested(object sender, AssetRequestedEventArgs e)
    {
        if (e.Name.IsEquivalentTo("Maps/Farm"))
        {
            e.LoadFromModFile<Map>("assets/Farm.tmx", AssetLoadPriority.Medium);
        }
    }
}
That's it! SMAPI will detect a reference to spring_customTilesheet.png, find the file relative to the map file, and load it too. When the season changes in-game, SMAPI will automatically switch it to summer_customTilesheet.png, etc. The other tilesheet references will be left untouched (since there's no local file), and use the game asset files.
Add a new asset
Providing a new asset is exactly like replacing an existing one (see previous sections). For example, this code adds a new dialogue file for a custom NPC:
internal sealed class ModEntry : Mod
{
    /// <inheritdoc/>
    public override void Entry(IModHelper helper)
    {
        helper.Events.Content.AssetRequested += this.OnAssetRequested;
    }

    /// <inheritdoc cref="IContentEvents.AssetRequested"/>
    /// <param name="sender">The event sender.</param>
    /// <param name="e">The event data.</param>
    private void OnAssetRequested(object sender, AssetRequestedEventArgs e)
    {
        if (e.Name.IsEquivalentTo("Characters/Dialogue/John"))
        {
            e.LoadFrom(
                () => {
                    return new Dictionary<string, string>
                    {
                        ["Introduction"] = "Hi there! My name is Jonathan."
                    };
                },
                AssetLoadPriority.Medium
            );
        }
    }
}
Edit a game asset
Basics
You can edit any game asset after it's loaded (but before it's provided to the game), without changing the original files. You do this by adding your edits in the AssetRequested event (see how to use events). SMAPI will raise the event every time an asset is loaded (which may happen multiple times per asset), so you can edit the asset.
There are two important concepts when replacing assets:
- Edit order
- When mods apply multiple edits to the same asset, they're applied sequentially in the order they were registered. You can optionally provide an edit priority when you call the e.Edit method, to apply your edit before or after other edits. You can use one of the preset levels like AssetEditPriority.Default, or add arbitrary offsets like AssetEditPriority.Default + 1 (which is higher-priority than AssetEditPriority.Default but lower than AssetEditPriority.Late).
- Deferred edits
- The edit doesn't happen right away. When you call e.Edit, you're telling SMAPI how to apply your edit when it's ready to do that. SMAPI will call every mod listening to the event first, then use all the information provided to edit the asset when it's loaded.
Example data edit
For example, here's a mod which doubles the sale price of all items:
internal sealed class ModEntry : Mod
{
    /// <inheritdoc/>
    public override void Entry(IModHelper helper)
    {
        helper.Events.Content.AssetRequested += this.OnAssetRequested;
    }

    /// <inheritdoc cref="IContentEvents.AssetRequested"/>
    /// <param name="sender">The event sender.</param>
    /// <param name="e">The event data.</param>
    private void OnAssetRequested(object sender, AssetRequestedEventArgs e)
    {
        if (e.NameWithoutLocale.IsEquivalentTo("Data/ObjectInformation"))
        {
            e.Edit(asset =>
            {
                var data = asset.AsDictionary<int, string>().Data;

                foreach ((int itemID, string itemData) in data)
                {
                    string[] fields = itemData.Split('/');
                    fields[1] = (int.Parse(fields[1]) * 2).ToString();
                    data[itemID] = string.Join('/', fields);
                }
            });
        }
    }
}
The IAssetData asset argument from the Edit method has some helpers to make editing data easier, documented below. (See IntelliSense for more info.)
Edit any file
These fields/methods are available directly on the asset from the Edit method for any asset type, and also available through the helpers listed below.
- Data
- A reference to the loaded asset data.
- ReplaceWith
- Replace the entire asset with a new version. You shouldn't do that in most cases though; see replace a game asset instead, or use one of the helpers below.
Edit a dictionary
A dictionary is a key/value data structure, represented like this in JSON exports:
{
   "key A": "value A",
   "key B": "value B",
   ...
}
You can get a dictionary helper using asset.AsDictionary<TKey, string>(), where TKey is replaced with the key type (usually int or string).
- Data
- A reference to the loaded data. For example, here's how to add or replace a specific entry to the above example:
    /// <inheritdoc cref="IContentEvents.AssetRequested"/>
    /// <param name="sender">The event sender.</param>
    /// <param name="e">The event data.</param>
    private void OnAssetRequested(object sender, AssetRequestedEventArgs e)
    {
        if (e.NameWithoutLocale.IsEquivalentTo("Location/Of/The/Asset"))
        {
            e.Edit(asset =>
            {
                 var editor = asset.AsDictionary<string, string>();
                 editor.Data["Key C"] = "Value C";
            });
        }
    }
Edit an image
When editing an image file, you can get a helper using asset.AsImage().
- Data
- A reference to the loaded image. You can directly edit each pixel in the image through this field, though that's rarely needed.
- PatchImage
- Edit or replace part of the image. This is basically a copy & paste operation, so the source texture is applied over the loaded texture. For example:
    /// <inheritdoc cref="IContentEvents.AssetRequested"/>
    /// <param name="sender">The event sender.</param>
    /// <param name="e">The event data.</param>
    private void OnAssetRequested(object sender, AssetRequestedEventArgs e)
    {
        if (e.NameWithoutLocale.IsEquivalentTo("Location/Of/The/Asset"))
        {
            e.Edit(asset =>
            {
                  var editor = asset.AsImage();
                  IRawTextureData sourceImage = this.Helper.ModContent.Load<IRawTextureData>("custom-texture.png");
                  editor.PatchImage(sourceImage, targetArea: new Rectangle(300, 100, 200, 200));
            });
        }
    }
- Available method arguments:
argument usage source The source image to copy & paste onto the loaded image. May be a Texture2D or a IRawTextureData sourceArea (optional) The pixel area within the source image to copy (or omit to use the entire source image). This must fit within the target image. targetArea (optional) The pixel area within the loaded image to replace (or omit to replace starting from the top-left corner up to the full source size). patchMode (optional) How the image should be patched. The possible values... - PatchMode.Replace (default): erase the original content within the area before pasting in the new content;
- PatchMode.Overlay: draw the new content over the original content, so the original content shows through transparent or semi-transparent pixels.
- ExtendImage
- Extend the image if needed to fit the given size. Note that resizing the image is an expensive operation, creates a new texture instance, and extending a spritesheet horizontally may cause game errors or bugs. For example:
e.Edit(asset =>
{
   var editor = asset.AsImage();

   // make sure the image is at least 1000px high
   editor.ExtendImage(minWidth: editor.Data.Width, minHeight: 1000);
});
- Available method arguments:
argument usage minWidth The minimum desired width. If the image width is less than this value, it'll be extended on the right up to that size. minHeight The minimum desired height. If the image height is less than this value, it'll be extended from the bottom up to that size.
Edit a map
When editing a map file, you can get a helper using asset.AsMap().
- Data
- A reference to the loaded map. You can directly edit the map or tiles through this field.
- PatchMap
- Edit or replace part of the map. This is basically a copy & paste operation, so the source map is applied over the loaded map. For example:
e.Edit(asset =>
{
   var editor = asset.AsMap();

   Map sourceMap = this.Helper.ModContent.Load<Map>("custom-map.tmx");
   editor.PatchMap(sourceMap, targetArea: new Rectangle(30, 10, 20, 20));
});
- Available method arguments:
argument usage source The source map to copy & paste onto the loaded map. sourceArea (optional) The tile area within the source map to copy (or omit to use the entire source map). This must fit within the target map. targetArea (optional) The tile area within the loaded map to replace (or omit to replace starting from the top-left corner up to the full source size). patchMode (optional) How to merge tiles into the target map. The default is ReplaceByLayer.For example, assume a mostly empty source map with two layers: Back (red) and Buildings (blue):
Here's how that would be merged with each patch mode (black areas are the empty void under the map):
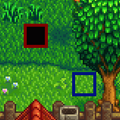
Overlay: only matching tiles are replaced. The red tile replaces the ground on the Back layer, but the ground is visible under the blue Buildings tile.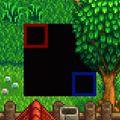
ReplaceByLayer(default): all tiles are replaced, but only on layers that exist in the source map.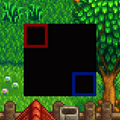
Replace: all tiles are replaced.


- ExtendMap
- Extend the map if needed to fit the given size. Note that this is an expensive operation and resizes the map in-place. For example:
e.Edit(asset =>
{
   var editor = asset.AsMap();

   // make sure the map is at least 256 tiles high
   editor.ExtendMap(minHeight: 256);
});
- Available method arguments:
argument usage minWidth The minimum desired width in tiles. If the map width is less than this value, it'll be extended on the right up to that size. minHeight The minimum desired height in tiles. If the map height is less than this value, it'll be extended from the bottom up to that size.
Advanced
Use IRawTextureData
When loading image data, creating a Texture2D instance or calling its GetData/SetData methods is very expensive and involves GPU calls. You can avoid that by loading images as SMAPI's IRawTextureData instead, which returns the data directly with no GPU calls. You can then pass it directly to other SMAPI APIs like PatchImage.
For example, this mod applies an image overlay to Abigail's portrait without loading the overlay as a Texture2D instance:
public class ModEntry : Mod
{
    public override void Entry(IModHelper helper)
    {
        helper.Events.Content.AssetRequested += this.OnAssetRequested;
    }

    private void OnAssetRequested(object sender, AssetRequestedEventArgs e)
    {
        if (e.NameWithoutLocale.IsEquivalentTo("Portraits/Abigail"))
        {
            e.Edit(asset =>
            {
                var editor = asset.AsImage();

                IRawTextureData overlay = this.Helper.ModContent.Load<IRawTextureData>("assets/overlay.png");
                editor.PatchImage(overlay);
            });
        }
    }
}
You can also edit the IRawTextureData data directly before passing it to other methods. For example, this converts the texture to grayscale:
IRawTextureData image = this.Helper.ModContent.Load<IRawTextureData>("assets/image.png");

int pixelCount = image.Width * image.Height;
for (int i = 0; i < pixelCount; i++)
{
    Color color = image.Data[i];
    if (color.A == 0)
        continue; // ignore transparent color

    int grayscale = (int)((color.R * 0.3) + (color.G * 0.59) + (color.B * 0.11)); // https://stackoverflow.com/a/596282/262123
    image.Data[i] = new Color(grayscale, grayscale, grayscale, color.A);
}
(Note: while SMAPI's implementation of IRawTextureData is exactly as long as it needs to be, this may not be the case for implementations of IRawTextureData from mods.)
Compare asset names
You can't use normal string comparison with asset names. For example, Characters/Abigail and CHARACTERS\ABIGAIL are the same asset name, but comparing them with C#'s == operator will return false.
You can use SMAPI's IAssetName type to compare asset names instead. For example, assetName.IsEquivalentTo("Characters/Abigail") will return true for both of the above names. There are two ways to get an IAssetName value:
- In content events like AssetRequested, use the e.Name or e.NameWithoutLocale property.
- You can parse a custom asset name string into an IAssetName:
IAssetName assetName = this.Helper.GameContent.ParseAssetName("CHARACTERS/Abigail");
if (assetName.StartsWith("Characters/")) { ... }
if (assetName.IsEquivalentTo("Characters/Abigail")) { ... }
If you really need to compare strings manually, you should normalize the asset names using PathUtilities and compare case-insensitively. For example:
string assetName = "Characters/Dialogue/Abigail";
string dialoguePrefix = PathUtilities.NormalizeAssetName("Characters/Dialogue/");
bool isDialogue = assetName.StartsWith(dialoguePrefix, StringComparison.OrdinalIgnoreCase);
Cache invalidation
You can reload an asset by invalidating it from the cache. It will be reloaded next time the game requests it (and mods will have another chance to intercept it), and SMAPI will automatically update references to the asset in many cases. For example, this lets you change what clothes an NPC is wearing (by invalidating their cached sprites or portraits).
Please be aware that in some cases a localized version of the asset will be cached and simply invalidating the default asset will not work for any language other than english.
Reloading assets is fairly expensive, so use this API judiciously to avoid impacting game performance. Definitely don't do this every update tick.
Typically you'll invalidate a specific asset key:
helper.GameContent.InvalidateCache("Data/ObjectInformation");
You can also invalidate assets matching a lambda:
helper.GameContent.InvalidateCache(asset => asset.DataType == typeof(Texture2D) && asset.Name.IsEquivalentTo("Data/ObjectInformation"));
Patch helper for custom assets
A patch helper provides utility methods for editing a given asset (e.g., to merge maps or resize an image).
You can get a patch helper for arbitrary data. For example, this loads two map files and merges them:
Map farm = this.Helper.ModContent.Load<Map>("assets/farm.tmx");
Map islands = this.Helper.ModContent.Load<Map>("assets/islands.tmx");

this.Helper.ModContent
   .GetPatchHelper(farm)
   .AsMap()
   .PatchMap(source: islands, targetArea: new Rectangle(0, 26, 56, 49));
See edit a game asset for a description of the available patch helpers.
Let other mods edit your internal assets
Other mods can't edit your internal mod files (including data or texture files), but they can edit custom assets you provide through the content pipeline. This technique consists of three steps:
- Define a custom asset based on the internal file using the AssetRequested event.
- Detect when it's loaded/changed using the AssetReady event.
- Load it through the content pipeline when you need it.
For example, this mod just loads a data asset (a dictionary of model entries):
public class ModEntry : Mod
{
    /// <summary>The loaded data.</summary>
    private Dictionary<string, ExampleModel> Data;

    /// <inheritdoc/>
    public override void Entry(IModHelper helper)
    {
        helper.Events.Content.AssetRequested += this.OnAssetRequested;
        helper.Events.Content.AssetReady += this.OnAssetReady;
        helper.Events.GameLoop.GameLaunched += this.OnGameLaunched;
    }

    private void OnAssetRequested(object sender, AssetRequestedEventArgs e)
    {
        //
        // 1. define the custom asset based on the internal file
        //
        if (e.Name.IsEquivalentTo("Mods/Your.ModId/Data"))
        {
            e.LoadFromModFile<Dictionary<string, ExampleModel>>("assets/default-data.json", AssetLoadPriority.Medium);
        }
    }

    private void OnAssetReady(object sender, AssetReadyEventArgs e)
    {
        //
        // 2. update the data when it's reloaded
        //
        if (e.Name.IsEquivalentTo("Mods/Your.ModId/Data"))
        {
            this.Data = Game1.content.Load<Dictionary<string, ExampleModel>>("Mods/Your.ModId/Data");
        }
    }

    private void OnGameLaunched(object sender, GameLaunchedEventArgs e)
    {
        //
        // 3. load the data
        //    (This doesn't need to be in OnGameLaunched, you can load it later depending on your mod logic.)
        //
        this.Data = Game1.content.Load<Dictionary<string, ExampleModel>>("Mods/Your.ModId/Data");
    }
}
This works for any asset type (e.g. maps or textures), and you can do this even without an internal file (e.g. using e.LoadFrom(() => new Dictionary<string, ExampleModel>(), AssetLoadPriority.Medium)).