Modding:Modder Guide/Release
Creating SMAPI mods ![]()
- Get started
- Game fundamentals
- Test & troubleshoot
- Release
- API reference
- Basic SMAPI APIs:
- Advanced SMAPI APIs:
- Specific guides
Once you're ready to share your mod, it's time to release it!
Prepare the release package
The 'release package' for a SMAPI mod is just a .zip file containing a mod with your compiled files, manifest.json, any i18n files, etc. The NuGet package will create it for you automatically.
Generate package
- Edit your mod's manifest.json to increase the version.
- Click Build > Rebuild Solution (Visual Studio) or Build > Rebuild All (MonoDevelop) to make sure the project is compiled.
- Open your mod project's bin/Debug or bin/Release folder (depending on your build configuration).
- There should be a .zip file there for your mod version.
That .zip file is the release package for your mod, ready to upload.
Troubleshoot package
Here's how to fix common issues with the generated .zip file.
- The .zip file is missing:
- Make sure you're looking at the right folder (either bin/Debug or bin/Release).
- Make sure there are no build errors.
- Some mod files aren't in the package:
- If it's a mod file: right-click on the file in Visual Studio or MonoDevelop, choose Properties, and change 'Copy to Output Directory' to 'copy if newer'.
- If it's an assembly reference: right-click on the reference in Visual Studio or MonoDevelop, choose Properties, and change 'Copy Local' or 'Local Copy' to true.
- Some mod files that shouldn't be in the package are included:
- If it's a mod file: right-click on the file in Visual Studio or MonoDevelop, choose Properties, and change 'Copy to Output Directory' to 'do not copy'.
- If it's an assembly reference: right-click on the reference in Visual Studio or MonoDevelop, choose Properties, and change 'Copy Local' or 'Local Copy' to false.
Release the mod
Create a mod page
If you haven't already, create a mod page on Nexus Mods. Ideally your mod description should...
- explain what the mod does and how to use it;
- provide clear install steps;
- explain which version of the game it works with;
- say whether it works in multiplayer (and list any multiplayer limitations);
- link to release notes, source code, discussion thread, etc if applicable.
Here's a recommended template for the mod description:
- Click the "[BBCODE]" button above the mod description on Nexus. This will switch to raw text mode.
- Paste this template in:
This mod adds pineapples everywhere in the game. Replace this line with a few sentences explaining your mod.

[size=5]Install[/size]
[list=1]
[*][url=https://smapi.io]Install the latest version of SMAPI[/url].
[*]Download this mod and unzip it into [font=Courier New]Stardew Valley/Mods[/font].
[*]Run the game using SMAPI.
[/list]

[size=5]How to use[/size]
Provide a few sentences explaining how to use your mod. For example, the default buttons to press, where to find a menu, etc. You can remove this section if it's self-evident.

[size=5]Compatibility[/size]
[list]
[*]Works with Stardew Valley 1.3 beta on Linux/Mac/Windows.
[*]Works in single player and multiplayer. If there are multiplayer limitations, explain them here.
[/list]

[size=5]See also[/size]
Add links below for your mod, and remove any that don't apply. Don't forget to remove this sentence.

[list]
[*]Official discussion thread
[*]Release notes
[*]Source code
[/list]
- Click the "[BBCODE]" button to switch back to the formatted view.
- Edit the template for your mod.
Add update keys to your manifest
Update keys tell SMAPI where your mod is released, so it can let players know when a new version is available. This requires your mod ID, which is available as soon as you create the mod page (before uploading the mod files). See the update check docs for more info.
Upload the mod release

To upload a file to Nexus:
- From your mod page, go to Manage > Files.
- Fill in the form:
- 'File name' should have the mod name and version (like PineapplesEverywhere 1.0).
- 'File version' field should match the version in your manifest.json! If it doesn't, players may get incorrect update alerts.
- Tick the "this is the latest version" checkbox so players get update alerts.
- 'File description' is up to you. You can mention the minimum SMAPI version (if any), what changed, link to release notes, etc.
- Upload the .zip file you prepared above.
Go open-source
Common questions
- What is 'open source'?
- Open source means your mod's code is public and others can change a copy of it subject to a license you choose. You still have full control of your original code and mod pages; nobody can change those without your approval! However, open source lets others create unofficial updates or publish their own versions.
- Do I have to go open-source?
- No, but it's strongly recommended. Making mods open-source is important for the long-term health of the modding community — when you're away or lose interest, others can still update your mods for the latest versions. 66% of SMAPI mods have source code available, which contributes to over 90% of tracked SMAPI mods being updated after major game updates.
- What is Git? What's a repository?
- Git is software that helps track changes to your code, and a repository is a folder containing your mod files plus special files for Git tracking. You don't really need to know how it works at this point; we'll walk you through getting your code up and making changes (and you can look up Git tutorials if you want to dig deeper).
- Doesn't this only apply for SMAPI mods?
- Nope! Although content packs aren't compiled, other modders can't legally make changes without a code license. Note that 'permissions' options on sites like Nexus are legally iffy (e.g. who has copyright on derivatives? Can derivatives be relicensed?), so it's a good idea to have a code license for content packs too. That also lets other modders contribute pull requests and updates.
First-time setup
This looks like a lot of steps, but don't worry: it's pretty straightforward. If you need help, come ask in #modding on the Stardew Valley Discord. :)
Create the Git repository
First, let's create the public repository which will contain your code.
- Create a GitHub account.
- Install SourceTree (Mac/Windows) or GitKraken (Linux). When asked, link it to your GitHub account.
- Create the repository on GitHub.
Suggested settings (see screenshot):
- Repository name: consider StardewMods if you'll put all your mods in the same repository, otherwise use the name of your mod.
- Description: consider Mods for Stardew Valley.
- Initialize ... with a README: enable this option.
- Add .gitignore: leave this blank; we'll add our own later.
- Add a license: choose a license (MIT License is a good choice if you're undecided), and select it here.
- Click 'Create repository'.
- On the repository page that appears, click the green "Clone or download" button and copy the URL:
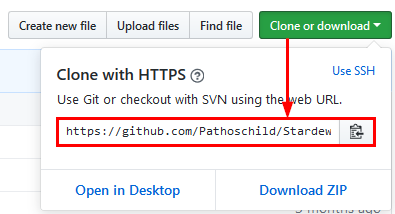
- In SourceTree, click File > Clone and paste the URL. Choose a destination path that's easy to access (like C:\source\StardewMods), and click 'Clone'.

That's the hard part done! Now you have a repository on GitHub that's synced with the folder on your computer.
Add the mod files
Next, let's add your files to the repository.
- Open the repository folder (the destination path you entered in step 5 above).
- Unzip this zip file into the folder. This will add two files to the root of your folder: .gitattributes (which normalises line endings between Linux/Mac/Windows) and .gitignore (which hides files which shouldn't be committed from Git). You just need to have them in your folder, you won't need to change them.
- Copy your mod files (including the .sln file) into the folder.
- Commit your changes in SourceTree:
- Click Commit at the top.
- Click Stage All to add the files to your commit.
- Enter a human-readable description for you changes in the textbox. The format is up to you, but "add initial mod files" is fine for now.
- Make sure "Push changes immediately" is ticked.
- Click "Commit".
That's it: all your files will appear on GitHub. Your mod is now open-source!
Making changes
The steps above are all first-time setup. When you want to make changes, it's much easier:
- Edit your code in the repository folder.
- In SourceTree, commit and push your changes (see step 4 in the previous section).