Modding:World map
← Index
This page explains how to edit the world map shown in the game menu.
To edit location maps, see Modding:Maps. See also an intro to making mods.
Data
Overview
You can change the world map by editing the Data/WorldMap asset. You can add custom maps for certain locations, apply texture overlays, add/edit tooltips, set player marker positioning, etc.
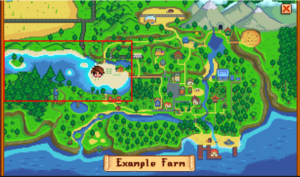
The game divides the world map into three main concepts (see example at right):
- A region is a large-scale part of the world containing everything shown on the map. For example, the default world map is the Valley region.
- A map area is a subset of the world map which optionally add tooltips, scroll text, texture overlays, and player marker positioning info.
- A map area position matches in-game locations and tile coordinates to the drawn world map. The game uses this to automatically position player markers at a relative position on the world map (e.g. so you can watch other players move across the location on the map).
In the data model:
- each entry is a region;
- each entry's MapAreas are the region's map area;
- and each map area's WorldPositions are the world map positions.
The game will find the first WorldPositions entry which matches the current location, and assume you're in the region and map area which contains it. If there's none found, it defaults to the farm.
Format
The Data/WorldMap data asset consists of a string → model lookup, where...
- The key is a unique string ID for the region.
- The value is a model with the fields listed below.
| field | effect | ||||||||||||||||||||||||||||||||||||||||||||||||||||||||||||||||||||||
|---|---|---|---|---|---|---|---|---|---|---|---|---|---|---|---|---|---|---|---|---|---|---|---|---|---|---|---|---|---|---|---|---|---|---|---|---|---|---|---|---|---|---|---|---|---|---|---|---|---|---|---|---|---|---|---|---|---|---|---|---|---|---|---|---|---|---|---|---|---|---|---|
| BaseTexture | (Optional) The base texture to draw for the map, if any. The first matching texture is applied. If map areas provide their own texture too, they're drawn on top of this base texture.
This consists of a list of models with these fields:
| ||||||||||||||||||||||||||||||||||||||||||||||||||||||||||||||||||||||
| MapAreas | The areas to draw on top of the BaseTexture. These can provide tooltips, scroll text, texture overlays, and player marker positioning info.
This consists of a list of models with these fields:
| ||||||||||||||||||||||||||||||||||||||||||||||||||||||||||||||||||||||
| MapNeighborIdAliases | (Optional) A set of aliases that can be used in tooltip fields like LeftNeighbor instead of the specific values they represent. Aliases can't be recursive.
For example, this lets you use Beach/FishShop in neighbor fields instead of specifying the specific tooltip IDs each time: "MapNeighborIdAliases": {
"Beach/FishShop": "Beach/FishShop_DefaultHours, Beach/FishShop_ExtendedHours"
}
|
Example
This Content Patcher content pack adds a new world map for Ginger Island. If the player unlocked the beach resort, it applies the beach resort texture.
{
    "Format": "2.0.0",
    "Changes": [
        // add world map edits
        {
            "Action": "EditData",
            "Target": "Data/WorldMap",
            "Entries": {
                "GingerIsland": {
                    "BaseTexture": [
                        {
                            "Id": "Default",
                            "Texture": "{{InternalAssetKey: assets/ginger-island.png}}"
                        }
                    ],
                    "MapAreas": [
                        // the Island South (dock) area
                        {
                            // basic info for the area within the map
                            "Id": "IslandSouth",
                            "PixelArea": { "X": 105, "Y": 105, "Width": 231, "Height": 240 },
                            "ScrollText": "Dock", // example only, should usually be translated

                            // a tooltip shown when hovering over the area on the map
                            "Tooltips": [
                                {
                                    "Id": "Dock",
                                    "Text": "Dock" // example only, should usually be translated
                                }
                            ],

                            // if the resort is unlocked, overlay a custom texture on top of the default Ginger Island map
                            "Textures": [
                                {
                                    "Id": "Resort",
                                    "Texture": "{{InternalAssetKey: assets/resort.png}}",
                                    "Condition": "PLAYER_HAS_FLAG Any Island_Resort"
                                }
                            ],

                            // the in-game locations that are part of this world map area
                            "WorldPositions": [
                                {
                                    "LocationName": "IslandSouth"
                                }
                            ]
                        }
                    ]
                }
            }
        }
    ]
}
Real-time positioning
The world map generally shows players' positions in real-time. There are three main approaches to do this for a custom location.
Automatic positioning (recommended)
If the drawn map area closely matches the in-game location, the game can determine positions automatically based on the PixelArea and LocationName fields in Data/WorldMap. For example, a player in the exact center of the in-game location will be drawn in the center of the drawn map area.
To do that:
- Take a screenshot of the full in-game location.
- Open the screenshot in an image editor like Paint.NET or GIMP.
- Crop as needed, then rescale it to the size you want on the world map. Make sure you use 'nearest neighbor' as the scale algorithm.
- Redraw parts if needed to clean it up.
That's it! If you use that as the map area's texture in Data/WorldMap, the game will be able to determine positions automatically. You can omit the WorldPositions field with this approach.
Manual positioning
If the in-game layout doesn't match the drawn world map, you can use the WorldPositions field in Data/WorldMap to manually align positions between them. This can be tricky; usually automatic positioning is recommended instead.
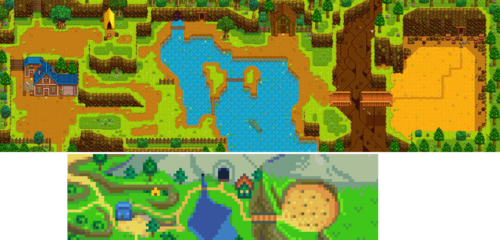
For example, the mountain's map area was very stylized before Stardew Valley 1.6 (the mine and adventure guild were right next to each other, there were no islands, there was no water south of the guild, etc):

With manual positioning, you add any number of world positions with a TileArea (the tile coordinates where the player is standing in the actual location) and MapPixelArea (where that area is on the map). When the player is within the TileArea, they'll be mapped to the relative position within the matching MapPixelArea. For example, if they're in the exact center of the TileArea, they'll be drawn in the center of the MapPixelArea.
For example, you could divide the pre-1.6 mountain into multiple areas like this (see the data format for info on each field):
"WorldPositions": [
    {
        "Id": "Quarry",
        "LocationName": "Mountain",
        "TileArea": { "X": 95, "Y": 11, "Width": 36, "Height": 24 },
        "ExtendedTileArea": { "X": 95, "Y": 0, "Width": 255, "Height": 255 },
        "MapPixelArea": { "X": 236, "Y": 29, "Width": 28, "Height": 19 }
    },
    {
        "Id": "Lake_Guild",
        "LocationName": "Mountain",
        "TileArea": { "X": 73, "Y": 5, "Width": 22, "Height": 30 },
        "ExtendedTileArea": { "X": 73, "Y": 0, "Width": 22, "Height": 255 },
        "MapPixelArea": { "X": 227, "Y": 29, "Width": 9, "Height": 19 }
    },
    {
        "Id": "Lake_BetweenGuildAndMine",
        "LocationName": "Mountain",
        "TileArea": { "X": 57, "Y": 5, "Width": 16, "Height": 32 },
        "ExtendedTileArea": { "X": 57, "Y": 0, "Width": 16, "Height": 255 },
        "MapPixelArea": { "X": 224, "Y": 29, "Width": 3, "Height": 19 }
    },
    {
        "Id": "Lake_Mine",
        "LocationName": "Mountain",
        "TileArea": { "X": 52, "Y": 5, "Width": 5, "Height": 30 },
        "ExtendedTileArea": { "X": 52, "Y": 0, "Width": 5, "Height": 255 },
        "MapPixelArea": { "X": 220, "Y": 29, "Width": 4, "Height": 19 }
    },
    {
        "Id": "Lake_MineBridge",
        "LocationName": "Mountain",
        "TileArea": { "X": 44, "Y": 5, "Width": 8, "Height": 30 },
        "ExtendedTileArea": { "X": 44, "Y": 0, "Width": 8, "Height": 255 },
        "MapPixelArea": { "X": 210, "Y": 29, "Width": 10, "Height": 19 }
    },
    {
        "Id": "West",
        "LocationName": "Mountain",
        "TileArea": { "X": 0, "Y": 5, "Width": 44, "Height": 30 },
        "ExtendedTileArea": { "X": 0, "Y": 0, "Width": 44, "Height": 255 },
        "MapPixelArea": { "X": 175, "Y": 29, "Width": 35, "Height": 19 }
    },
    {
        "Id": "Default",
        "LocationName": "Mountain"
    }
]
Here's a visual representation of those areas:

Note how the area between the mine and adventurer's guild is wide in the location, but narrow on the drawn world map. When the player is walking across that part of the location, they'll be shown walking slowly across the equivalent location on the drawn map.
If the player is outside a TileArea but within the ExtendedTileArea (if set), their position is snapped to the nearest position within the TileArea. For example, notice how the bottom of the location south of the carpenter shop isn't part of the red area. It is part of that area's ExtendedTileArea though, so a player there will be snapped to the bottom of the red area on the world map.
Fixed positions
For very complex locations, real-time positions on the world map may not be possible (e.g. because the drawn world map is very stylized). In that case you can set a fixed position (or multiple fixed positions) on the world map.
For example, this draws the player marker at one of five world map positions depending where they are in town. The TileArea indicates the tile coordinates where the player is standing in the actual town, and MapPixelArea is where to draw them on the map. Note that the latter is always 1x1 pixel in the code below, which means that anywhere within the TileArea will be placed on that specific pixel on the world map. The last entry has no TileArea, which means it applies to all positions that didn't match a previous entry.
"WorldPositions": [
    {
        "Id": "East_NearJojaMart",
        "LocationName": "Town",
        "TileArea": { "X": 85, "Y": 0, "Width": 255, "Height": 68 },
        "MapPixelArea": { "X": 225, "Y": 81, "Width": 1, "Height": 1 }
    },
    {
        "Id": "East_NearMuseum",
        "LocationName": "Town",
        "TileArea": { "X": 81, "Y": 68, "Width": 255, "Height": 255 },
        "MapPixelArea": { "X": 220, "Y": 108, "Width": 1, "Height": 1 }
    },
    {
        "Id": "West_North",
        "LocationName": "Town",
        "TileArea": { "X": 0, "Y": 0, "Width": 85, "Height": 43 },
        "MapPixelArea": { "X": 178, "Y": 64, "Width": 1, "Height": 1 }
    },
    {
        "Id": "West_Center",
        "LocationName": "Town",
        "TileArea": { "X": 0, "Y": 43, "Width": 85, "Height": 33 },
        "MapPixelArea": { "X": 175, "Y": 88, "Width": 1, "Height": 1 }
    },
    {
        "Id": "West_South",
        "LocationName": "Town",
        "MapPixelArea": { "X": 182, "Y": 109, "Width": 0, "Height": 0 }
    }
]
Interacting with the world map in C#
SMAPI mods (written in C#) can use the game's StardewValley.WorldMaps.WorldMapManager class to interact with the world map.
For example, you can get the pixel position on the world map which matches an in-game tile coordinate (if the location appears in Data/WorldMap):
MapAreaPosition mapAreaPosition = WorldMapManager.GetPositionData(location, tile);
if (mapAreaPosition != null)
    return mapAreaPosition.GetMapPixelPosition(location, tile);
Debug view
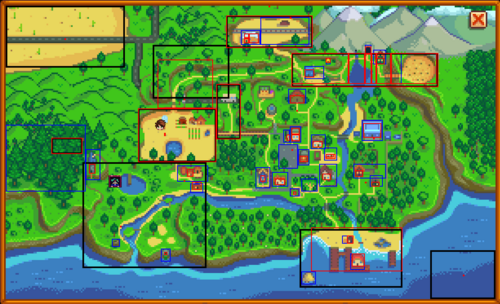
You can run debug worldMapLines in the SMAPI console window to enable the world map's debug view. This will outline map areas (black), map area positions (blue), and tooltips (green):
You can optionally specify which types to highlight, like debug worldMapLines areas positions tooltips.

