Difference between revisions of "Modding:IDE reference"
Pathoschild (talk | contribs) (copy from canimod.com with permission, dual-licensed CC BY-NC-SA for compatibility with wiki. Only author is Pathoschild.) |
Wrongcoder (talk | contribs) |
||
| (41 intermediate revisions by 10 users not shown) | |||
| Line 1: | Line 1: | ||
| − | + | ←[[Modding:Index|Index]] | |
| − | |||
| − | |||
| − | |||
| − | |||
| − | |||
| − | |||
| − | |||
| − | |||
| − | + | This page is a quick reference for how to use Visual Studio 2017 or MonoDevelop/Visual Studio for Mac when creating or editing a SMAPI mod. See [[Modding:Modder Guide/Get Started|Modding:Modder Guide]] for the main guide. | |
| − | |||
| − | |||
| − | |||
| − | |||
| − | + | ==Before you start== | |
| − | + | <ul> | |
| − | + | <li>You should install [https://visualstudio.microsoft.com/vs/community/ Visual Studio Community] (Windows), [http://www.monodevelop.com/ MonoDevelop] (Linux), or [https://visualstudio.microsoft.com/vs/mac/ Visual Studio for Mac] (Mac).</li> | |
| − | + | <li>Reviewing [https://mva.microsoft.com/en-us/training-courses/c-fundamentals-for-absolute-beginners-16169 ''C# Fundamentals for Absolute Beginners''] is strongly recommended if you're new to programming C#.</li> | |
| − | + | <li>Here are some basic terms to remember: | |
| − | |||
| − | + | {| class="wikitable" | |
| − | < | + | |- |
| + | ! term !! definition | ||
| + | |- | ||
| + | | IDE || The program used to edit, run, and compile your code (short for ''Integrated Development Environment''). The main IDEs are Visual Studio on Windows, and MonoDevelop/Visual Studio for Mac on Linux/Mac. | ||
| + | |- | ||
| + | | DLL || The file with a <samp>.dll</samp> extension which contains your compiled code (short for ''Dynamic Link Library''). This is the file that SMAPI reads when loading your mod. | ||
| + | |- | ||
| + | | project || A collection of source code + configuration + resources (like images) you edit in the IDE. Each project is compiled into its own DLL. | ||
| + | |- | ||
| + | | solution || A collection of projects with some global settings. The solution itself isn't compiled, but it enables some convenient features (like letting projects easily reference each other). | ||
| + | |}</li> | ||
| + | </ul> | ||
| + | ==Create a mod project== | ||
| + | <span id="create-project"></span> | ||
Before you can write your mod code, you need to create a solution and project to contain it. | Before you can write your mod code, you need to create a solution and project to contain it. | ||
| − | ### In Visual Studio | + | ===Windows (Visual Studio 2019/2022)=== |
| + | # Open Visual Studio 2019/2022. | ||
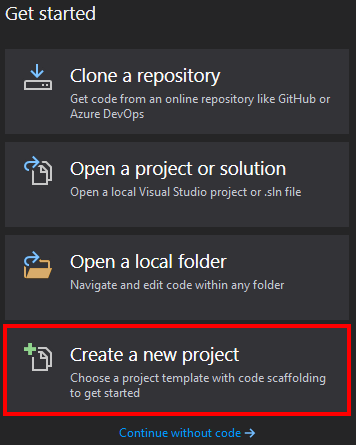
| + | # Click ''Create a new project'' from the start screen.<br />[[File:Modding - IDE reference - create project (Visual Studio 1).png]] | ||
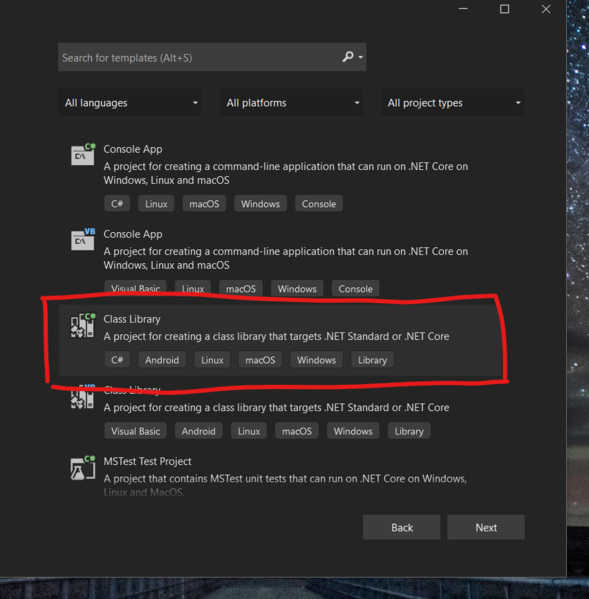
| + | # Filter by "C#" and "Library", then choose ''Class Library'' and click ''Next''. Make sure you '''don't''' choose ''Class Library (.NET Framework)'' which won't work.<br />[[File:Modding - IDE reference - create project (Visual Studio 2).png| 589px]] | ||
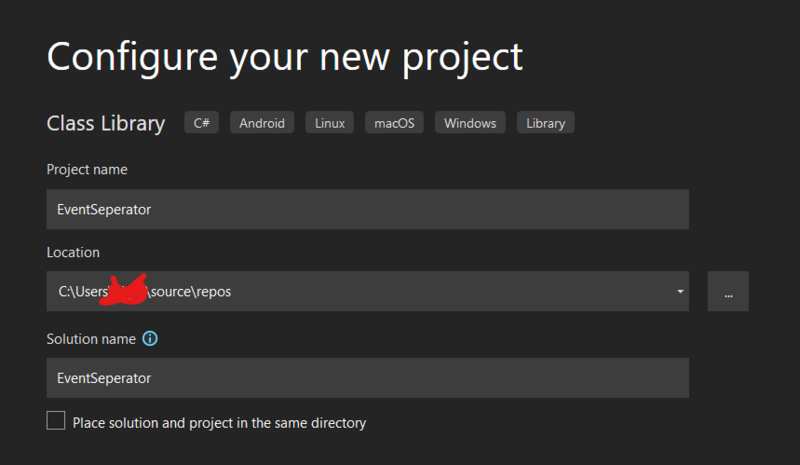
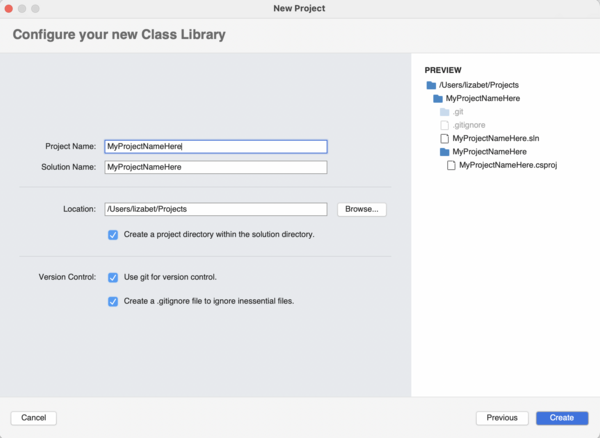
| + | # In the ''configure your new project'' window: <ol><li>Enter a descriptive mod name. By convention, the name should be one word with mixed caps (like "PineapplesEverywhere").</li><li>Make sure "Place solution and project in the same directory" is ''not'' checked.</li><li>Click "Create" to to create the project.</li></ol>[[File:Modding - IDE reference - create project (Visual Studio 3).png|800px]] | ||
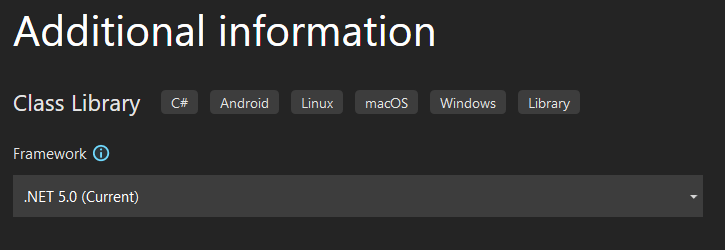
| + | # Next, select NET 6.0 and click "Create" to create the project. For VS 2022, this will be on the next page. <br />[[File:Screenshot 2021-12-16 140835.png]] | ||
| − | + | ===Linux (MonoDevelop)=== | |
| − | + | # Open MonoDevelop. | |
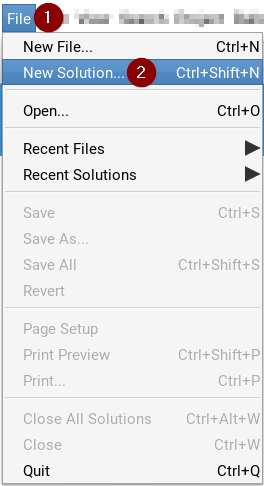
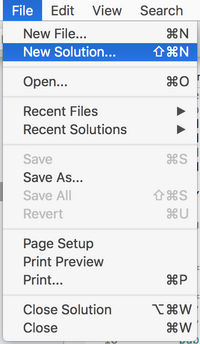
| − | + | # Click ''File » New Solution'' from the menu bar:<br />[[File:Modding - IDE reference - create project (MonoDevelop 1).png]] | |
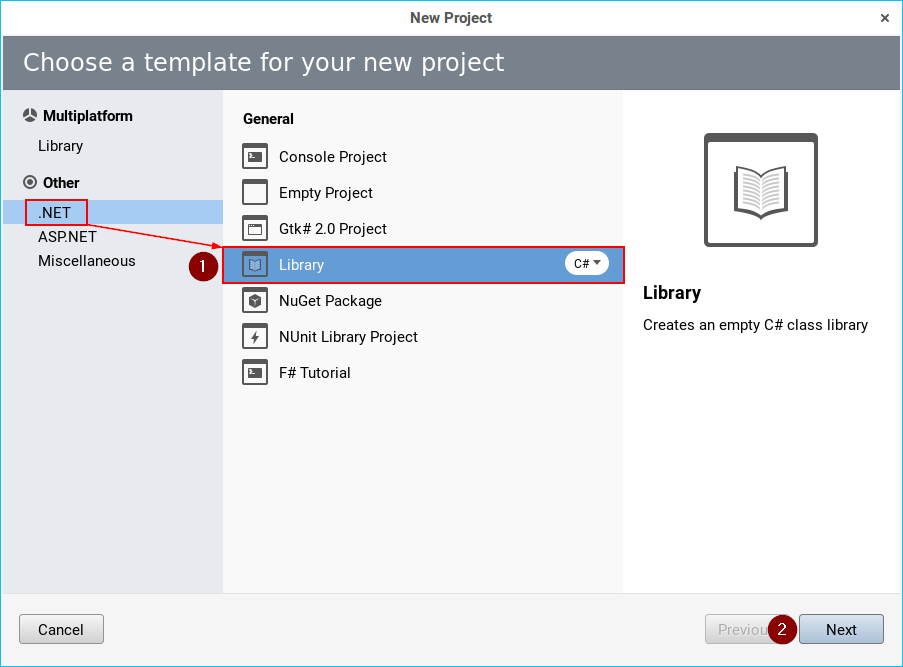
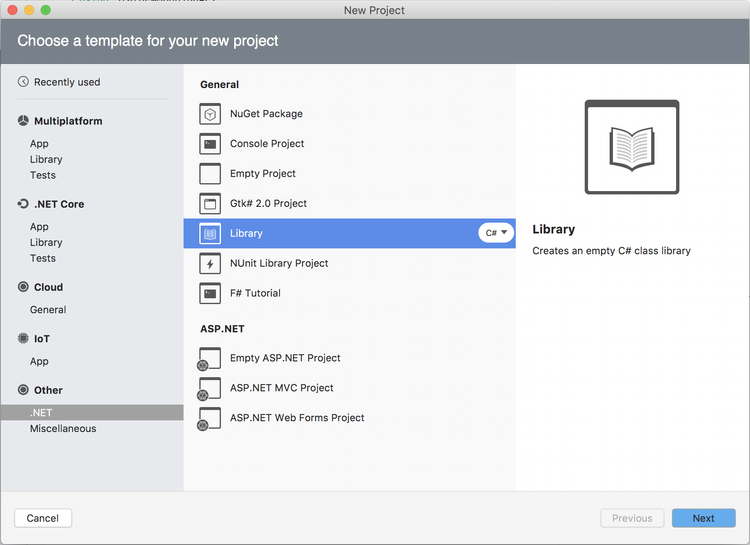
| − | + | # In the 'New Project' window, choose ''.NET » Library'' and click ''Next'':<br />[[File:Modding - IDE reference - create project (MonoDevelop 2).png]] | |
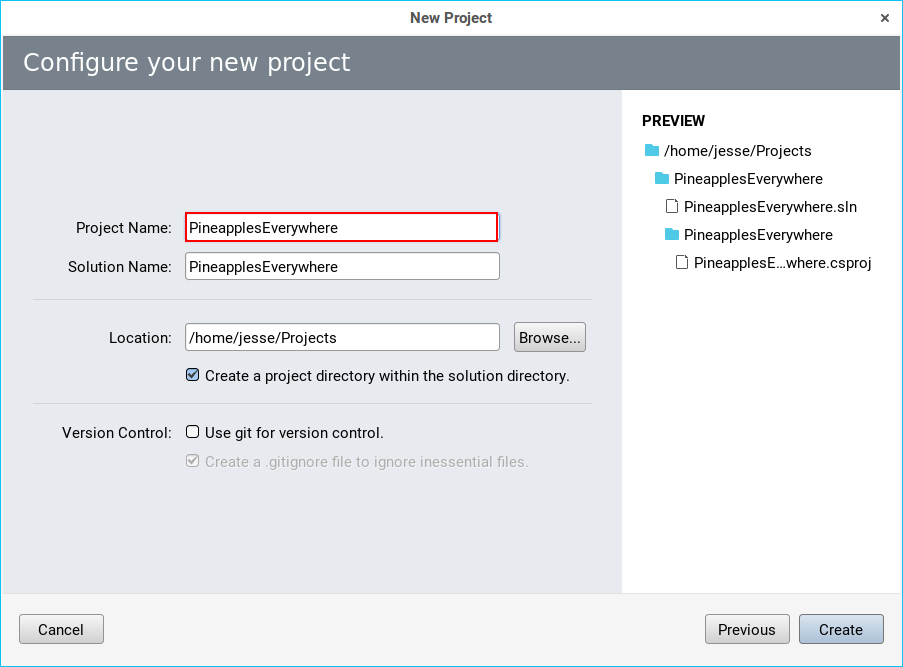
| − | + | # Enter a descriptive mod name. By convention, the name should be one word with mixed caps (like "PineapplesEverywhere"):<br />[[File:Modding - IDE reference - create project (MonoDevelop 3).png]] | |
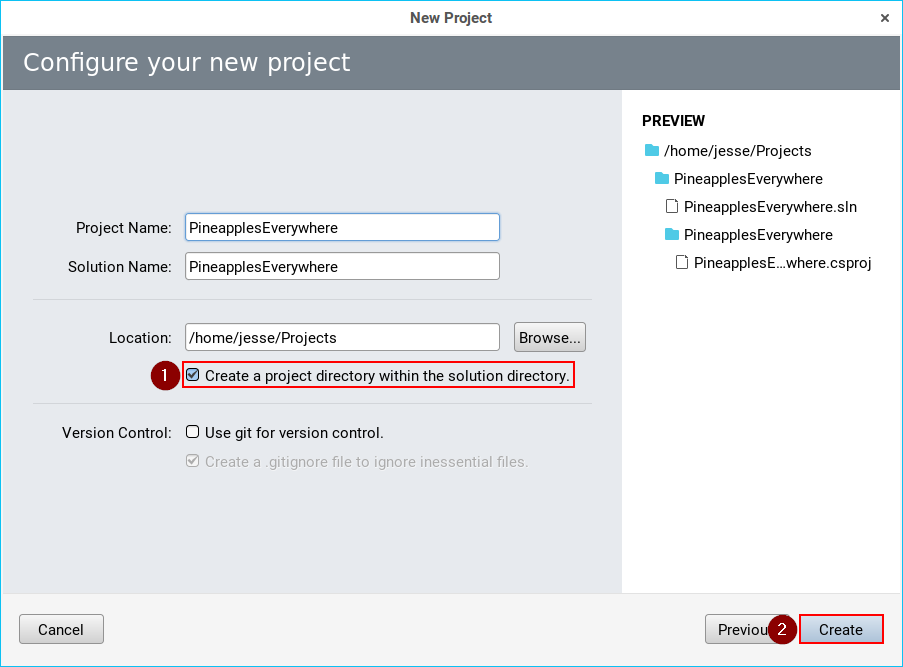
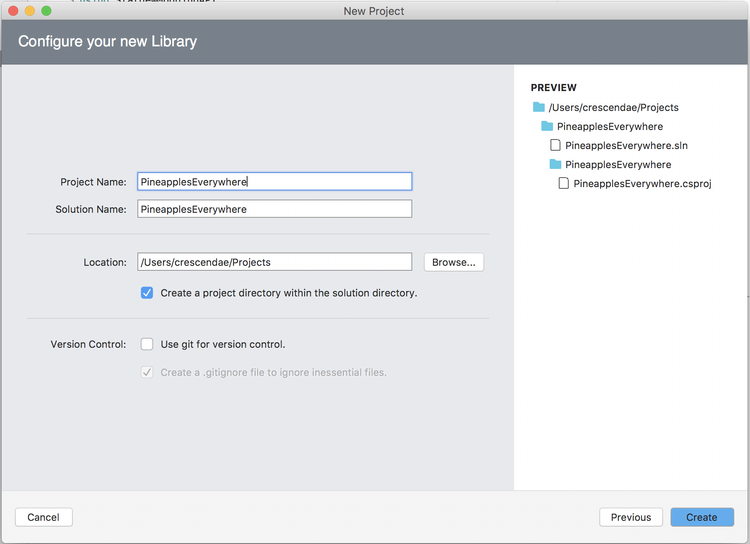
| − | + | # Make sure "create a project directory within the solution directory" is checked, and click ''Create'':<br />[[File:Modding - IDE reference - create project (MonoDevelop 4).png]] | |
| − | |||
| − | |||
| − | |||
| − | |||
| − | + | ===MacOS (Visual Studio 2019 for Mac)=== | |
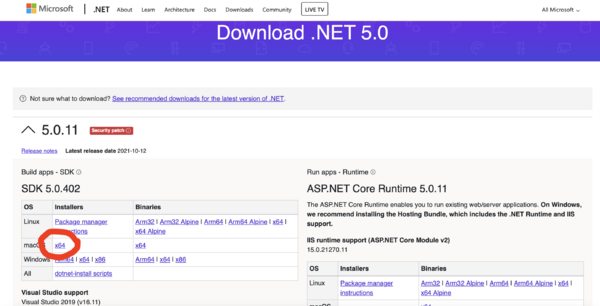
| − | + | # Install the .NET 5.0 SDK if you haven't already (link: [https://dotnet.microsoft.com/en-us/download/dotnet/5.0]).<br />[[File:1a NET website.png|600px]] | |
| − | + | # Open Visual Studio for Mac. | |
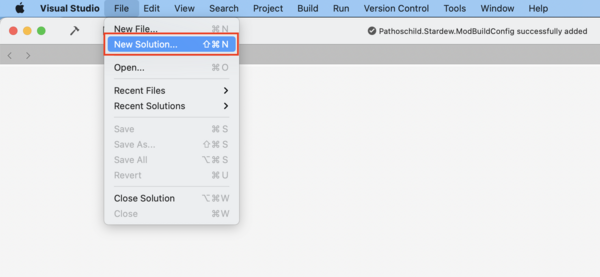
| − | + | # Click ''File » New Solution'' from the menu bar:<br />[[File:VS Mac 1 newsolution.png|600px]] | |
| − | + | # Select the correct type of class library:<br />[[File:VS Mac 2 createlibrary.png|600px]] | |
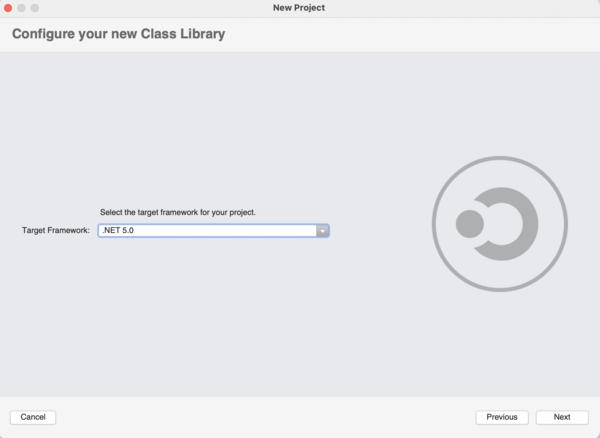
| − | + | # Set it to target '''.NET 5.0.''':<br />[[File:VS Mac 3 setframework.png|600px]] | |
| − | + | # Enter a descriptive mod name for the project. By convention, the name should be one word with mixed caps (like "PineapplesEverywhere"):<br />[[File:VS Mac 4 nameproject.png|600px]] | |
| − | |||
| − | |||
| − | |||
| − | |||
| − | ## | + | ===MacOS (Visual Studio for Mac)=== |
| − | < | + | # Open Visual Studio for Mac. |
| + | # Click ''File » New Solution'' from the menu bar:<br />[[File:Modding - IDE reference - create project (Visual Studio for Mac 1).png|200px]] | ||
| + | # In the 'New Project' window, choose ''.NET » Library'' and click ''Next'':<br />[[File:Modding - IDE reference - create project (Visual Studio for Mac 2).png|750px]] | ||
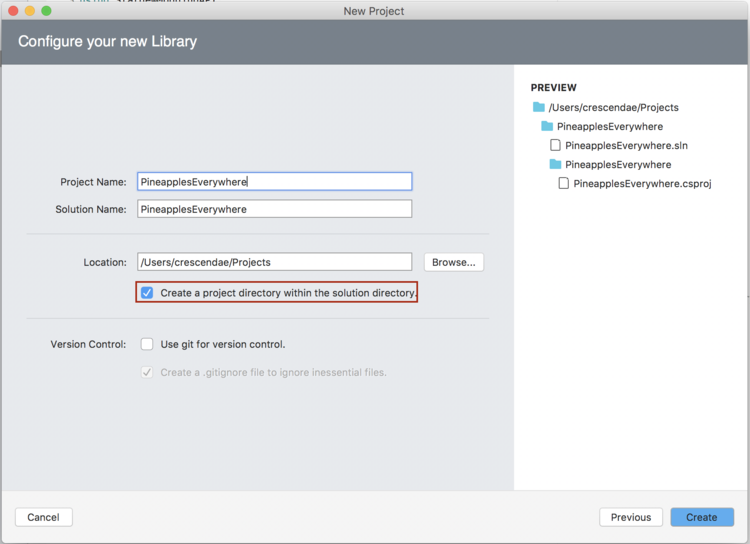
| + | # Enter a descriptive mod name. By convention, the name should be one word with mixed caps (like "PineapplesEverywhere"):<br />[[File:Modding - IDE reference - create project (Visual Studio for Mac 3).png|750px]] | ||
| + | # Make sure "create a project directory within the solution directory" is checked, and click ''Create'':<br />[[File:Modding - IDE reference - create project (Visual Studio for Mac 4).png|750px]] | ||
| − | The 'target framework' is the version of .NET | + | ==Set the target framework== |
| − | needed to run your mod. The recommended target framework is .NET | + | <span id="set-target-framework"></span> |
| − | version SMAPI itself targets. | + | The 'target framework' is the version of .NET your code uses, which affects the version needed to run your mod. The recommended target framework is .NET 5.0, which is the version SMAPI itself targets. '''Please find the subsection below for your OS''' (Windows/Mac). '''You cannot use .NET 6.0'''. |
| − | + | (yes, we know .NET 5.0 is past EOL.) | |
| − | + | ===In Windows Visual Studio 2019/2022=== | |
| − | + | '''NOTE: Visual Studio 2017 MAY no longer be compatible with creating mods!''' If you followed [[Modding:Modder_Guide/Get_Started]] and receive errors, from the code that page instructed be copy and pasted, with regards to helper. Events in the Entry(IModhelper helper) method and ButtonPressedEventArgs from the Entry(IModHelper helper) method, try the project-creation and code-copy/paste process again with Visual Studio 2019/2022 instead. | |
| − | |||
| − | |||
| − | |||
| − | |||
| − | |||
| − | |||
| − | |||
| − | |||
| − | + | # Open the Solution Explorer pane. If it's not visible, click ''View » Solution Explorer'' from the menu:<br />[[File:Modding - IDE reference - show solution pane (Visual Studio).png]] | |
| − | + | # From the Solution Explorer, right-click on the project and choose ''Properties'':<br />[[File:Modding - IDE reference - change target framework (Visual Studio 1).png]] | |
| − | + | # On the ''Application'' tab, change the ''Target Framework'' dropdown to ''.NET 5.0'':<br />[[File:Modding - IDE reference - change target framework (Visual Studio 2).png|800px]] | |
| − | + | # A dialogue may appear asking you to confirm the change. Click 'Yes' to confirm:<br />[[File:Modding - IDE reference - change target framework (Visual Studio 3).png]] | |
| − | |||
| − | |||
| − | |||
| − | + | ===In Visual Studio 2019 for Mac=== | |
| − | |||
| − | + | If you followed the instructions above to set up your project, your framework should already be set to .NET 5.0. However, if you picked the wrong class library or you just want to check, you can follow these steps to look at the .csproj file, which is basically equivalent to setting it manually. (If you're checking that it worked, don't replace the .csproj, just check it refers to .NET 5.0.) | |
| − | 1. Open the | + | Unfortunately there doesn't appear to be a way to change the target framework using the GUI. However, it is very easy to follow the 1.5.5 migration guide steps: |
| − | + | # Open the .csproj file for editing:<br />[[File:VS Mac 7 editcsproj.png|600px]] | |
| − | + | # Replace your mod's <samp>.csproj</samp> file with this (where <code>EXAMLE_MOD_NAME</code> is your solution's name): | |
| − | + | <syntaxhighlight lang="xml"> | |
| − | + | <Project Sdk="Microsoft.NET.Sdk"> | |
| − | + | <PropertyGroup> | |
| − | + | <AssemblyName>EXAMPLE_MOD_NAME</AssemblyName> | |
| − | + | <RootNamespace>EXAMPLE_MOD_NAME</RootNamespace> | |
| − | + | <Version>1.0.0</Version> | |
| + | <TargetFramework>net5.0</TargetFramework> | ||
| + | </PropertyGroup> | ||
| − | + | <ItemGroup> | |
| + | <PackageReference Include="Pathoschild.Stardew.ModBuildConfig" Version="4.0.0" /> | ||
| + | </ItemGroup> | ||
| + | </Project> | ||
| + | </syntaxhighlight> | ||
| − | + | # If the mod uses [[Modding:Modder Guide/APIs/Harmony|Harmony]], add <code><nowiki><EnableHarmony>true</EnableHarmony></nowiki></code> to the property group. | |
| − | |||
| − | |||
| − | |||
| − | |||
| − | |||
| − | |||
| − | |||
| − | |||
| − | + | ===In MonoDevelop/Visual Studio for Mac=== | |
| − | < | + | <p style="color:red;">'''This section is out of date for Stardew Valley 1.5.5. It appears you cannot change the .NET framework in this way with Visual Studio 2019 and Stardew Valley 1.5.5.'''</p> |
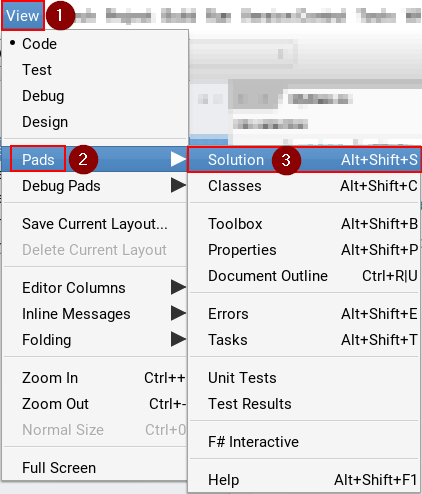
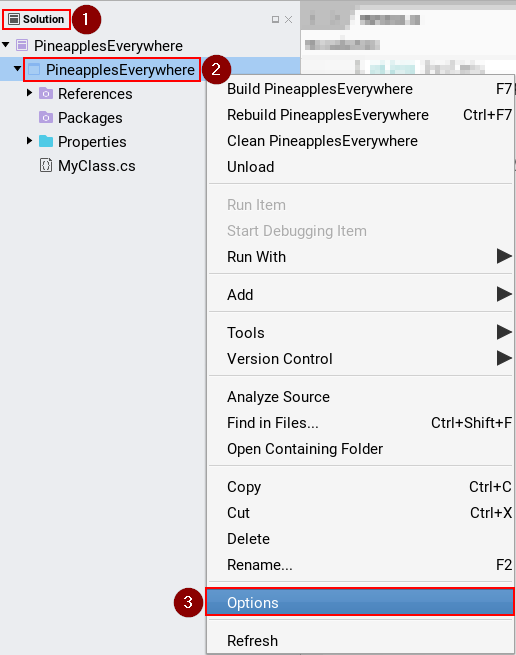
| − | ### | + | # Open the Solution pad. If it's not visible, click ''View » Pads » Solution'' from the menu:<br />[[File:Modding - IDE reference - show solution pane (MonoDevelop).png]] |
| + | # From the Solution pad, right-click on the project and choose ''Options'':<br />[[File:Modding - IDE reference - change target framework (MonoDevelop 1).png]] | ||
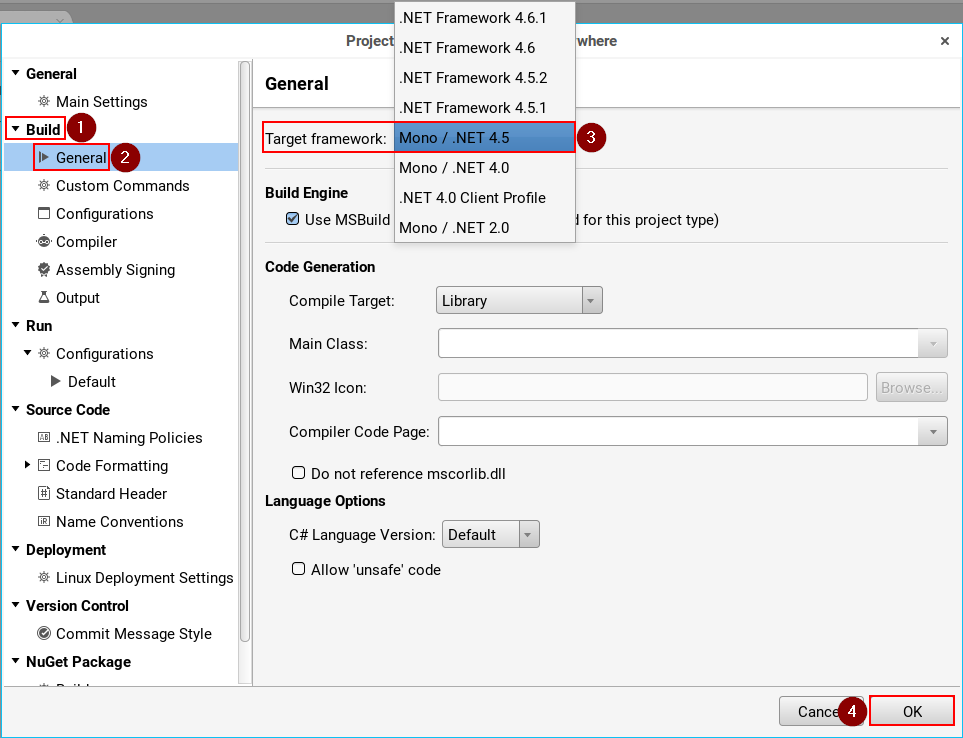
| + | # On the ''Build » General'' tab, change the ''Target Framework'' dropdown to ''Mono / .NET 4.5'':<br />[[File:Modding - IDE reference - change target framework (MonoDevelop 2).png]] | ||
| − | + | ==Add a file== | |
| − | + | <span id="add-file"></span> | |
| − | |||
| − | |||
| − | |||
| − | ### | + | ===In Visual Studio 2017=== |
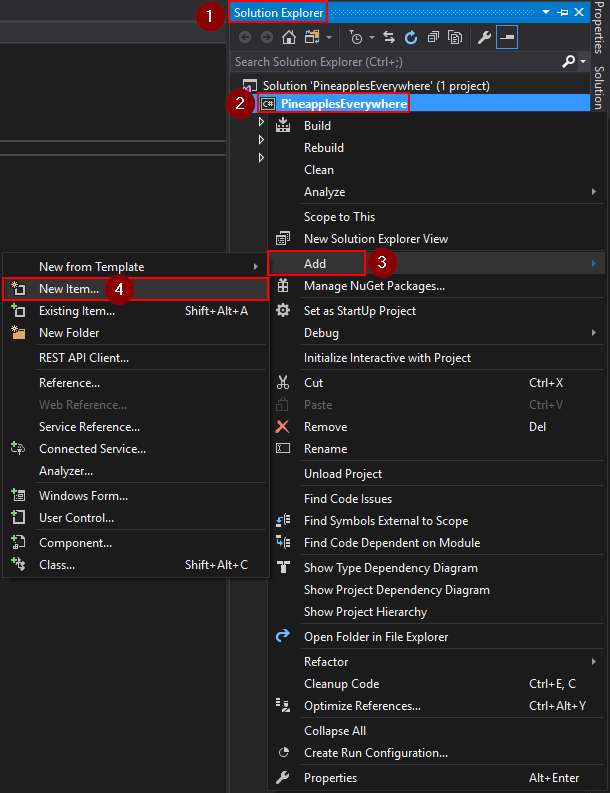
| + | # Open the Solution Explorer pane. If it's not visible, click ''View » Solution Explorer'' from the menu:<br />[[File:Modding - IDE reference - show solution pane (Visual Studio).png]] | ||
| + | # From the Solution Explorer pane, right-click on the project and choose ''Add » New Item'':<br />[[File:Modding - IDE reference - create file (Visual Studio 1).png]] | ||
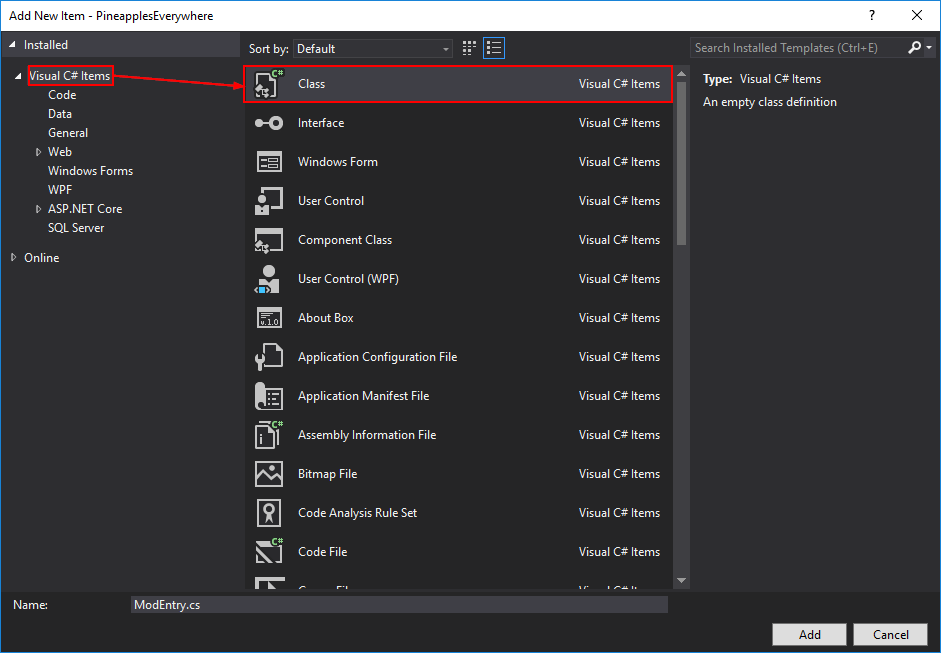
| + | # From the 'Add New Item' window, choose the file type (usually ''Visual C# Item » Class''):<br />[[File:Modding - IDE reference - create file (Visual Studio 2).png]] | ||
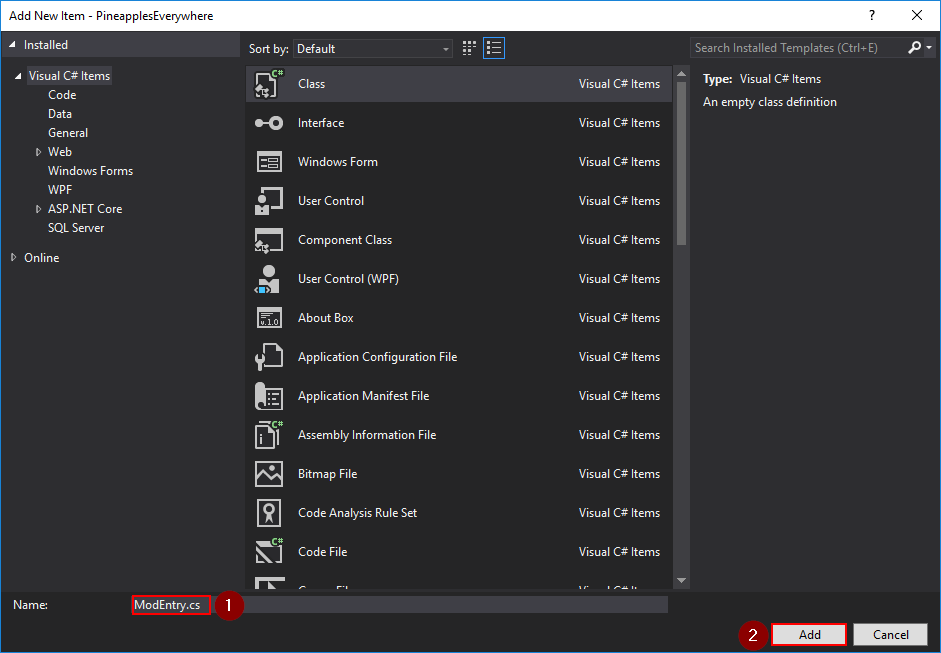
| + | # Enter a descriptive file name and click ''Add'':<br />[[File:Modding - IDE reference - create file (Visual Studio 3).png]] | ||
| − | + | ===In MonoDevelop/Visual Studio for Mac=== | |
| − | + | # Open the Solution pad. If it's not visible, click ''View » Pads » Solution'' from the menu:<br />[[File:Modding - IDE reference - show solution pane (MonoDevelop).png]] | |
| − | + | # From the Solution pad, right-click on the project to delete and choose ''Add » New File'':<br />[[File:Modding - IDE reference - create file (MonoDevelop 1).png]] | |
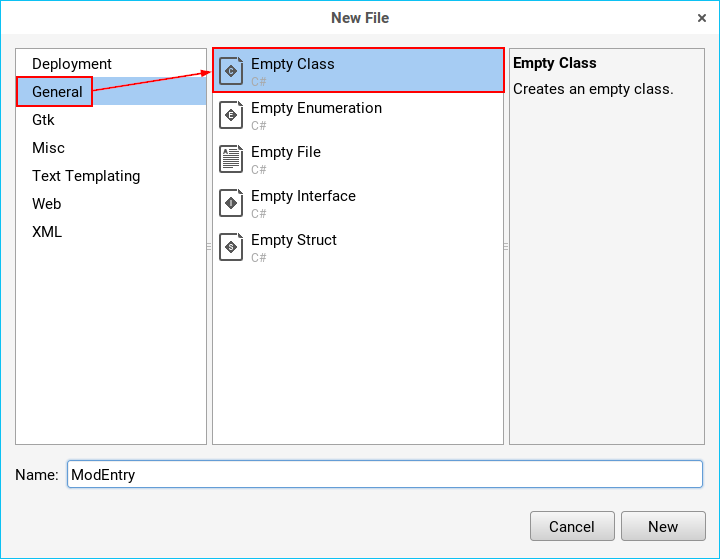
| − | + | # From the 'New File' window, choose the file type (usually ''General » Empty Class''):<br />[[File:Modding - IDE reference - create file (MonoDevelop 2).png]] | |
| − | + | # Enter a descriptive file name and click ''New'':<br />[[File:Modding - IDE reference - create file (MonoDevelop 3).png]] | |
| − | + | ==Delete a file== | |
| − | < | + | <span id="delete-file"></span> |
| − | ## | + | ===In Visual Studio 2017=== |
| + | # Open the Solution Explorer pane. If it's not visible, click ''View » Solution Explorer'' from the menu:<br />[[File:Modding - IDE reference - show solution pane (Visual Studio).png]] | ||
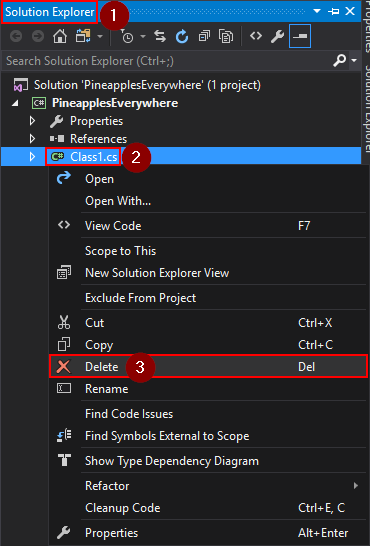
| + | # From the Solution Explorer pane, right-click on the file to delete and choose ''Delete'':<br />[[File:Modding - IDE reference - delete file (Visual Studio).png]] | ||
| − | + | ===In MonoDevelop/Visual Studio for Mac=== | |
| − | + | # Open the Solution pad. If it's not visible, click ''View » Pads » Solution'' from the menu:<br />[[File:Modding - IDE reference - show solution pane (MonoDevelop).png]] | |
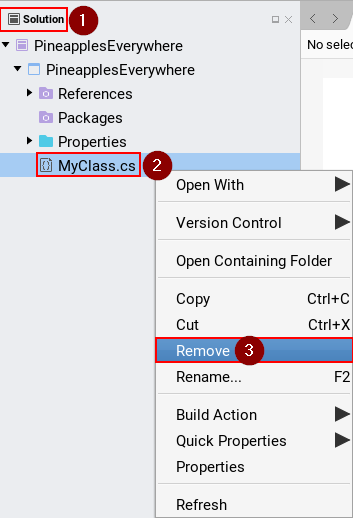
| − | + | # From the Solution pad, right-click on the file to delete and choose ''Remove'':<br />[[File:Modding - IDE reference - delete file (MonoDevelop).png]] | |
| − | |||
| − | |||
| − | |||
| − | |||
| − | |||
| − | + | ==Add a NuGet package== | |
| + | <span id="add-nuget"></span> | ||
| − | + | ===In Visual Studio 2019/2022=== | |
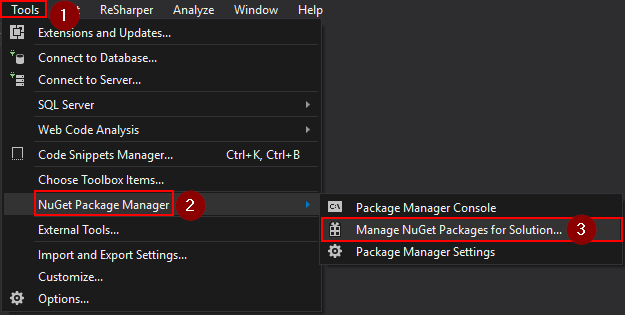
| − | + | # Click ''Tools » NuGet Package Manager » Manage NuGet Packages for Solution'' from the menu:<br />[[File:Modding - IDE reference - add NuGet package (Visual Studio 1).png]] | |
| − | + | # Note: if the nuget package manager is missing, you can add it as a package source with the following steps: https://stackoverflow.com/questions/37293242/nuget-package-manager-no-packages-found-even-though-the-package-exists | |
| − | + | # On the ''Browse'' tab, search for the package and click on the result to display some options:<br />[[File:Modding - IDE reference - add NuGet package (Visual Studio 2).png]] | |
| + | # In the options, check the box next to your project and click ''Install'':<br />[[File:Modding - IDE reference - add NuGet package (Visual Studio 3).png]] | ||
| + | # If a 'Review Changes' dialogue appears, click ''OK'':<br />[[File:Modding - IDE reference - add NuGet package (Visual Studio 4).png]] | ||
| − | # | + | ===In Visual Studio 2019 for Mac=== |
| − | < | + | # Click ''Project » Manage NuGet Packages...'' from the menu:<br />[[File:VS Mac 5 managenuget.png|600px]] |
| + | # Search for the package, click on the result, and click ''Add Package'':<br />[[File:VS Mac 6 addnuget.png|600px]] | ||
| + | # Quit and relaunch Visual Studio. | ||
| − | + | ===In MonoDevelop/Visual Studio for Mac=== | |
| − | + | # Click ''Project » Add NuGet Packages'' from the menu:<br />[[File:Modding - IDE reference - add NuGet package (MonoDevelop 1).png]] | |
| + | # Search for the package, click on the result, and click ''Add Package'':<br />[[File:Modding - IDE reference - add NuGet package (MonoDevelop 2).png]] | ||
| − | + | ==Edit project file (<samp>.csproj</samp>)== | |
| + | <span id="edit-project"></span> | ||
| − | + | Sometimes you may want to edit the project file directly (mainly to configure build steps). The project is a <samp>.csproj</samp> file, and can be edited from within the IDE. | |
| − | |||
| − | |||
| − | |||
| − | |||
| − | |||
| − | |||
| − | |||
| − | |||
| − | |||
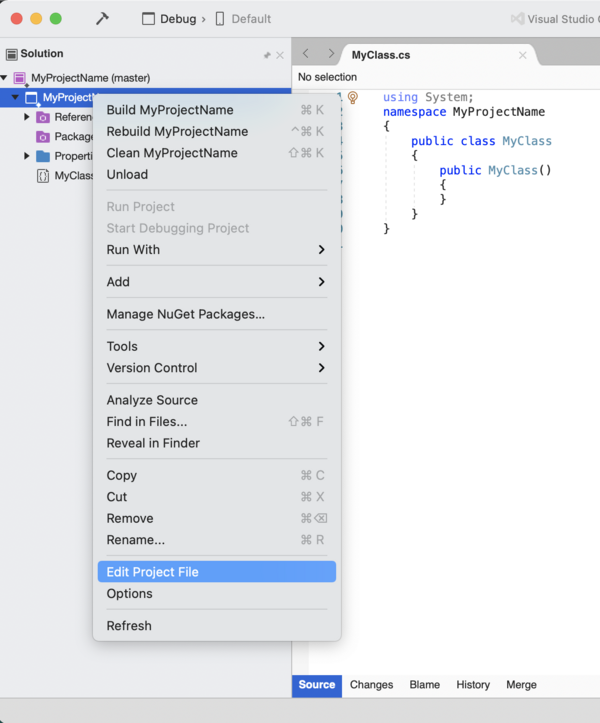
| − | ### | + | ===In Visual Studio 2017=== |
| + | # Open the Solution Explorer pane. If it's not visible, click ''View » Solution Explorer'' from the menu:<br />[[File:Modding - IDE reference - show solution pane (Visual Studio).png]] | ||
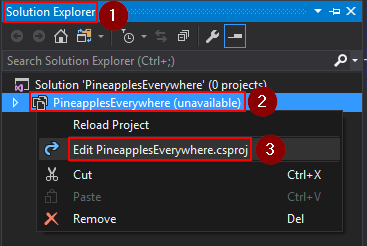
| + | # From the Solution Explorer pane, right-click on the project and choose ''Unload'':<br />[[File:Modding - IDE reference - edit project (Visual Studio 1).png]] | ||
| + | # Right-click on the project again and choose ''Edit <project name>.csproj'':<br />[[File:Modding - IDE reference - edit project (Visual Studio 2).png]] | ||
| + | # Make your changes in the editor that appears and save. | ||
| + | # When you're done, right-click on the project again and choose ''Reload Project'':<br />[[File:Modding - IDE reference - edit project (Visual Studio 3).png]] | ||
| − | + | ===In MonoDevelop/Visual Studio for Mac=== | |
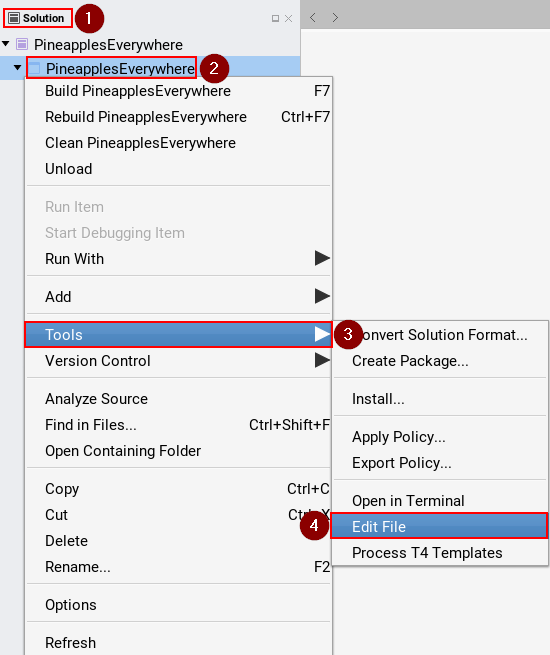
| − | + | # Open the Solution pad. If it's not visible, click ''View » Pads » Solution'' from the menu:<br />[[File:Modding - IDE reference - show solution pane (MonoDevelop).png]] | |
| − | + | # From the Solution pad, right-click on the project and choose ''Tools » Edit File'':<br />[[File:Modding - IDE reference - edit project (MonoDevelop).png]] | |
| − | + | # Make your changes in the editor that appears and save. | |
| − | |||
| − | |||
| − | + | ==Find compiled files== | |
| − | < | + | <span id="build-output"></span> |
| − | ## | + | ===In Visual Studio 2017=== |
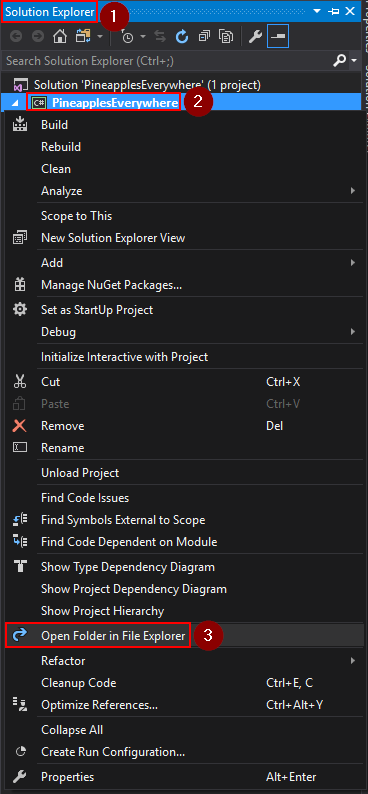
| + | # Open the Solution Explorer pane. If it's not visible, click ''View » Solution Explorer'' from the menu:<br />[[File:Modding - IDE reference - show solution pane (Visual Studio).png]] | ||
| + | # From the Solution Explorer pane, right-click on the project and choose ''Open Folder in File Explorer'':<br />[[File:Modding - IDE reference - view build output (Visual Studio).png]] | ||
| + | # Navigate to <samp>bin\Debug</samp> (or <samp>bin\Release</samp> if you switched to release build configuration). | ||
| − | + | ===In MonoDevelop/Visual Studio for Mac=== | |
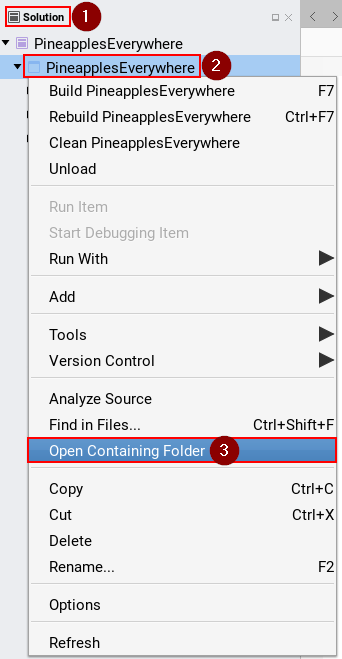
| − | + | # Open the Solution pad. If it's not visible, click ''View » Pads » Solution'' from the menu:<br />[[File:Modding - IDE reference - show solution pane (MonoDevelop).png]] | |
| − | + | # From the Solution pad, right-click on the project and choose ''Open Containing Folder'':<br />[[File:Modding - IDE reference - view build output (MonoDevelop).png]] | |
| − | + | # Navigate to <samp>bin/Debug</samp> (or <samp>bin/Release</samp> if you switched to release build configuration). | |
| − | |||
| − | |||
| − | + | ==Add a reference to another DLL== | |
| + | <span id="add-reference"></span> | ||
| − | + | ===In Visual Studio 2017=== | |
| − | + | # Open the Solution Explorer pane. If it's not visible, click ''View » Solution Explorer'' from the menu:<br />[[File:Modding - IDE reference - show solution pane (Visual Studio).png]] | |
| − | + | # From the Solution Explorer pane, right-click on ''References'' and choose ''Add Reference...'':<br />[[File:Modding - IDE reference - add reference (Visual Studio 1).png]] | |
| − | + | # From the 'Reference Manager' window, choose ''Browse'' in the left side, then click ''Browse..'' at the bottom:<br />[[File:Modding - IDE reference - add reference (Visual Studio 2).png]] | |
| − | + | # Find the DLL you want to reference, select it, and click ''Add'':<br />[[File:Modding - IDE reference - add reference (Visual Studio 3).png]] | |
| − | + | # From the 'Reference Manager' window, click ''OK'':<br />[[File:Modding - IDE reference - add reference (Visual Studio 4).png]] | |
| − | </ | ||
| − | [[Category:Modding | + | ===In Rider=== |
| + | When opening a project for the first time, you must add a reference to StardewModdingAPI.dll for code completion to work. | ||
| + | # In the Explorer panel, select the ''Solution'' view | ||
| + | # Under the project, right-click on ''Dependencies'' and choose ''Reference...'' | ||
| + | # In the Add Reference window, click ''Add From...'' at the bottom | ||
| + | # Find the DLL you want to reference, select it, and click ''OK'' | ||
| + | |||
| + | |||
| + | [[Category:Modding]] | ||
| + | |||
| + | [[es:Modding:Referencia IDE]] | ||
| + | [[ru:Модификации:Настройка среды разработки]] | ||
| + | [[zh:模组:IDE 参考]] | ||
Revision as of 04:13, 14 April 2024
This page is a quick reference for how to use Visual Studio 2017 or MonoDevelop/Visual Studio for Mac when creating or editing a SMAPI mod. See Modding:Modder Guide for the main guide.
Before you start
- You should install Visual Studio Community (Windows), MonoDevelop (Linux), or Visual Studio for Mac (Mac).
- Reviewing C# Fundamentals for Absolute Beginners is strongly recommended if you're new to programming C#.
- Here are some basic terms to remember:
term definition IDE The program used to edit, run, and compile your code (short for Integrated Development Environment). The main IDEs are Visual Studio on Windows, and MonoDevelop/Visual Studio for Mac on Linux/Mac. DLL The file with a .dll extension which contains your compiled code (short for Dynamic Link Library). This is the file that SMAPI reads when loading your mod. project A collection of source code + configuration + resources (like images) you edit in the IDE. Each project is compiled into its own DLL. solution A collection of projects with some global settings. The solution itself isn't compiled, but it enables some convenient features (like letting projects easily reference each other).
Create a mod project
Before you can write your mod code, you need to create a solution and project to contain it.
Windows (Visual Studio 2019/2022)
- Open Visual Studio 2019/2022.
- Click Create a new project from the start screen.
- Filter by "C#" and "Library", then choose Class Library and click Next. Make sure you don't choose Class Library (.NET Framework) which won't work.
- In the configure your new project window:
- Enter a descriptive mod name. By convention, the name should be one word with mixed caps (like "PineapplesEverywhere").
- Make sure "Place solution and project in the same directory" is not checked.
- Click "Create" to to create the project.
- Next, select NET 6.0 and click "Create" to create the project. For VS 2022, this will be on the next page.
.png)
.png)
.png)

Linux (MonoDevelop)
- Open MonoDevelop.
- Click File » New Solution from the menu bar:
- In the 'New Project' window, choose .NET » Library and click Next:
- Enter a descriptive mod name. By convention, the name should be one word with mixed caps (like "PineapplesEverywhere"):
- Make sure "create a project directory within the solution directory" is checked, and click Create:
.png)
.png)
.png)
.png)
MacOS (Visual Studio 2019 for Mac)
- Install the .NET 5.0 SDK if you haven't already (link: [1]).
- Open Visual Studio for Mac.
- Click File » New Solution from the menu bar:
- Select the correct type of class library:
- Set it to target .NET 5.0.:
- Enter a descriptive mod name for the project. By convention, the name should be one word with mixed caps (like "PineapplesEverywhere"):


MacOS (Visual Studio for Mac)
- Open Visual Studio for Mac.
- Click File » New Solution from the menu bar:
- In the 'New Project' window, choose .NET » Library and click Next:
- Enter a descriptive mod name. By convention, the name should be one word with mixed caps (like "PineapplesEverywhere"):
- Make sure "create a project directory within the solution directory" is checked, and click Create:
.png)
.png)
.png)
.png)
Set the target framework
The 'target framework' is the version of .NET your code uses, which affects the version needed to run your mod. The recommended target framework is .NET 5.0, which is the version SMAPI itself targets. Please find the subsection below for your OS (Windows/Mac). You cannot use .NET 6.0.
(yes, we know .NET 5.0 is past EOL.)
In Windows Visual Studio 2019/2022
NOTE: Visual Studio 2017 MAY no longer be compatible with creating mods! If you followed Modding:Modder_Guide/Get_Started and receive errors, from the code that page instructed be copy and pasted, with regards to helper. Events in the Entry(IModhelper helper) method and ButtonPressedEventArgs from the Entry(IModHelper helper) method, try the project-creation and code-copy/paste process again with Visual Studio 2019/2022 instead.
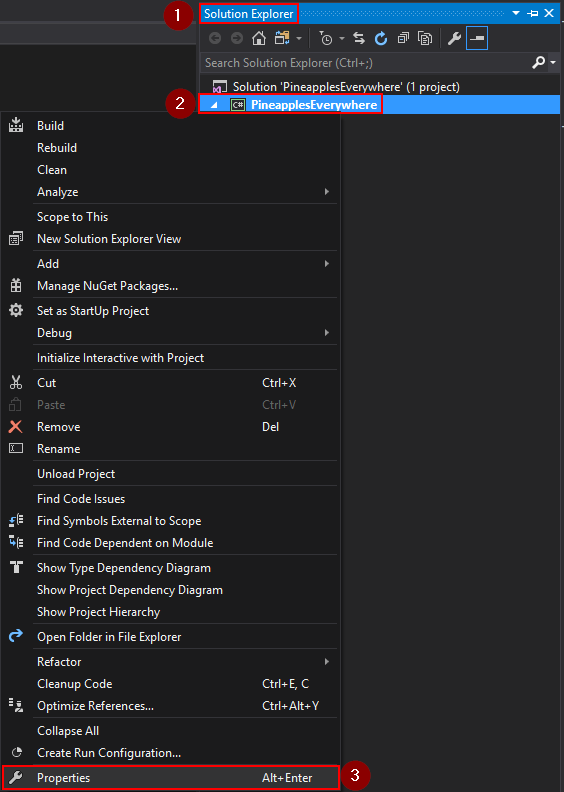
- Open the Solution Explorer pane. If it's not visible, click View » Solution Explorer from the menu:

- From the Solution Explorer, right-click on the project and choose Properties:
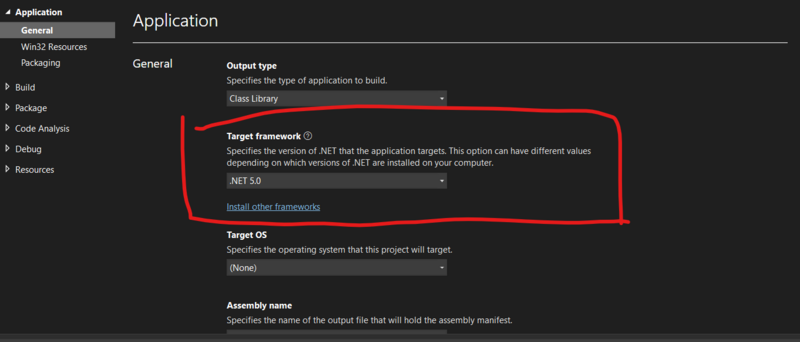
- On the Application tab, change the Target Framework dropdown to .NET 5.0:
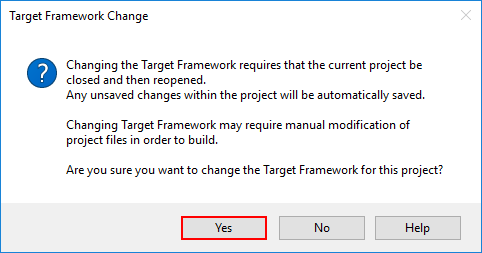
- A dialogue may appear asking you to confirm the change. Click 'Yes' to confirm:
.png)
.png)
.png)
.png)
In Visual Studio 2019 for Mac
If you followed the instructions above to set up your project, your framework should already be set to .NET 5.0. However, if you picked the wrong class library or you just want to check, you can follow these steps to look at the .csproj file, which is basically equivalent to setting it manually. (If you're checking that it worked, don't replace the .csproj, just check it refers to .NET 5.0.)
Unfortunately there doesn't appear to be a way to change the target framework using the GUI. However, it is very easy to follow the 1.5.5 migration guide steps:
- Open the .csproj file for editing:
- Replace your mod's .csproj file with this (where
EXAMLE_MOD_NAMEis your solution's name):

<Project Sdk="Microsoft.NET.Sdk">
  <PropertyGroup>
    <AssemblyName>EXAMPLE_MOD_NAME</AssemblyName>
    <RootNamespace>EXAMPLE_MOD_NAME</RootNamespace>
    <Version>1.0.0</Version>
    <TargetFramework>net5.0</TargetFramework>
  </PropertyGroup>

  <ItemGroup>
    <PackageReference Include="Pathoschild.Stardew.ModBuildConfig" Version="4.0.0" />
  </ItemGroup>
</Project>
- If the mod uses Harmony, add
<EnableHarmony>true</EnableHarmony>to the property group.
In MonoDevelop/Visual Studio for Mac
This section is out of date for Stardew Valley 1.5.5. It appears you cannot change the .NET framework in this way with Visual Studio 2019 and Stardew Valley 1.5.5.
- Open the Solution pad. If it's not visible, click View » Pads » Solution from the menu:
- From the Solution pad, right-click on the project and choose Options:
- On the Build » General tab, change the Target Framework dropdown to Mono / .NET 4.5:
.png)
.png)
.png)
Add a file
In Visual Studio 2017
- Open the Solution Explorer pane. If it's not visible, click View » Solution Explorer from the menu:
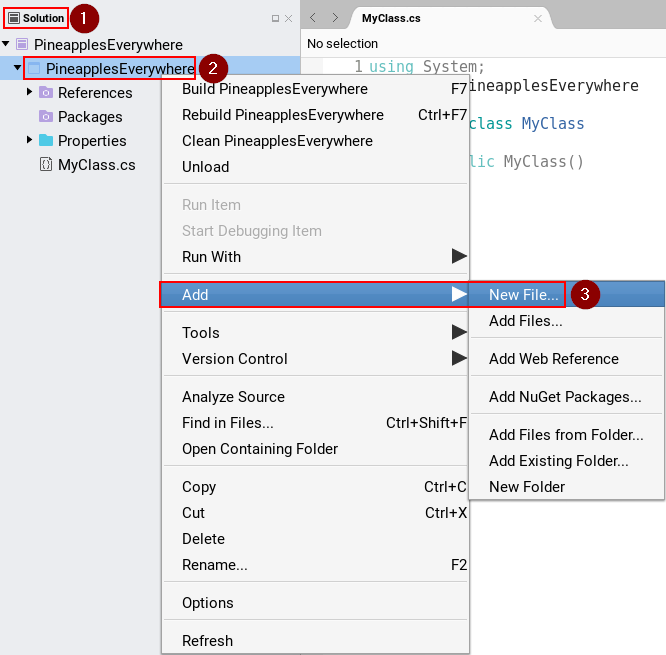
- From the Solution Explorer pane, right-click on the project and choose Add » New Item:
- From the 'Add New Item' window, choose the file type (usually Visual C# Item » Class):
- Enter a descriptive file name and click Add:
.png)
.png)
.png)
In MonoDevelop/Visual Studio for Mac
- Open the Solution pad. If it's not visible, click View » Pads » Solution from the menu:
- From the Solution pad, right-click on the project to delete and choose Add » New File:
- From the 'New File' window, choose the file type (usually General » Empty Class):
- Enter a descriptive file name and click New:

.png)
.png)
.png)
Delete a file
In Visual Studio 2017
- Open the Solution Explorer pane. If it's not visible, click View » Solution Explorer from the menu:
- From the Solution Explorer pane, right-click on the file to delete and choose Delete:
.png)
In MonoDevelop/Visual Studio for Mac
- Open the Solution pad. If it's not visible, click View » Pads » Solution from the menu:
- From the Solution pad, right-click on the file to delete and choose Remove:
.png)
Add a NuGet package
In Visual Studio 2019/2022
- Click Tools » NuGet Package Manager » Manage NuGet Packages for Solution from the menu:
- Note: if the nuget package manager is missing, you can add it as a package source with the following steps: https://stackoverflow.com/questions/37293242/nuget-package-manager-no-packages-found-even-though-the-package-exists
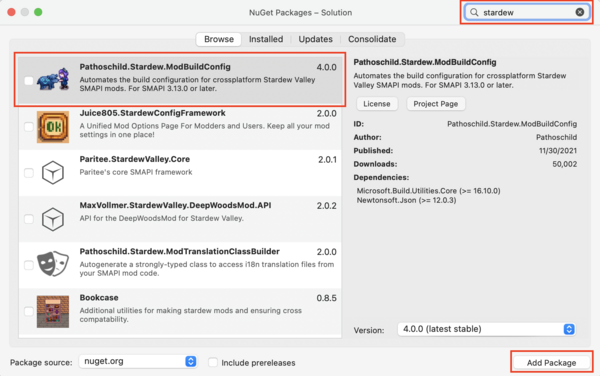
- On the Browse tab, search for the package and click on the result to display some options:
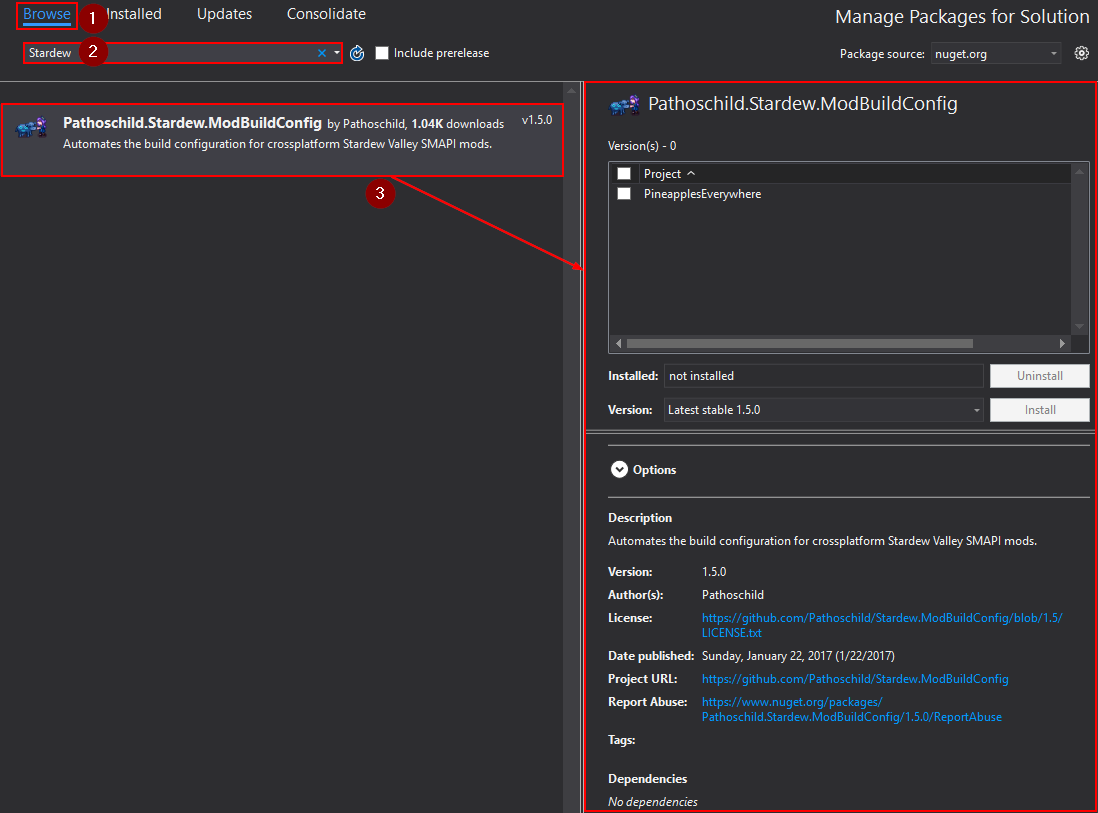
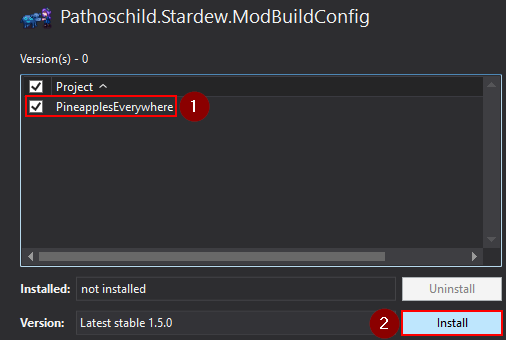
- In the options, check the box next to your project and click Install:
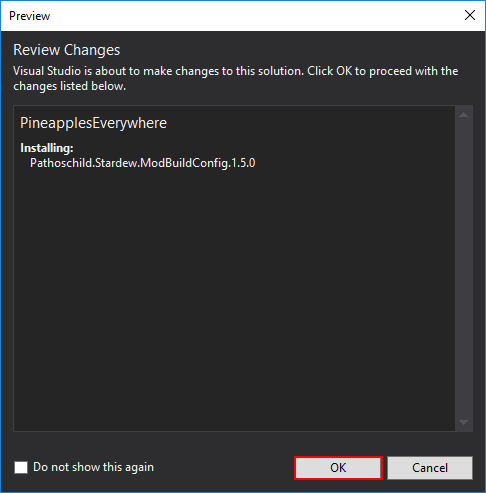
- If a 'Review Changes' dialogue appears, click OK:
.png)
.png)
.png)
.png)
In Visual Studio 2019 for Mac
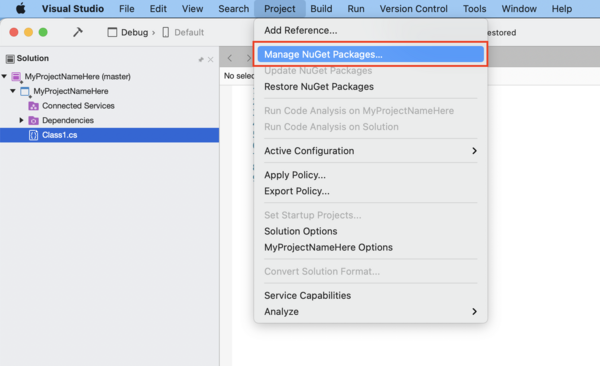
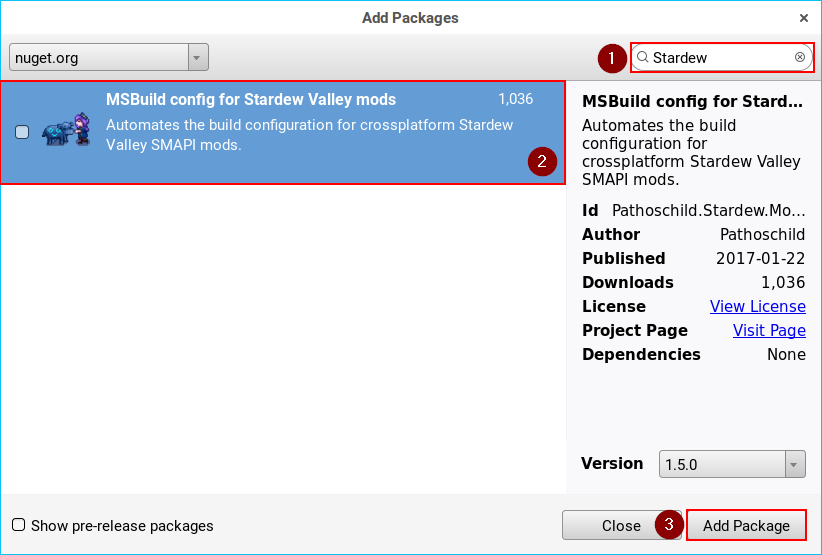
- Click Project » Manage NuGet Packages... from the menu:
- Search for the package, click on the result, and click Add Package:
- Quit and relaunch Visual Studio.


In MonoDevelop/Visual Studio for Mac
- Click Project » Add NuGet Packages from the menu:
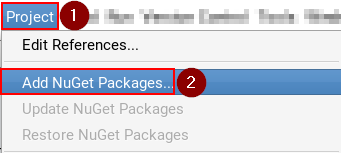
- Search for the package, click on the result, and click Add Package:
.png)
.png)
Edit project file (.csproj)
Sometimes you may want to edit the project file directly (mainly to configure build steps). The project is a .csproj file, and can be edited from within the IDE.
In Visual Studio 2017
- Open the Solution Explorer pane. If it's not visible, click View » Solution Explorer from the menu:
- From the Solution Explorer pane, right-click on the project and choose Unload:
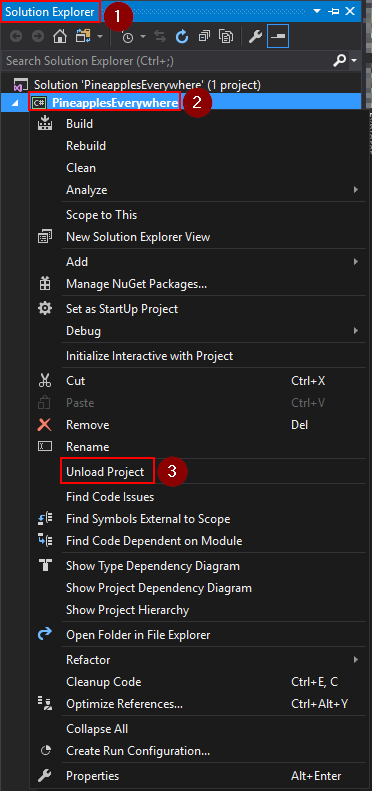
- Right-click on the project again and choose Edit <project name>.csproj:
- Make your changes in the editor that appears and save.
- When you're done, right-click on the project again and choose Reload Project:

.png)
.png)
.png)
In MonoDevelop/Visual Studio for Mac
- Open the Solution pad. If it's not visible, click View » Pads » Solution from the menu:
- From the Solution pad, right-click on the project and choose Tools » Edit File:
- Make your changes in the editor that appears and save.
.png)
Find compiled files
In Visual Studio 2017
- Open the Solution Explorer pane. If it's not visible, click View » Solution Explorer from the menu:
- From the Solution Explorer pane, right-click on the project and choose Open Folder in File Explorer:
- Navigate to bin\Debug (or bin\Release if you switched to release build configuration).
.png)
In MonoDevelop/Visual Studio for Mac
- Open the Solution pad. If it's not visible, click View » Pads » Solution from the menu:
- From the Solution pad, right-click on the project and choose Open Containing Folder:
- Navigate to bin/Debug (or bin/Release if you switched to release build configuration).
.png)
Add a reference to another DLL
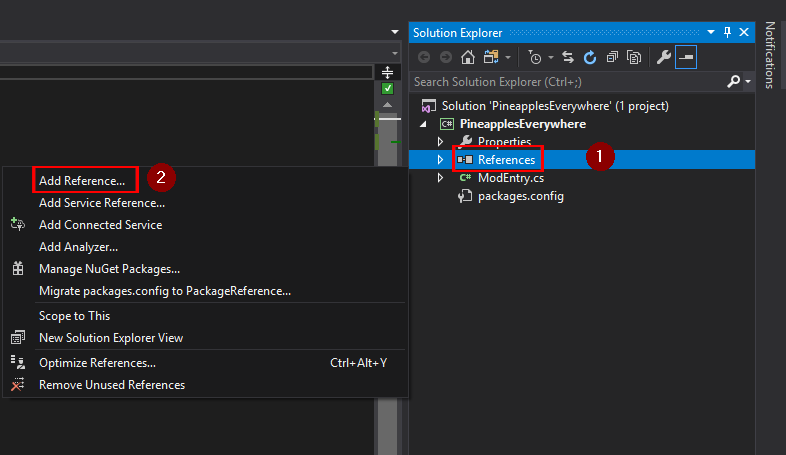
In Visual Studio 2017
- Open the Solution Explorer pane. If it's not visible, click View » Solution Explorer from the menu:
- From the Solution Explorer pane, right-click on References and choose Add Reference...:
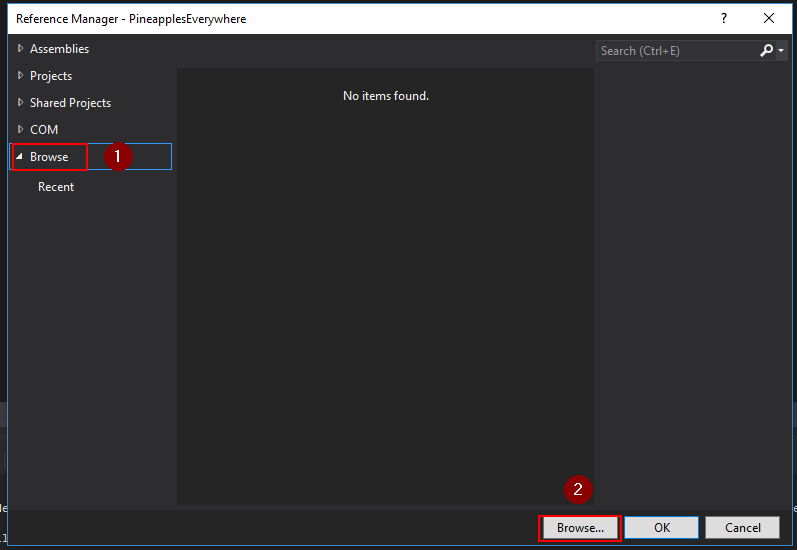
- From the 'Reference Manager' window, choose Browse in the left side, then click Browse.. at the bottom:
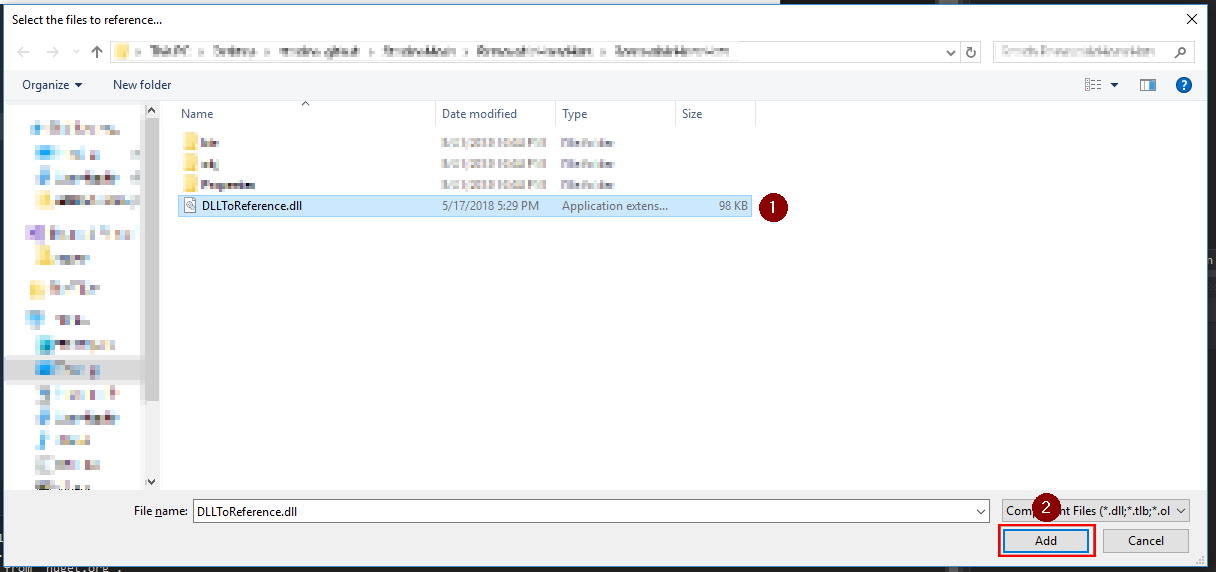
- Find the DLL you want to reference, select it, and click Add:
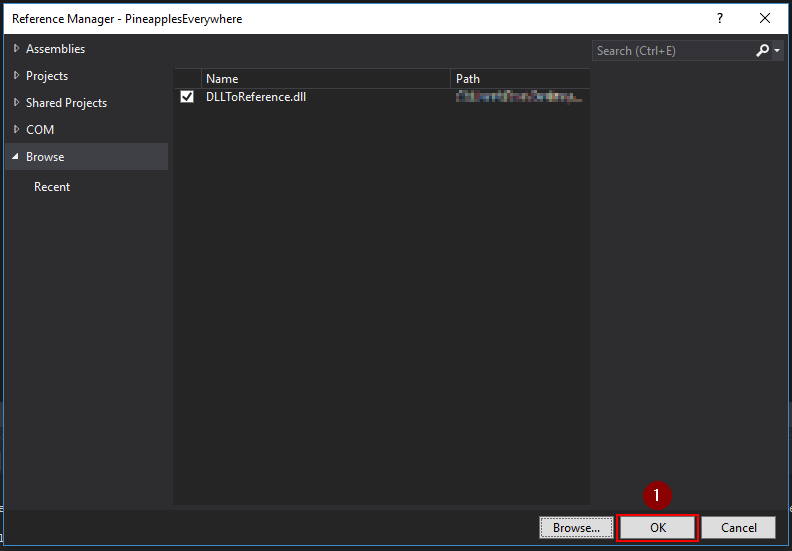
- From the 'Reference Manager' window, click OK:
.png)
.png)
.png)
.png)
In Rider
When opening a project for the first time, you must add a reference to StardewModdingAPI.dll for code completion to work.
- In the Explorer panel, select the Solution view
- Under the project, right-click on Dependencies and choose Reference...
- In the Add Reference window, click Add From... at the bottom
- Find the DLL you want to reference, select it, and click OK