Difference between revisions of "Fruit Trees"
Jump to navigation
Jump to search
(Added stamina and health information from data files) |
|||
| Line 59: | Line 59: | ||
{{health|27}} | {{health|27}} | ||
|} | |} | ||
| − | | rowspan=2 style="width:120px;"| | + | | rowspan=2 style="text-align:left;width:120px;"| |
{| | {| | ||
|- | |- | ||
| − | |{{name|Fruit Salad}} | + | |{{name|Artisan Bundle}}<br>{{name|Fruit Salad}} |
|} | |} | ||
| Line 95: | Line 95: | ||
!Profit | !Profit | ||
!Restores | !Restores | ||
| + | !Used In | ||
|- | |- | ||
| Line 119: | Line 120: | ||
{{energy|68}} | {{energy|68}} | ||
{{health|27}} | {{health|27}} | ||
| + | |} | ||
| + | | rowspan=2 style="text-align:left;width:120px;"| | ||
| + | {| | ||
| + | |- | ||
| + | |{{name|Artisan Bundle}} | ||
|} | |} | ||
|} | |} | ||
| Line 153: | Line 159: | ||
!Profit | !Profit | ||
!Restores | !Restores | ||
| + | !Used In | ||
|- | |- | ||
| Line 178: | Line 185: | ||
{{health|27}} | {{health|27}} | ||
|} | |} | ||
| − | + | | rowspan=2 style="text-align:left;width:120px;"| | |
| + | {| | ||
| + | |- | ||
| + | |{{name|Artisan Bundle}} | ||
| + | |} | ||
|} | |} | ||
| Line 209: | Line 220: | ||
!Profit | !Profit | ||
!Restores | !Restores | ||
| + | !Used In | ||
|- | |- | ||
| Line 234: | Line 246: | ||
{{health|27}} | {{health|27}} | ||
|} | |} | ||
| − | + | | rowspan=2 style="text-align:left;width:120px;"| | |
| + | {| | ||
| + | |- | ||
| + | |{{name|Artisan Bundle}} | ||
| + | |} | ||
|} | |} | ||
| Line 294: | Line 310: | ||
{{health|27}} | {{health|27}} | ||
|} | |} | ||
| − | | rowspan=2 style="width:120px;"| | + | | rowspan=2 style="text-align:left;width:120px;"| |
{| | {| | ||
|- | |- | ||
| − | |{{name|Cranberry Candy}} | + | |{{name|Artisan Bundle}}<br>{{name|Cranberry Candy}}<br>{{name|Fodder Bundle}} |
|} | |} | ||
| Line 330: | Line 346: | ||
!Profit | !Profit | ||
!Restores | !Restores | ||
| + | !Used In | ||
|- | |- | ||
| Line 354: | Line 371: | ||
{{energy|68}} | {{energy|68}} | ||
{{health|27}} | {{health|27}} | ||
| + | |} | ||
| + | | rowspan=2 style="text-align:left;width:120px;"| | ||
| + | {| | ||
| + | |- | ||
| + | |{{name|Artisan Bundle}}<br>{{name|Enchanter's Bundle}} | ||
|} | |} | ||
|} | |} | ||
[[Category:Content]] | [[Category:Content]] | ||
Revision as of 11:27, 7 March 2016
Fruit trees take 28 days to mature. After that, they produce one fruit a day when in season.
Fruit trees require to be in the center of a 3x3 empty tile square.
Spring
Only harvestable in Spring.
 Apricot
|
|
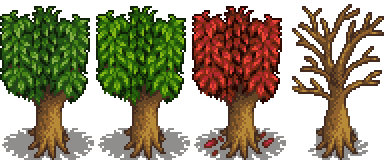
Stage 1 | Stage 2 | Stage 3 | Stage 4 | Harvest |
|---|---|---|---|---|---|
 |
 |
 |
 |
 | |
| 1 Day | ? Day | ? Day | ? Day | Total: 28 Days |
| Profit | Restores | Used In | ||||||||||
|---|---|---|---|---|---|---|---|---|---|---|---|---|
|
|
|
 Cherry
|
|
Stage 1 | Stage 2 | Stage 3 | Stage 4 | Harvest |
|---|---|---|---|---|---|
 |
 |
 |
 |
 | |
| 1 Day | ? Day | ? Day | ? Day | Total: 28 Days |
| Profit | Restores | Used In | ||||||||||
|---|---|---|---|---|---|---|---|---|---|---|---|---|
|
|
|
Summer
Only harvestable in Summer.
 Orange
|
|
Stage 1 | Stage 2 | Stage 3 | Stage 4 | Harvest |
|---|---|---|---|---|---|
 |
 |
 |
 |
 | |
| ? Day | ? Day | ? Day | ? Day | Total: 28 Days |
| Profit | Restores | Used In | ||||||||||
|---|---|---|---|---|---|---|---|---|---|---|---|---|
|
|
|
 Peach
Peach
|
|
Stage 1 | Stage 2 | Stage 3 | Stage 4 | Harvest |
|---|---|---|---|---|---|
 |
 |
 |
 |
 | |
| ? Day | ? Day | ? Day | ? Day | Total: 28 Days |
| Profit | Restores | Used In | ||||||||||
|---|---|---|---|---|---|---|---|---|---|---|---|---|
|
|
|
Fall
Only harvestable in Fall.
 Apple
Apple
|
|
Stage 1 | Stage 2 | Stage 3 | Stage 4 | Harvest |
|---|---|---|---|---|---|
 |
 |
 |
 |
 | |
| 1 Day | ? Day | ? Day | ? Day | Total: 28 Days |
| Profit | Restores | Used In | ||||||||||
|---|---|---|---|---|---|---|---|---|---|---|---|---|
|
|
|
 Pomegranate
|
|
Stage 1 | Stage 2 | Stage 3 | Stage 4 | Harvest |
|---|---|---|---|---|---|
 |
 |
 |
 |
 | |
| ? Day | ? Day | ? Day | ? Day | Total: ? Days |
| Profit | Restores | Used In | ||||||||||
|---|---|---|---|---|---|---|---|---|---|---|---|---|
|
|
|