Getting Started

|
Under Construction This article or section is under construction. It may be in the process of an expansion or major restructuring. Last edited by MaximoTG98 on 2016-03-03 18:51:35. |
Welcome to Stardew Valley! This guide should help familiarize you with the game's mechanics and interface, and aid you as you adjust to life on the farm.
Character Creation
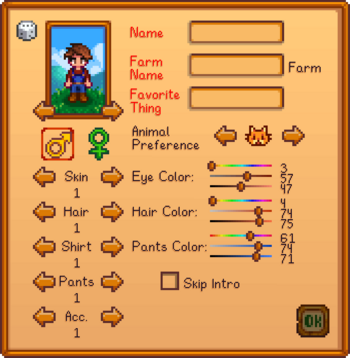
At the Character Creation screen you can choose your name, gender, the name of your farm, your preferred pet and your appearance. Later on, if you're unhappy with your basic appearance (skin tone, shirt, pants, cannot change gender), or just want a new shirt, try giving gifts to the Wizard. He has a secret room below his tower that can transform your look for 500g.
- There are 24 skin tones, 32 hair styles, 112 shirts and 20 accessories to choose from.
- The sliders next to Eye Color, Hair Color and Pants Color represent hue, saturation and lightness.
- The pet you choose here determines which pet you have on your farm.
- The gender you choose does not affect which villagers you can marry.
- Your Favorite Thing is sometimes referenced in-game. Example - Using the word "Butts" can lead to funny conversations with townsfolk, but you might want something less comical like "Discovery" or "Pizza".
Controls
All hotkeys can be reassigned by opening the menu and choosing the Options tab ![]()
| Key | Description |
| W A S D | W moves the character up, A moves left, S moves down, D moves right |
| Left Click, C | Use tool |
| Right Click, X | Check/Do Action |
| Escape, E | Open Menu - Setting this to Tab is recommended |
| F | Open Journal |
| M | Open Map window |
| Left Shift | Walk (Auto Run is enabled by default) |
| 1-0, -, + | Inventory hotkeys or use middle mouse for a faster scroll |
Watch some TV and Have Fun
When you wake up on the first day after the intro be sure to check your television to the left. It has useful information such as weather forecasts for current and next day, fortune telling, general game tips (random times), and free cooking recipes(random times). Try checking it again just before bed as to make sure you get a good amount of viewing.
Now, the first thing you should know. You can do whatever you want. You will be given a rating at the start of year 3, but do not take this as a deadline and it is not the end to the game. You're encouraged to be productive, but above all else, have fun in what you choose to do. This game doesn't have to be a farming sim if you find yourself not enjoying that after trying it. Sure, farming is rewarding in terms of income, but you can fish, forage, mine, fight monsters (in the mines), raise livestock, make artisan goods, give gifts to neighbors, explore, buy furniture for your house, and complete help wanted ads from the town bulletin board. Figure out what you like doing and do it.
Tilling the Soil
Mayor Lewis has left a little housewarming gift to help you get settled into your new life -- 15 pouches of parsnip seeds!
6 Tips to help you along the way
Watch TV every morning
The reason : The Weather Forecast is straightforward, telling you what you can expect for the next day. While it's not immediately useful information, it can potentially change what you might want to do that day if you know it will be raining the next.
The Fortune Teller is another one that can seem unimportant, but can genuinely shape what you plan for the day is. How "lucky" the Fortune Teller says your day will be directly influences certain RNG events within the game. Two important ones for that are item quality and ore in the mines. Picking crops or doing similar activities on lucky days increases the likelihood of those items being higher quality, thus selling for more.
Queen of Sauce and Livin' Off The Land, can be incredibly important. Queen of Sauce will teach you a new cooking recipe once a week, which becomes more relevant once you have a kitchen to cook in. On the other hand, Livin' Off The Land has immediately relevant information, telling you things you would otherwise only be able to learn from the game's official wiki page—like which fish are only available to catch during a season and the location and time of day then can be found.
Go to bed
The reason : Let's just say I learned this the hard way so you don't have to. Staying up past 1 AM isn't much of a problem as long as you don't run entirely out of energy, but you will wake up with slightly less energy the next day. But once the clock strikes 2 AM, your Cinderella dress fades away as you hit the dirt and pass out on the ground, which is a whole lot worse than just going to sleep tired. You'll have less energy the next day and be charged for a percentage of your total gold for the expense of whoever dragged you home that night. Additionally, and I may be crazy and wrong about this as I couldn't find anyone else who mentioned it, but I'm pretty sure I once lost a whole day after passing out in the woods. Either way, it's not worth the risk. It's good to push your usable hours to the max, but make sure you can still get home in time for a real bed each night.
Fix the Bridge to the tide pools early
The reason : From the very start of the game, there's a broken plank across the river on the right side of the beach that requires 300 wood to fix. Now, 300 wood is a whole lot, especially early in the game when it may take you a full day or two of chopping trees to get that amount, but it's definitely worth it in the long run. Repairing the bridge gives you access to the tide pools, a small extension to the beach area without much to do. What it does have, however, is Sea Urchins and Coral lying on the ground. Sea Urchins and Coral, along with a few other things that occasionally show up, can be foraged from this area practically daily and sell for a surprising amount—which can make for an extremely helpful boost of gold in the early game. You make money slowly for your first few seasons, and the tide pools area offers a reliable (and, once opened, free) source of income. You won't miss the wood next season, and you will be thankful for the extra cash.
Plan ahead for Community Center bundles
The reason: I'm going to do my best not to spoil anything in this section, as the Community Center begins the game as a bit of a mystery. But pretty early on in the story, the Community Center begins giving you little quest-like challenges, asking you to assemble bundles of items in exchange for rewards. These can range from monster-drops and minerals to crops and fish, and even cold hard cash. While you don't start with every bundle visible, it doesn't take long to unlock a couple dozen of them, and that's when you should start planning ahead for completing each one—specifically when it comes to the crops bundles. A lot of the items these bundles ask for are seasons specific, and if you don't get them the first time around, you'll have to wait until the next game year. And from my experience so far, it could take anywhere from 30-45 hours of playing the game for spring to roll back around just so you can grow those high quality parsnips. It will pretty much be impossible not to miss some things, but check ahead and you might be able to complete a few bundles earlier than you otherwise would!
Build a Silo before a coop
The reason: Pretty early on in your farming career, you are given a quest to build a Chicken Coop. It will probably take a little while after getting the quest to complete it, but there's a big reason not to rush. You will absolutely want to build a Silo first, and maybe even before you are ready for the Coop at all. Chickens start out by producing one normal-sized egg per day, which sell for 25 gold each, but they require one piece of hay per day to eat which, if purchased from Marnie's store, costs 50 gold each. So if you buy a Coop and some chickens as soon as you can, you'll be losing money every day for a long time. That's where the Silo comes in, and why you want it before the chickens. Simply having a Silo on your farm makes it so whenever you use your sickle to cut down the wild fields of grass occupying your property, hay is automatically collected and put in the Silo. It essentially turns what is otherwise a nuisance into free money, so you should also wait to clear out the patches of grass around your field until you either have a Silo or just need the space. The quicker you are collecting hay, the better. There are lots more tricks you'll pick up as you play Stardew Valley, but these were the ones that jumped out to me as vital to a new player. We'll look forward to sending more tips your way as we continue to till the earth.
Activate "Always Show Tool Hit Location immediately"
The reason: I really like Stardew Valley, but the controls were incredibly confusing for me at first. It felt like I wasn't always watering/chopping/hoeing the square I was aiming at, and I couldn't figure out why. Then I discovered the "Always Show Tool Hit Location" option in the settings menu, which shows a red outline around the tile you are targeting, and immediately understood what was happening. If your mouse is pointed at one of the eight squares adjacent to your character, that's where you'll hit. But if it's farther away in any direction, you'll hit the square directly in front of the direction your character is facing. It doesn't behave as you'd expect if you are used to playing twin-stick shooters or Terraria, which follows your mouse more accurately. Initially I assumed that if my mouse was in the top-left corner of the screen, I would be aiming at the top-left block adjacent to my character. Activating "Always Show Tool Hit Location" was pretty much the only way I could tell where I was going wrong, and it goes a long way in teaching you how to more accurately control your farmer.


