Difference between revisions of "Barn"
Jump to navigation
Jump to search
(give build time) |
Margotbean (talk | contribs) (added borders between columns in infobox) |
||
| Line 2: | Line 2: | ||
{| | {| | ||
|- | |- | ||
| − | + | | | |
| − | |style="min-width:150px;text-align:center;"|'''Barn''' | + | |style="min-width:150px; text-align: center;"|'''Barn''' |
| − | |style="min-width:150px;text-align:center;"|'''Big Barn''' | + | |style="min-width:150px; text-align: center;"|'''Big Barn''' |
| − | |style="min-width:150px;text-align:center;"|'''Deluxe Barn''' | + | |style="min-width:150px; text-align: center;"|'''Deluxe Barn''' |
|- | |- | ||
| − | || | + | | |
| − | + | |style="text-align: center;"|[[File:Barn.png|96px]] | |
| − | + | |style="text-align: center;"|[[File:Big Barn.png|96px]] | |
| − | + | |style="text-align: center;"|[[File:Deluxe Barn.png|96px]] | |
|- | |- | ||
!id="infoboxsection" style="text-align:right;"|Upgrades From | !id="infoboxsection" style="text-align:right;"|Upgrades From | ||
| − | || | + | |style="border-right: 1px solid #8DCAF0;"|N/A |
| − | ||Barn | + | |style="border-right: 1px solid #8DCAF0;"|Barn |
| − | ||Big Barn | + | |style="border-right: 1px solid #8DCAF0;"|Big Barn |
|- | |- | ||
!id="infoboxsection" style="text-align:right;"|Building Cost | !id="infoboxsection" style="text-align:right;"|Building Cost | ||
| − | ||{{price|6000}} | + | |style="border-right: 1px solid #8DCAF0;"|{{price|6000}} |
| − | ||{{price|12000}} | + | |style="border-right: 1px solid #8DCAF0;"|{{price|12000}} |
| − | ||{{price|25000}} | + | |style="border-right: 1px solid #8DCAF0;"|{{price|25000}} |
|-style="vertical-align:top;" | |-style="vertical-align:top;" | ||
!id="infoboxsection" style="text-align:right;"|Building Materials | !id="infoboxsection" style="text-align:right;"|Building Materials | ||
| − | ||{{name|Wood|350}} | + | |style="border-right: 1px solid #8DCAF0;"|{{name|Wood|350}}{{name|Stone|150}} |
| − | {{name|Stone|150}} | + | |style="border-right: 1px solid #8DCAF0;"|{{name|Wood|450}}{{name|Stone|200}} |
| − | ||{{name|Wood|450}} | + | |style="border-right: 1px solid #8DCAF0;"|{{name|Wood|550}}{{name|Stone|300}} |
| − | {{name|Stone|200}} | ||
| − | ||{{name|Wood|550}} | ||
| − | {{name|Stone|300}} | ||
|- | |- | ||
!id="infoboxsection" style="text-align:right;"|Capacity | !id="infoboxsection" style="text-align:right;"|Capacity | ||
| − | ||4 | + | |style="border-right: 1px solid #8DCAF0;"|4 |
| − | ||8 | + | |style="border-right: 1px solid #8DCAF0;"|8 |
| − | ||12 | + | |style="border-right: 1px solid #8DCAF0;"|12 |
|-style="vertical-align:top;" | |-style="vertical-align:top;" | ||
!id="infoboxsection" style="text-align:right;"|Animals | !id="infoboxsection" style="text-align:right;"|Animals | ||
| − | || | + | |style="border-right: 1px solid #8DCAF0;"|[[File:White Cow.png|25px|link=Cow]] [[Cow]] |
| − | [[File:White Cow.png|25px|link=Cow]] [[Cow]] | + | |style="border-right: 1px solid #8DCAF0;"|[[File:White Cow.png|25px|link=Cow]] [[Cow]]{{name|Goat}} |
| − | || | + | |style="border-right: 1px solid #8DCAF0;"|[[File:White Cow.png|25px|link=Cow]] [[Cow]]{{name|Goat}}{{name|Sheep}}{{name|Pig}} |
| − | [[File:White Cow.png|25px|link=Cow]] [[Cow]] | ||
| − | {{name|Goat}} | ||
| − | || | ||
| − | [[File:White Cow.png|25px|link=Cow]] [[Cow]] | ||
| − | {{name|Goat}} | ||
| − | {{name|Sheep}} | ||
| − | {{name|Pig}} | ||
|- | |- | ||
!id="infoboxsection" style="text-align:right;"|Footprint | !id="infoboxsection" style="text-align:right;"|Footprint | ||
| − | ||[[File:Marker4x7.png]] | + | |style="border-right: 1px solid #8DCAF0;"|'''7x4'''<br />[[File:Marker4x7.png]] |
| − | ||[[File:Marker4x7.png]] | + | |style="border-right: 1px solid #8DCAF0;"|'''7x4'''<br />[[File:Marker4x7.png]] |
| − | ||[[File:Marker4x7.png]] | + | |style="border-right: 1px solid #8DCAF0;"|'''7x4'''<br />[[File:Marker4x7.png]] |
|-style="vertical-align:top;" | |-style="vertical-align:top;" | ||
!id="infoboxsection" style="text-align:right;"|Features | !id="infoboxsection" style="text-align:right;"|Features | ||
| − | || | + | |style="border-right: 1px solid #8DCAF0;"| |
* [[Hay Hopper]] | * [[Hay Hopper]] | ||
* Feeding Bench | * Feeding Bench | ||
| − | || | + | |style="border-right: 1px solid #8DCAF0;"| |
* [[Hay Hopper]] | * [[Hay Hopper]] | ||
* Feeding Bench | * Feeding Bench | ||
* Enables Pregnancy | * Enables Pregnancy | ||
| − | || | + | |style="border-right: 1px solid #8DCAF0;"| |
* [[Hay Hopper]] | * [[Hay Hopper]] | ||
* Feeding Bench | * Feeding Bench | ||
Revision as of 21:56, 28 April 2017
| Barn | Big Barn | Deluxe Barn | |

|

|

| |
| Upgrades From | N/A | Barn | Big Barn |
|---|---|---|---|
| Building Cost | |||
| Building Materials | |||
| Capacity | 4 | 8 | 12 |
| Animals | |||
| Footprint | 7x4
|
7x4
|
7x4
|
| Features |
|
|
|
The Barn is a type of farm building purchasable and upgradeable from Robin at the Carpenter's Shop. It takes three days to build.
The barn houses cows, goats, sheep, and pigs.
The total cost of a Deluxe Barn, built from scratch, is ![]() 43,000g
43,000g ![]() Wood (1350)
Wood (1350) ![]() Stone (650) (Or, if all wood and stone are bought from Robin,
Stone (650) (Or, if all wood and stone are bought from Robin, ![]() 69,500g).
69,500g).
Barn Animals may be stuck outside at night if the barn doors are closed. The conditions for this are not clear (see the Talk page). If an animal is stuck outside the barn at night, the next day his/her mood will be "grumpy." Animals stuck outside are also subject to Wild Animal Attacks.

Interior Images:
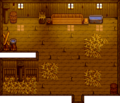
Barn Interior
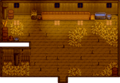
Big Barn Interior
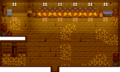
Deluxe Barn Interior


| Buildings | ||
|---|---|---|
| Merchants | Abandoned House • Adventurer's Guild • Blacksmith • Bookseller • Carpenter's Shop • Casino • Desert Trader • Fish Shop • Giant Stump • Harvey's Clinic • Ice Cream Stand • Island Trader • JojaMart • Marnie's Ranch • Oasis • Pierre's General Store • Qi's Walnut Room • The Stardrop Saloon • Traveling Cart • Volcano Dwarf • Wizard's Tower | |
| Houses | 1 River Road • 2 River Road • 1 Willow Lane • 2 Willow Lane • 24 Mountain Road • Elliott's Cabin • Farmhouse • Island Farmhouse • Leah's Cottage • Mayor's Manor • Tent • Trailer • Treehouse | |
| Farm Buildings | Farming | Barn • Cabin • Coop • Fish Pond • Greenhouse • Mill • Pet Bowl • Shed • Silo • Slime Hutch • Stable • Well |
| Special | Desert Obelisk • Earth Obelisk • Farm Obelisk • Gold Clock • Island Obelisk • Junimo Hut • Water Obelisk | |
| Other Buildings | Community Center • Dog Pen • Island Field Office • Joja Warehouse • Movie Theater • Museum • Spa • Witch's Hut | |