Difference between revisions of "Monsters"
Oath2order (talk | contribs) |
Eslachance (talk | contribs) (changed the table formats for readability (perhaps the wikitables class can be adjusted) so that the width isn't always so... tiny.) |
||
| Line 2: | Line 2: | ||
There are various monsters in the game, all of them encountered in the mines: | There are various monsters in the game, all of them encountered in the mines: | ||
| − | == Slimes == | + | == The Mines == |
| − | {|class=wikitable style="text-align:center;" | + | The following monsters are found in [[The Mines]] as you go down. |
| + | |||
| + | |||
| + | |||
| + | === Slimes === | ||
| + | {|class=wikitable style="text-align:center;width: auto; min-width: 0; display: table; max-width: 100%;" | ||
| rowspan=4 | | | rowspan=4 | | ||
<u>Female Ice Slime</u> <br> | <u>Female Ice Slime</u> <br> | ||
[[File:Blue Slime (female).png|link=]] | [[File:Blue Slime (female).png|link=]] | ||
| − | !HP | + | ! style="width:40px;" | HP |
| − | !Damage | + | ! style="width:40px;" | Damage |
| − | !Location | + | ! style="width:100px; | Location |
| − | !Drops | + | ! style="width: auto;" | Drops |
|- | |- | ||
|50? | |50? | ||
| Line 18: | Line 23: | ||
|- | |- | ||
|class=wikitable style="text-align:center;"| Behaviour: | |class=wikitable style="text-align:center;"| Behaviour: | ||
| − | | colspan="4 | + | | colspan="4"| They will jump at you from far distances |
|- | |- | ||
|class=wikitable style="text-align:center;"| Strategies: | |class=wikitable style="text-align:center;"| Strategies: | ||
| − | | colspan="4 | + | | colspan="4"| Simply hit them. |
|} | |} | ||
| − | {|class=wikitable style="text-align:center;" | + | {|class=wikitable style="text-align:center;width: auto; min-width: 0; display: table; max-width: 100%;" |
| rowspan=4 | | | rowspan=4 | | ||
<u>Male Ice Slime</u> <br> | <u>Male Ice Slime</u> <br> | ||
[[File:Blue Slime (male).png|link=]] | [[File:Blue Slime (male).png|link=]] | ||
| − | !HP | + | ! style="width:40px;" | HP |
| − | !Damage | + | ! style="width:40px;" | Damage |
| − | !Location | + | ! style="width:100px; | Location |
| − | !Drops | + | ! style="width: auto;" | Drops |
|- | |- | ||
|50? | |50? | ||
| Line 39: | Line 44: | ||
|- | |- | ||
|class=wikitable style="text-align:center;"| Behaviour: | |class=wikitable style="text-align:center;"| Behaviour: | ||
| − | | colspan="4 | + | | colspan="4"| They will jump at you from far distances |
|- | |- | ||
|class=wikitable style="text-align:center;"| Strategies: | |class=wikitable style="text-align:center;"| Strategies: | ||
| − | | colspan="4 | + | | colspan="4"| Simply hit them. |
|} | |} | ||
| − | {|class=wikitable style="text-align:center;" | + | {|class=wikitable style="text-align:center;width: auto; min-width: 0; display: table; max-width: 100%;" |
| rowspan=4 | | | rowspan=4 | | ||
<u>Green Slime</u> <br> | <u>Green Slime</u> <br> | ||
[[File:Green_Slime.png|link=]] | [[File:Green_Slime.png|link=]] | ||
| − | !HP | + | ! style="width:40px;" | HP |
| − | !Damage | + | ! style="width:40px;" | Damage |
| − | !Location | + | ! style="width:100px; | Location |
| − | !Drops | + | ! style="width: auto;" | Drops |
|- | |- | ||
|21-24? | |21-24? | ||
| Line 60: | Line 65: | ||
|- | |- | ||
|class=wikitable style="text-align:center;"| Behaviour: | |class=wikitable style="text-align:center;"| Behaviour: | ||
| − | | colspan="4 | + | | colspan="4"| They will jump at you from far distances |
| + | |- | ||
| + | |class=wikitable style="text-align:center;"| Strategies: | ||
| + | | colspan="4"| Simply hit them. | ||
| + | |} | ||
| + | |||
| + | === Flyers === | ||
| + | |||
| + | |||
| + | {|class=wikitable style="text-align:center;width: auto; min-width: 0; display: table; max-width: 100%;" | ||
| + | | rowspan=4 | | ||
| + | <u>Beetle</u> <br> | ||
| + | [[File:Beetle.jpg|link=]] | ||
| + | ! style="width:40px;" | HP | ||
| + | ! style="width:40px;" | Damage | ||
| + | ! style="width:100px; | Location | ||
| + | ! style="width: auto;" | Drops | ||
| + | |- | ||
| + | |0 | ||
| + | |0-0 | ||
| + | |Cave 1-29 | ||
| + | |[[Bug Meat]] | ||
| + | |- | ||
| + | |class=wikitable style="text-align:center;"| Behaviour: | ||
| + | | colspan="4"| Simply flying up and down or left and right in a fixed path | ||
|- | |- | ||
|class=wikitable style="text-align:center;"| Strategies: | |class=wikitable style="text-align:center;"| Strategies: | ||
| − | | colspan="4 | + | | colspan="4"| Simply hit them from the side. |
|} | |} | ||
| − | + | ||
| − | {|class=wikitable style="text-align:center;" | + | {|class=wikitable style="text-align:center;width: auto; min-width: 0; display: table; max-width: 100%;" |
| rowspan=4 | | | rowspan=4 | | ||
<u>Cave Fly</u> <br> | <u>Cave Fly</u> <br> | ||
[[File:Cave Fly.jpg|link=]] | [[File:Cave Fly.jpg|link=]] | ||
| − | !HP | + | ! style="width:40px;" | HP |
| − | !Damage | + | ! style="width:40px;" | Damage |
| − | !Location | + | ! style="width:100px; | Location |
| − | !Drops | + | ! style="width: auto;" | Drops |
|- | |- | ||
|0 | |0 | ||
| Line 82: | Line 111: | ||
|- | |- | ||
|class=wikitable style="text-align:center;"| Behaviour: | |class=wikitable style="text-align:center;"| Behaviour: | ||
| − | | colspan="4 | + | | colspan="4"| They will fly at you at high speeds and deal drive-by-damage. |
|- | |- | ||
|class=wikitable style="text-align:center;"| Strategies: | |class=wikitable style="text-align:center;"| Strategies: | ||
| − | | colspan="4 | + | | colspan="4"| Sword timing - Stand still and swing at them right before they would hit you. Use a weapon with high knockback to make it easier. |
|} | |} | ||
| − | == Crabs == | + | === Crabs === |
| − | {|class=wikitable style="text-align:center;" | + | {|class=wikitable style="text-align:center;width: auto; min-width: 0; display: table; max-width: 100%;" |
| rowspan=4 | | | rowspan=4 | | ||
<u>Stone Crab</u> <br> | <u>Stone Crab</u> <br> | ||
[[File:Stone Crab.png|link=]] | [[File:Stone Crab.png|link=]] | ||
| − | !HP | + | ! style="width:40px;" | HP |
| − | !Damage | + | ! style="width:40px;" | Damage |
| − | !Location | + | ! style="width:100px; | Location |
| − | !Drops | + | ! style="width: auto;" | Drops |
|- | |- | ||
|29-36 | |29-36 | ||
| Line 104: | Line 133: | ||
|- | |- | ||
|class=wikitable style="text-align:center;"| Behaviour: | |class=wikitable style="text-align:center;"| Behaviour: | ||
| − | | colspan="4 | + | | colspan="4"| They disguise themselves as stones, sometimes surprising the player. |
|- | |- | ||
|class=wikitable style="text-align:center;"| Strategies: | |class=wikitable style="text-align:center;"| Strategies: | ||
| − | | colspan="4 | + | | colspan="4"|Either use the pickaxe to knock the stone off their heads, which makes them flee. Kill them while they are fleeing. You can tell it's a Stone Crab hiding under a rock because the rock won't have a shadow. |
Or preferably: Use your weapon to hit them directly. | Or preferably: Use your weapon to hit them directly. | ||
| Line 114: | Line 143: | ||
| − | == Other == | + | === Other === |
| − | {|class=wikitable style="text-align:center;" | + | {|class=wikitable style="text-align:center;width: auto; min-width: 0; display: table; max-width: 100%;" |
| rowspan=4 | | | rowspan=4 | | ||
<u>Maggot</u> <br> | <u>Maggot</u> <br> | ||
[[File:Maggot.png|link=]] | [[File:Maggot.png|link=]] | ||
[[File:Maggot_cocoon.png|link=]] | [[File:Maggot_cocoon.png|link=]] | ||
| − | !HP | + | ! style="width:40px;" | HP |
| − | !Damage | + | ! style="width:40px;" | Damage |
| − | !Location | + | ! style="width:100px; | Location |
| − | !Drops | + | ! style="width: auto;" | Drops |
|- | |- | ||
|0 | |0 | ||
| Line 132: | Line 161: | ||
|- | |- | ||
|class=wikitable style="text-align:center;"| Behaviour: | |class=wikitable style="text-align:center;"| Behaviour: | ||
| − | | colspan="4 | + | | colspan="4"| They will come in (small) groups and attack on sight, although not in a group intelligent way. If you manage it wisely, you can trigger them one by one. (And you should!) |
If they take too much damage, they will quickly run away from you and pupate, to turn into #Moths. During pupation, they turn blue and negate any damage dealt to them. | If they take too much damage, they will quickly run away from you and pupate, to turn into #Moths. During pupation, they turn blue and negate any damage dealt to them. | ||
|- | |- | ||
|class=wikitable style="text-align:center;"| Strategies: | |class=wikitable style="text-align:center;"| Strategies: | ||
| − | | colspan="4 | + | | colspan="4"| Pull them one by one, moving close enough to aggro one but not many others. Use a weapon with as little knockback as possible, since you don't want to throw them into the rest of the group or give them the chance to run away. Kill them quickly before they can run away. |
|} | |} | ||
| − | {|class=wikitable style="text-align:center;" | + | {|class=wikitable style="text-align:center;width: auto; min-width: 0; display: table; max-width: 100%;" |
| rowspan=4 | | | rowspan=4 | | ||
<u>Coal Sprites</u> <br> | <u>Coal Sprites</u> <br> | ||
[[File:Coal Sprite.png]] | [[File:Coal Sprite.png]] | ||
| − | !HP | + | ! style="width:40px;" | HP |
| − | !Damage | + | ! style="width:40px;" | Damage |
| − | !Location | + | ! style="width:100px; | Location |
| − | !Drops | + | ! style="width: auto;" | Drops |
|- | |- | ||
|20? | |20? | ||
| Line 155: | Line 184: | ||
|- | |- | ||
|class=wikitable style="text-align:center;"| Behaviour: | |class=wikitable style="text-align:center;"| Behaviour: | ||
| − | | colspan="4 | + | | colspan="4"| They have no special attacks |
|- | |- | ||
|class=wikitable style="text-align:center;"| Strategies: | |class=wikitable style="text-align:center;"| Strategies: | ||
| − | | colspan="4 | + | | colspan="4"| Simply hit them. |
|} | |} | ||
| − | {|class=wikitable style="text-align:center;" | + | {|class=wikitable style="text-align:center;width: auto; min-width: 0; display: table; max-width: 100%;" |
| rowspan=4 | | | rowspan=4 | | ||
<u>Spooky Ghost</u> <br> | <u>Spooky Ghost</u> <br> | ||
[[File:Spooky Ghost.png|link=]] | [[File:Spooky Ghost.png|link=]] | ||
| − | !HP | + | ! style="width:40px;" | HP |
| − | !Damage | + | ! style="width:40px;" | Damage |
| − | !Location | + | ! style="width:100px; | Location |
| − | !Drops | + | ! style="width: auto;" | Drops |
|- | |- | ||
|100? | |100? | ||
| Line 176: | Line 205: | ||
|- | |- | ||
|class=wikitable style="text-align:center;"| Behaviour: | |class=wikitable style="text-align:center;"| Behaviour: | ||
| − | | colspan="4 | + | | colspan="4"| They are flying |
|- | |- | ||
|class=wikitable style="text-align:center;"| Strategies: | |class=wikitable style="text-align:center;"| Strategies: | ||
| − | | colspan="4 | + | | colspan="4"| Simply hit them. |
|} | |} | ||
| − | {|class=wikitable style="text-align:center;" | + | {|class=wikitable style="text-align:center;width: auto; min-width: 0; display: table; max-width: 100%;" |
| rowspan=4 | | | rowspan=4 | | ||
<u>Ice Bat</u> <br> | <u>Ice Bat</u> <br> | ||
[[File:Ice Bat.png|link=]] | [[File:Ice Bat.png|link=]] | ||
| − | !HP | + | ! style="width:40px;" | HP |
| − | !Damage | + | ! style="width:40px;" | Damage |
| − | !Location | + | ! style="width:100px; | Location |
| − | !Drops | + | ! style="width: auto;" | Drops |
|- | |- | ||
|50? | |50? | ||
| Line 199: | Line 228: | ||
|- | |- | ||
|class=wikitable style="text-align:center;"| Behaviour: | |class=wikitable style="text-align:center;"| Behaviour: | ||
| − | | colspan="4 | + | | colspan="4"| Flying |
|- | |- | ||
|class=wikitable style="text-align:center;"| Strategies: | |class=wikitable style="text-align:center;"| Strategies: | ||
| − | | colspan="4 | + | | colspan="4"| Simply hit them. |
|} | |} | ||
| − | {|class=wikitable style="text-align:center;" | + | == Desert Cave Monsters == |
| + | |||
| + | {|class=wikitable style="text-align:center;width: auto; min-width: 0; display: table; max-width: 100%;" | ||
| rowspan=4 | | | rowspan=4 | | ||
<u>Skelton</u> <br> | <u>Skelton</u> <br> | ||
[[File:Skelton.png|link=]] | [[File:Skelton.png|link=]] | ||
| − | !HP | + | ! style="width:40px;" | HP |
| − | !Damage | + | ! style="width:40px;" | Damage |
| − | !Location | + | ! style="width:100px; | Location |
| − | !Drops | + | ! style="width: auto;" | Drops |
|- | |- | ||
|50? | |50? | ||
| Line 220: | Line 251: | ||
|- | |- | ||
|class=wikitable style="text-align:center;"| Behaviour: | |class=wikitable style="text-align:center;"| Behaviour: | ||
| − | | colspan="4 | + | | colspan="4"| They will throw a bone at you. |
|- | |- | ||
|class=wikitable style="text-align:center;"| Strategies: | |class=wikitable style="text-align:center;"| Strategies: | ||
| − | | colspan="4 | + | | colspan="4"| Simply hit them. |
|} | |} | ||
| − | {|class=wikitable style="text-align:center;" | + | {|class=wikitable style="text-align:center;width: auto; min-width: 0; display: table; max-width: 100%;" |
| rowspan=4 | | | rowspan=4 | | ||
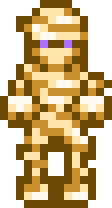
<u>Mummy</u> <br> | <u>Mummy</u> <br> | ||
[[File:Mummy.png|link=]] | [[File:Mummy.png|link=]] | ||
| − | !HP | + | ! style="width:40px;" | HP |
| − | !Damage | + | ! style="width:40px;" | Damage |
| − | !Location | + | ! style="width:100px; | Location |
| − | !Drops | + | ! style="width: auto;" | Drops |
|- | |- | ||
|200? | |200? | ||
| Line 241: | Line 272: | ||
|- | |- | ||
|class=wikitable style="text-align:center;"| Behaviour: | |class=wikitable style="text-align:center;"| Behaviour: | ||
| − | | colspan="4 | + | | colspan="4"| After being knock down they will get back up after 10 sec unless killed by a bomb while downed |
|- | |- | ||
|class=wikitable style="text-align:center;"| Strategies: | |class=wikitable style="text-align:center;"| Strategies: | ||
| − | | colspan="4 | + | | colspan="4"| Simply hit them until they fall into a pile of bandage then use a bomb to kill em' |
|} | |} | ||
| − | {|class=wikitable style="text-align:center;" | + | {|class=wikitable style="text-align:center;width: auto; min-width: 0; display: table; max-width: 100%;" |
| rowspan=4 | | | rowspan=4 | | ||
<u>Flying Lizard</u> <br> | <u>Flying Lizard</u> <br> | ||
[[File:Flying Lizard.png|link=]] | [[File:Flying Lizard.png|link=]] | ||
| − | !HP | + | ! style="width:40px;" | HP |
| − | !Damage | + | ! style="width:40px;" | Damage |
| − | !Location | + | ! style="width:100px; | Location |
| − | !Drops | + | ! style="width: auto;" | Drops |
|- | |- | ||
|200? | |200? | ||
| Line 262: | Line 293: | ||
|- | |- | ||
|class=wikitable style="text-align:center;"| Behaviour: | |class=wikitable style="text-align:center;"| Behaviour: | ||
| − | | colspan="4 | + | | colspan="4"| Flying |
|- | |- | ||
|class=wikitable style="text-align:center;"| Strategies: | |class=wikitable style="text-align:center;"| Strategies: | ||
| − | | colspan="4 | + | | colspan="4"| They are fast and will hit you if your swing is to slow |
|} | |} | ||
| − | {|class=wikitable style="text-align:center;" | + | {|class=wikitable style="text-align:center;width: auto; min-width: 0; display: table; max-width: 100%;" |
| rowspan=4 | | | rowspan=4 | | ||
<u>Scarab</u> <br> | <u>Scarab</u> <br> | ||
[[File:Scarab.png|link=]] | [[File:Scarab.png|link=]] | ||
| − | !HP | + | ! style="width:40px;" | HP |
| − | !Damage | + | ! style="width:40px;" | Damage |
| − | !Location | + | ! style="width:100px; | Location |
| − | !Drops | + | ! style="width: auto;" | Drops |
|- | |- | ||
|?? | |?? | ||
| Line 283: | Line 314: | ||
|- | |- | ||
|class=wikitable style="text-align:center;"| Behaviour: | |class=wikitable style="text-align:center;"| Behaviour: | ||
| − | | colspan="4 | + | | colspan="4"| Follows a set path and is non aggressive but will do dmg if you touch it |
| − | |||
| − | |||
| − | |||
| − | |||
| − | |||
| − | |||
| − | |||
| − | |||
| − | |||
| − | |||
| − | |||
| − | |||
| − | |||
| − | |||
| − | |||
| − | |||
| − | |||
| − | |||
| − | |||
| − | |||
| − | |||
|- | |- | ||
|class=wikitable style="text-align:center;"| Strategies: | |class=wikitable style="text-align:center;"| Strategies: | ||
| − | | colspan="4 | + | | colspan="4"| Cannot be killed |
|} | |} | ||
Revision as of 12:53, 1 March 2016
| Article Stub
This article is a stub and is missing information. You can help Stardew Valley Wiki by expanding it! |
There are various monsters in the game, all of them encountered in the mines:
The Mines
The following monsters are found in The Mines as you go down.
Slimes
|
Female Ice Slime |
HP | Damage | Location | Drops |
|---|---|---|---|---|
| 50? | ?? | Cave 60-90 | Slime, Sap | |
| Behaviour: | They will jump at you from far distances | |||
| Strategies: | Simply hit them. | |||
|
Male Ice Slime |
HP | Damage | Location | Drops |
|---|---|---|---|---|
| 50? | ?? | Cave 60-90 | Slime, Sap | |
| Behaviour: | They will jump at you from far distances | |||
| Strategies: | Simply hit them. | |||
|
Green Slime |
HP | Damage | Location | Drops |
|---|---|---|---|---|
| 21-24? | ?? | Cave 1-29 | Slime, Sap | |
| Behaviour: | They will jump at you from far distances | |||
| Strategies: | Simply hit them. | |||

Flyers
|
Beetle |
HP | Damage | Location | Drops |
|---|---|---|---|---|
| 0 | 0-0 | Cave 1-29 | Bug Meat | |
| Behaviour: | Simply flying up and down or left and right in a fixed path | |||
| Strategies: | Simply hit them from the side. | |||
|
Cave Fly |
HP | Damage | Location | Drops |
|---|---|---|---|---|
| 0 | 0-0 | Cave 1-29 | Bug Meat | |
| Behaviour: | They will fly at you at high speeds and deal drive-by-damage. | |||
| Strategies: | Sword timing - Stand still and swing at them right before they would hit you. Use a weapon with high knockback to make it easier. | |||
Crabs
|
Stone Crab |
HP | Damage | Location | Drops |
|---|---|---|---|---|
| 29-36 | 0-0 | Cave 1-29 | Crab | |
| Behaviour: | They disguise themselves as stones, sometimes surprising the player. | |||
| Strategies: | Either use the pickaxe to knock the stone off their heads, which makes them flee. Kill them while they are fleeing. You can tell it's a Stone Crab hiding under a rock because the rock won't have a shadow.
Or preferably: Use your weapon to hit them directly. | |||
Other
| HP | Damage | Location | Drops | |
|---|---|---|---|---|
| 0 | 0-0 | Cave ??? | Bug Meat | |
| Behaviour: | They will come in (small) groups and attack on sight, although not in a group intelligent way. If you manage it wisely, you can trigger them one by one. (And you should!)
If they take too much damage, they will quickly run away from you and pupate, to turn into #Moths. During pupation, they turn blue and negate any damage dealt to them. | |||
| Strategies: | Pull them one by one, moving close enough to aggro one but not many others. Use a weapon with as little knockback as possible, since you don't want to throw them into the rest of the group or give them the chance to run away. Kill them quickly before they can run away. | |||
|
Coal Sprites |
HP | Damage | Location | Drops |
|---|---|---|---|---|
| 20? | 6-8? | Cave 60-90 | Coal | |
| Behaviour: | They have no special attacks | |||
| Strategies: | Simply hit them. | |||
|
Spooky Ghost |
HP | Damage | Location | Drops |
|---|---|---|---|---|
| 100? | ?? | Cave 60-90 | Gold Ore, Solar Essence, Refined Quartz | |
| Behaviour: | They are flying | |||
| Strategies: | Simply hit them. | |||
|
Ice Bat |
HP | Damage | Location | Drops |
|---|---|---|---|---|
| 50? | ?? | Cave 60-90 | Bat Wing | |
| Behaviour: | Flying | |||
| Strategies: | Simply hit them. | |||
Desert Cave Monsters
|
Skelton |
HP | Damage | Location | Drops |
|---|---|---|---|---|
| 50? | ?? | Cave 70-90 | none | |
| Behaviour: | They will throw a bone at you. | |||
| Strategies: | Simply hit them. | |||
|
Mummy |
HP | Damage | Location | Drops |
|---|---|---|---|---|
| 200? | ?? | Desert Cave | none | |
| Behaviour: | After being knock down they will get back up after 10 sec unless killed by a bomb while downed | |||
| Strategies: | Simply hit them until they fall into a pile of bandage then use a bomb to kill em' | |||
.png)
.png)
|
Flying Lizard |
HP | Damage | Location | Drops |
|---|---|---|---|---|
| 200? | ?? | Desert Cave | none | |
| Behaviour: | Flying | |||
| Strategies: | They are fast and will hit you if your swing is to slow | |||
|
Scarab |
HP | Damage | Location | Drops |
|---|---|---|---|---|
| ?? | ?? | Desert Cave | none | |
| Behaviour: | Follows a set path and is non aggressive but will do dmg if you touch it | |||
| Strategies: | Cannot be killed | |||