The printable version is no longer supported and may have rendering errors. Please update your browser bookmarks and please use the default browser print function instead.
Warning: Spoilers
This page or section contains unmarked spoilers from update 1.6 of Stardew Valley. Players may want to avoid or be cautious toward reading this article/section.
The selection area for maps at character creation.
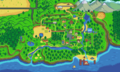
There are eight different Farm Maps to choose from in Stardew Valley. Each map features a unique layout of the Farm, offering different benefits and favoring specific skills. Only one map can be chosen when starting a new game, and cannot be changed once selected.
The Standard Farm offers the most space to plant crops and raise animals. The other seven farms lack farming area, but offer special perks in comparison:
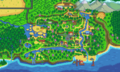
The Wilderness Farm encourages Combat (but only gives 1/3 Combat experience for it).
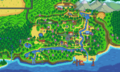
The Four Corners Farm offers perks from other maps and encourages Multiplayer.
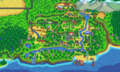
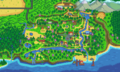
The Beach Farm offers extra items and encourages Fishing and Foraging, but discourages Farming late game.
The Meadowlands Farm encourages Farming, specifically raising animals, and comes with two chickens by default.
The interior of the farmhouse is decorated to match the theme of the chosen map. This includes furniture, wallpaper and flooring. The exterior of the house is the same regardless of map choice.
There is an abandoned building on all maps which can later be turned into the Greenhouse. Once repaired, it can be moved by visiting the Carpenter's Shop or Wizard's Tower.
5% of the time (modified by daily Luck), players will catch Woodskip. The exact formula is 0.05 + Daily Luck. This means that if the daily luck is at or below -0.05, there is no chance of catching a Woodskip. With maximum luck (0.125, only possible with the Special Charm), each cast has a 17.5% chance to hook a Woodskip.
45% of the rest of the time, players will catch pond and river fish, i.e.,fish that are found in Cindersap Forest.
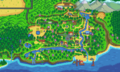
The southwest hill-top spawns Stones, Ore nodes, and Geode nodes depending on the player's Mining level. If the farm quarry is cleared, it will usually regenerate 7-13 items every 4th day, which appears to be the optimal day to clear the farm quarry. The mining area may sometimes be blocked by a Large Stump, Large Log, or a Boulder, making it impossible to enter until the player has the correct tool.
Additional cliffs and a stream decrease the overall farming area.
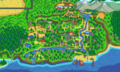
Monsters spawn at night (scales with the player's Combat level). This map can spawn more Wilderness Golems than other farms if they have spawning monster enabled. See Advanced options for more info.
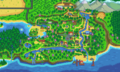
The farming area is split by cliffs into four distinct areas, each reminiscent of some of the other Farm Maps.
Top left: Forest Farm. This quadrant has a small grassy area containing a Large Stump, and weeds here can transform into the unique ones that always drop mixed seeds, the same as on the Forest Farm.
Top right: Standard Farm. This quadrant has the most farming space.
Bottom left: This quadrant has a pond. Players have a 50% chance of catching forest pond fish, i.e.,fish that are found in the Cindersap Forest pond.[1]
Bottom right: Hill-top Farm. This quadrant contains a small quarry that spawns Rocks and Ore and Geode nodes depending on the player's Mining level.
Additional cliffs and ponds decrease the overall farming area.
1.5: Added Beach Farm Map. Chat interface changes, which eliminated a bug preventing placement of path tiles near Cindersap Forest. Greenhouse can now be moved.
1.6: Added Meadowlands Farm Map. Players on the Riverland Farm Map get a Fish Smoker by default. Monsters now give 1/3 of normal Combat experience when spawned on the Farm.