Difference between revisions of "User:Samu698/Sandbox/Template Map"
Jump to navigation
Jump to search
m (Added a few locations) |
m (.) |
||
| (6 intermediate revisions by 2 users not shown) | |||
| Line 1: | Line 1: | ||
| − | <includeonly><templatestyles src=" | + | <includeonly><templatestyles src="template:Map/styles.css" /><div class="mapcontainer" style="width:{{#if:{{{3|}}}|{{{3|}}}|400}}px;height:{{#expr:({{#if:{{{3|}}}|{{{3|}}}|400}}/400*244)round0}}px;"> |
| − | <div class="mapcontainer" style="width:{{#if:{{{3|}}}|{{{3|}}}|400}}px;height:{{#expr:({{#if:{{{3|}}}|{{{3|}}}|400}}/400*244)round0}}px;"> | + | <p style="margin:0;"> |
| − | [[Desert|<span style="position:absolute;background:rgba(255, 0, 0, 50%);top: | + | [[The Desert|<span style="position:absolute;background:rgba(255, 0, 0, 50%);top:2%;left:1%;width:25%;height:23%"></span>]] |
| − | [[Pierre's General Store|<span style="position:absolute;background:rgba(255, 0, 0, 50%);top: | + | [[Pierre's General Store|<span style="position:absolute;background:rgba(255, 0, 0, 50%);top:41%;left:58%;width:3%;height:7%"></span>]] |
| − | [[ | + | [[Blacksmith|<span style="position:absolute;background:rgba(255, 0, 0, 50%);top:52.3%;left:68.5%;width:7%;height:5.3%"></span>]] |
| − | [[ | + | [[Marnie's Ranch|<span style="position:absolute;background:rgba(255, 0, 0, 50%);top:52.7%;left:35%;width:7%;height:6%"></span>]] |
| − | [[ | + | [[The Stardrop Saloon|<span style="position:absolute;background:rgba(255, 0, 0, 50%);top:48.6%;left:58.5%;width:4%;height:6.5%"></span>]] |
| − | [[The | + | [[The Mines|<span style="position:absolute;background:rgba(255, 0, 0, 50%);top:12%;left:70.5%;width:4.5%;height:6%"></span>]] |
| − | [[ | + | [[Carpenter's Shop|<span style="position:absolute;background:rgba(255, 0, 0, 50%);top:21%;left:60%;width:3.5%;height:6%"></span>]] |
| − | [[ | + | [[Secret Woods|<span style="position:absolute;background:rgba(255, 0, 0, 50%);top:32%;left:1%;width:15.5%;height:36%"></span>]] |
| − | [[ | + | [[Abandoned House|<span style="position:absolute;background:rgba(255, 0, 0, 50%);top:76%;left:20%;width:6%;height:6%"></span>]] |
| − | [[ | + | [[Spa|<span style="position:absolute;background:rgba(255, 0, 0, 50%);top:9%;left:47%;width:6%;height:8%"></span>]] |
| − | [[ | + | [[Community Center|<span style="position:absolute;background:rgba(255, 0, 0, 50%);top:28.5%;left:56.5%;width:5.5%;height:7%"></span>]] |
| − | [[ | + | [[Museum|<span style="position:absolute;background:rgba(255, 0, 0, 50%);top:57.8%;left:73%;width:4%;height:4.5%"></span>]] |
| − | [[ | + | [[JojaMart|<span style="position:absolute;background:rgba(255, 0, 0, 50%);top:38%;left:70.5%;width:9.5%;height:9.5%"></span>]] |
| − | [[ | + | [[1 Willow Lane|<span style="position:absolute;background:rgba(255, 0, 0, 50%);top:54.5%;left:51%;width:3%;height:7%"></span>]] |
| − | [[ | + | [[2 Willow Lane|<span style="position:absolute;background:rgba(255, 0, 0, 50%);top:56.5%;left:54.3%;width:3%;height:5%"></span>]] |
| − | [[ | + | [[Traveling Cart|<span style="position:absolute;background:rgba(255, 0, 0, 50%);top:52%;left:22%;width:4%;height:4.5%"></span>]] |
| − | [[ | + | [[Adventurer's Guild|<span style="position:absolute;background:rgba(255, 0, 0, 50%);top:17%;left:74.5%;width:2.5%;height:5.5%"></span>]] |
| − | [[ | + | [[The Sewers|<span style="position:absolute;background:rgba(255, 0, 0, 50%);top:62%;left:57.5%;width:2.3%;height:2.5%"></span>]] |
| − | [[ | + | [[Wizard's Tower|<span style="position:absolute;background:rgba(255, 0, 0, 50%);top:48%;left:16.7%;width:4%;height:12%"></span>]] |
| − | [[ | + | [[Bus Stop|<span style="position:absolute;background:rgba(255, 0, 0, 50%);top:29.5%;left:43.3%;width:4.5%;height:6%"></span>]] |
| − | [[ | + | [[Trailer|<span style="position:absolute;background:rgba(255, 0, 0, 50%);top:49%;left:64.5%;width:3%;height:3%"></span>]] |
| − | [[ | + | [[Harvey's Clinic|<span style="position:absolute;background:rgba(255, 0, 0, 50%);top:41%;left:56%;width:2%;height:7%"></span>]] |
| − | [[ | + | [[The Farm|<span style="position:absolute;background:rgba(255, 0, 0, 50%);top:36%;left:28%;width:15%;height:16.5%"></span>]] |
| − | [[ | + | [[Fish Shop|<span style="position:absolute;background:rgba(255, 0, 0, 50%);top:82%;left:69.5%;width:4%;height:7%"></span>]] |
| − | [[ | + | [[Leah's Cottage|<span style="position:absolute;background:rgba(255, 0, 0, 50%);top:59%;left:37.5%;width:3%;height:4.5%"></span>]] |
| − | [[ | + | [[Elliott's Cabin|<span style="position:absolute;background:rgba(255, 0, 0, 50%);top:76%;left:68.3%;width:3%;height:4.5%"></span>]] |
| − | [[ | + | [[Tent|<span style="position:absolute;background:rgba(255, 0, 0, 50%);top:18%;left:64%;width:3%;height:4%"></span>]] |
| − | [[ | + | [[Treehouse|<span style="position:absolute;background:rgba(255, 0, 0, 50%);top:12%;left:61%;width:5%;height:5.5%"></span>]] |
| − | [[ | + | [[Witch's Hut|<span style="position:absolute;background:rgba(255, 0, 0, 50%);top:3%;left:57%;width:5%;height:8%"></span>]] |
| − | [[ | + | [[Ice Cream Stand|<span style="position:absolute;background:rgba(255, 0, 0, 50%);top:59%;left:68.5%;width:3%;height:4%"></span>]] |
| − | [[ | + | [[Graveyard|<span style="position:absolute;background:rgba(255, 0, 0, 50%);top:57.5%;left:60%;width:3.5%;height:5%"></span>]] |
| − | [[ | + | [[Dog Pen|<span style="position:absolute;background:rgba(255, 0, 0, 50%);top:49%;left:62.8%;width:1.4%;height:3.5%"></span>]] |
| − | [[ | + | [[Farmhouse|<span style="position:absolute;background:rgba(0, 0, 255, 50%);top:36.5%;left:37.5%;width:5%;height:7%"></span>]] |
| − | [[ | + | [[Desert Trader|<span style="position:absolute;background:rgba(0, 0, 255, 50%);top:5%;left:14%;width:8%;height:7%"></span>]] |
| − | [[ | + | [[Casino|<span style="position:absolute;background:rgba(0, 0, 255, 50%);top:14%;left:3%;width:8%;height:7%"></span>]] |
| − | + | </p> | |
| − | [[ | + | <div class="maplocation" style="left:{{#if:{{{1|}}}|{{{1|}}}|0}}px;top:{{#if:{{{2|}}}|{{{2|}}}|0}}px;">[[File:Maplocation.png|20px|link=]]</div>{{#if:{{{loc2x|}}} | <div class="maplocation" style="left:{{#if:{{{loc2x|}}}|{{{loc2x|}}}|0}}px;top:{{#if:{{{loc2y|}}}|{{{loc2y|}}}|0}}px;">[[File:Maplocation.png|20px|link=]]</div>|}}{{#if:{{{loc3x|}}} | <div class="maplocation" style="left:{{#if:{{{loc3x|}}}|{{{loc3x|}}}|0}}px;top:{{#if:{{{loc3y|}}}|{{{loc3y|}}}|0}}px;">[[File:Maplocation.png|20px|link=]]</div>|}}{{#if:{{{loc4x|}}} | <div class="maplocation" style="left:{{#if:{{{loc4x|}}}|{{{loc4x|}}}|0}}px;top:{{#if:{{{loc4y|}}}|{{{loc4y|}}}|0}}px;">[[File:Maplocation.png|20px|link=]]</div>|}}[[File:Map{{#ifeq:{{{island|}}}|true|_with_Island|}}.png|{{#if:{{{3|}}}|{{{3|}}}|400}}px|link=]]</div></includeonly> |
| − | + | <noinclude> | |
| − | {{#if:{{{ | + | == Map template with clickable links == |
| − | {{#if:{{{ | + | The CSS for this template can be found at [[User:Samu698/Sandbox/Template Map/styles.css]] |
| − | + | TODO: disable links when size is less than 400 | |
| − | |||
| − | |||
| − | |||
| − | |||
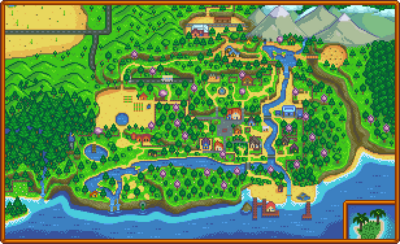
Normal map: {{User:samu698/Sandbox/Template_Map|100|100}} | Normal map: {{User:samu698/Sandbox/Template_Map|100|100}} | ||
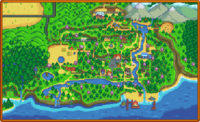
Smaller map(no links): {{User:samu698/Sandbox/Template_Map|100|10|200}} | Smaller map(no links): {{User:samu698/Sandbox/Template_Map|100|10|200}} | ||
| − | Map with 3 locations: {{ | + | Map with 3 locations: {{User:samu698/Sandbox/Template_Map|200|150|loc2x=276|loc2y=54|loc3x=96|loc3y=130}} |
| − | Map with Island: {{ | + | Map with Island: {{User:samu698/Sandbox/Template_Map|360|214|island=true}} |
</noinclude> | </noinclude> | ||
Latest revision as of 21:32, 28 June 2022
Map template with clickable links
The CSS for this template can be found at User:Samu698/Sandbox/Template Map/styles.css
TODO: disable links when size is less than 400
Normal map:

Smaller map(no links):
Map with 3 locations:
Map with Island: