Difference between revisions of "Ginger Island"
(Reorganized, trimmed and rewrote parts for redundancy or clarity) |
|||
| Line 15: | Line 15: | ||
The player can return to Stardew Valley at any time for free by entering the boat on the southern beach. They will usually arrive back inside the [[Fish Shop]], except on festival days when the path back to the [[Farm]] may be blocked, in which case the player will be deposited on the [[Bus Stop]] instead. | The player can return to Stardew Valley at any time for free by entering the boat on the southern beach. They will usually arrive back inside the [[Fish Shop]], except on festival days when the path back to the [[Farm]] may be blocked, in which case the player will be deposited on the [[Bus Stop]] instead. | ||
| − | ==Island | + | ==Island South== |
| − | [[File:Ginger Island | + | [[File:Ginger Island South.png|thumb|right|Island South]] |
| − | + | The area where the player first lands; contains the dock, a small beach, and a warp location for a [[Warp Totem: Island]] or [[Island Obelisk]]. | |
| − | |||
| − | |||
| − | |||
| − | |||
| − | |||
| − | |||
| − | |||
| − | |||
| − | |||
| − | |||
| − | |||
| − | |||
| − | |||
| − | |||
| − | |||
| − | |||
| − | |||
| − | |||
| − | |||
| − | |||
| − | |||
| − | |||
| − | |||
| − | |||
| − | |||
| − | |||
| − | |||
| − | |||
| − | |||
| − | |||
| − | |||
| − | |||
| − | |||
| − | |||
| − | |||
| − | [[ | ||
| − | |||
| − | |||
| − | |||
| − | |||
| − | + | ===Beach Resort=== | |
| + | After the other areas of the island have been unlocked, a beach resort can be built for 20 [[Golden Walnut]]s. From then on a subset of villagers from Pelican Town will visit each non-raining day. | ||
| − | |||
| − | |||
| − | |||
| − | |||
| − | |||
The player can open/close the resort the next following day with the toggle located between the two doors of the changing room. | The player can open/close the resort the next following day with the toggle located between the two doors of the changing room. | ||
| − | ===Bar=== | + | ====Bar==== |
| − | |||
After opening the beach resort, [[Gus]] will run a bar on the days when he visits. | After opening the beach resort, [[Gus]] will run a bar on the days when he visits. | ||
| Line 116: | Line 71: | ||
===Island Southeast=== | ===Island Southeast=== | ||
[[File:Ginger Island Beach.png|thumb|right|Island Southeast]] | [[File:Ginger Island Beach.png|thumb|right|Island Southeast]] | ||
| − | + | This area is unlocked by building the Island Beach Resort, which clears the debris east of the dock. It contains a star-shaped tide pool, a large rock offshore, and a hidden pirate's cove. | |
| − | |||
| − | |||
====Pirate Cove==== | ====Pirate Cove==== | ||
| − | + | There is a hidden entrance on right side of Island Southeast that leads to the Pirate Cove. It can be accessed at any time once Island Southeast is available, and on non-rainy and even-numbered days of the month there are visiting pirates. | |
| − | |||
| − | |||
| − | |||
| − | |||
| − | |||
| − | |||
| − | + | When pirates are visiting, the player can play [[Darts]] to win [[Golden Walnut]]s. (There are no rewards after the first three games.) There is also a bar where the player will be given [[Mead]] once a day if they are wearing a [[Pirate Hat]] or an [[Eye Patch]]. | |
| − | Fishing in the | + | '''Pirate Cove Fishing''' |
| + | The player can enter the cave at any time to fish in the pool to the southeast. It is the only place in the game where [[Stingrays]] can be caught. | ||
* [[Flounder]] | * [[Flounder]] | ||
* [[Lionfish]] | * [[Lionfish]] | ||
| Line 139: | Line 87: | ||
* [[Gourmand Statue]] | * [[Gourmand Statue]] | ||
| − | Note | + | '''Note:''' |
* This is the only place in the game where you can catch the Stringray. | * This is the only place in the game where you can catch the Stringray. | ||
* When catching the Gourmand Statue, it will initially appear as a present box when emerging from the water. | * When catching the Gourmand Statue, it will initially appear as a present box when emerging from the water. | ||
| Line 146: | Line 94: | ||
====Mermaid==== | ====Mermaid==== | ||
[[File:Ginger Island Mermaid.png|thumb|right|The mermaid and stones, all of which only appear on rainy days.]] | [[File:Ginger Island Mermaid.png|thumb|right|The mermaid and stones, all of which only appear on rainy days.]] | ||
| − | On rainy days a Mermaid will appear on the large rock by the shore. | + | On rainy days a Mermaid will appear on the large rock by the shore. If the player places [[Flute Block]]s and tunes them to play the [[Night Market#Mermaid Boat|Mermaid's song]], she will reward them with 5 [[Golden Walnut]]s. |
| − | To play the song | + | To play the Mermaid's song, place [[Flute Block]] on top or below each set of stones on the shore, then tune each block by the amount of stones. A large stone symbolizes 5, and a small stone symbolizes 1. After tuning all 5 blocks, simply run past each one left-to-right. |
| − | { | + | {|class="wikitable mw-collapsible mw-collapsed" |
| − | 2 | + | |- |
| − | + | !colspan="4" style="text-align: left;"|General (All) | |
| − | + | |- | |
| − | + | !Block 1 | |
| − | + | !Block 2 | |
| − | + | !Block 3 | |
| − | 5 | + | !Block 4 |
| − | + | !Block 5 | |
| − | 7 | + | |- |
| − | + | |[[File:Mermaid stone 1.png|center|link=]] | |
| + | |[[File:Mermaid stone 2.png|center|link=]] | ||
| + | |[[File:Mermaid stone 3.png|center|link=]] | ||
| + | |[[File:Mermaid stone 4.png|center|link=]] | ||
| + | |[[File:Mermaid stone 5.png|center|link=]] | ||
| + | |- | ||
| + | | 2 Clicks | ||
| + | | 11 Clicks | ||
| + | | 9 Clicks | ||
| + | | 5 Clicks | ||
| + | | 7 Clicks | ||
| + | |} | ||
{{Clear}} | {{Clear}} | ||
| Line 166: | Line 125: | ||
==Island East== | ==Island East== | ||
[[File:Ginger Island East.png|thumb|right|Island East]] | [[File:Ginger Island East.png|thumb|right|Island East]] | ||
| − | This area is reached by walking East from the dock on Island South. It contains a jungle, and a hut where a boy named [[Leo]] lives with a talking parrot. This parrot will give you | + | This area is reached by walking East from the dock on Island South. It contains a jungle, and a hut where a boy named [[Leo]] lives with a talking parrot. This parrot will give you [[Golden Walnut#Parrot Hints|hints]] as to how many [[Golden Walnut]]s you have left to find in areas. Outside of the hut is a Banana Shrine. |
*[[Fiddlehead Fern]]s can spawn here to be foraged. | *[[Fiddlehead Fern]]s can spawn here to be foraged. | ||
| − | |||
===Gem Birds=== | ===Gem Birds=== | ||
| − | A path to the East in the jungle leads to an area with a shrine and several pedestals. The entrance is one square south of the parrot express kiosk and all the way to the east. Each pedestal has an image carved in stone in front of it that corresponds to a section of the island. Interacting with the shrine shows the following message: | + | A hidden path to the East in the jungle leads to an area with a shrine and several pedestals. The entrance is one square south of the parrot express kiosk and all the way to the east. Each pedestal has an image carved in stone in front of it that corresponds to a section of the island. Interacting with the shrine shows the following message: |
<blockquote> | <blockquote> | ||
| Line 181: | Line 139: | ||
</blockquote> | </blockquote> | ||
| − | Each day that it's raining on the island, a gem-bird will appear in one cardinal direction of the island | + | Each day that it's raining on the island, a gem-bird will appear in one cardinal direction of the island: |
| + | *South: Just above and to the left of the docks | ||
| + | *East: Middle of area, near the path | ||
| + | *North: Right and up from [[Island Trader]] | ||
| + | *West: Just right of the pond | ||
| + | |||
| + | Approaching the bird will cause it to fly away, leaving behind a gem that matches the bird color: [[Aquamarine|aquamarine]], [[Topaz|topaz]], [[Amethyst|amethyst]], [[Emerald|emerald]], or [[Ruby|ruby]]). (Note: The gems for each area are randomized per game.) The gem should be placed on the pedestal that matches the location where the bird was found. The arrangement of the pictures and pedestals corresponds to the traditional compass rose, with north at the top. When all 4 pedestals have been filled the shrine will activate and give the player 5 [[Golden Walnut]]s. | ||
'''Note''': | '''Note''': | ||
*The [[weather]] on the island does not correspond to the weather in Stardew Valley. [[Television#Weather_Report|TV weather forecasts]] will show the daily forecast for Ginger Island also once the area has been unlocked. | *The [[weather]] on the island does not correspond to the weather in Stardew Valley. [[Television#Weather_Report|TV weather forecasts]] will show the daily forecast for Ginger Island also once the area has been unlocked. | ||
| − | + | *A [[Rain Totem]] can be used while on the island in order to force the birds to appear. | |
| − | + | ||
| + | {{Clear}} | ||
| + | |||
| + | ==Island North== | ||
| + | [[File:Ginger Island North.png|thumb|right|Island North]] | ||
| + | This area includes everything reached by walking north from the docks on Island South. | ||
| + | |||
| + | [[File:Island Trader.png|230px|thumb|right|Island Trader]] | ||
| + | ===[[Island Trader]]=== | ||
| + | The [[Island Trader]] becomes available after the player trades 10 [[Golden Walnut]]s with a parrot to unlock the stand. It is run by the [[Island Trader]] who is a blue-bird merchant. Similar to a few other merchants, it only barters in exchange for other items and has a rotating stock of island-themed items. | ||
| + | |||
| + | The [[Island Trader]] exclusively trades for [[Foraging]] items such as [[Pineapple Seeds]], [[Banana Sapling]]s, [[Mango Sapling]]s, [[Taro Tuber]]s, and [[Golden Coconut]]s. There are also exclusive [[Furniture]] items such as [[Tropical TV]], [[Jungle Torch]], [[Tropical Chair]], [[Wild Double Bed]], [[Tropical Bed]], [[Tropical Double Bed]], [['Volcano' Photo]], and [[Oceanic Rug]]. The Trader also offers the [[Galaxy Soul]] item on the last day of the month for 10 [[Radioactive Bar]]s. (Galaxy Souls are available after killing at least 50 monsters exclusive to [[Quests#List of Mr. Qi's Special Orders|Qi's Challenges]]) | ||
| + | |||
| + | ===Dig Site=== | ||
| + | On the left side is a broken bridge which can be repaired by parrots in exchange for ten [[Golden Walnut]]s. Once repaired, it leads to an area similar to the [[Mountain]] [[Quarry]]. Rocks, [[Mining#Bone Node|Bone Nodes]], [[Mining#Clay Node|Clay Nodes]], and [[mahogany tree]] seeds have a chance of spawning every day. | ||
| + | |||
| + | To the right of the stairs north of the Dig Site is the Ginger Island Mushroom Cave. Initially, there is a boulder blocking the entrance, with someone behind it calling for help. Placing any bomb will remove the large boulder and free [[Professor Snail]], thus also unlocking the [[Island Field Office]]. There is a chance of new mushrooms spawning every day in the cave. Unlike the [[The_Cave|farm's cave]], mushrooms grow directly on the ground, so players can benefit from the [[Skills#Foraging|botanist]] profession. | ||
| + | |||
| + | [[File:Island Field Office.png|230px|thumb|right|Island Field Office]] | ||
| + | ===[[Island Field Office]]=== | ||
| + | On the North Side of the Island resides the [[Island Field Office]] Tent, where the player may donate fossils. Until [[Professor Snail]] is rescued from the nearby cave, the office remains empty with no interactable elements. After the rescue, you can donate fossils to him and answer the Island Survey on the wall in return for [[Golden Walnut]]s. | ||
| + | |||
| + | {{Collapse|Rewards|content= | ||
| + | [[File:Island Field Office Interior.png|thumb|right|150px|A completed Island Field Office]] | ||
| + | <ul> | ||
| + | <li>For completing the Large Animal collection, the player is rewarded with 6 [[Golden Walnut]]s and 1 [[Banana Sapling]].</li> | ||
| + | <li>For completing the Snake collection, the player is rewarded with 3 [[Golden Walnut]]s and 1 [[Mango Sapling]].</li> | ||
| + | <li>For donating the Mummified Frog, the player is rewarded with 1 [[Golden Walnut]].</li> | ||
| + | <li>For donating the Mummified Bat, the player is rewarded with 1 [[Golden Walnut]].</li> | ||
| + | <li>For completing all four fossils and the island survey, the player is rewarded with the {{name|Ostrich Incubator|size=24|class=inline}} recipe.</li> | ||
| + | <li>For completing each Island Survey, the player is rewarded with 1 [[Golden Walnut]].</li> | ||
| + | </ul> | ||
| + | }} | ||
| + | ===[[Volcano Dungeon]]=== | ||
| + | At the farthest north is a volcano dungeon with ten levels, eight of which are randomly generated similar to the [[Skull Cavern]]. The fifth level has a shop, and at the tenth and last level is the [[Forge]], where tools and weapons can be upgraded using [[Cinder Shard]]s. | ||
| + | |||
| + | In order to access the dungeon, a watering can is required to make a path through the lava. This path does not persist between days and must be remade to cross again. After the player reaches the [[Forge]] and unlocks the door needed to exit (left of the Forge, right of the starting area), a parrot will perch near the lava river offering to unlock a permanent bridge in exchange for [[Golden Walnut]]s. | ||
| + | |||
| + | The lava river in the starting area can be followed to the left to find a hidden exit. The exit leads to the river north of the dig site, where the player can find 2 [[Golden Walnut]]s. | ||
{{Clear}} | {{Clear}} | ||
| Line 193: | Line 195: | ||
[[File:Ginger Island West.png|thumb|right|Island West]] | [[File:Ginger Island West.png|thumb|right|Island West]] | ||
| − | This area includes everything reached by walking west from the docks on Island South. | + | This area includes everything reached by walking west from the docks on Island South. The entrance to this area is initially blocked by a sleeping turtle, which can be woken by giving a nearby parrot 10 [[Golden Walnut]]s. This parrot will only appear after the first parrot in [[Leo]]'s house has received its own [[Golden Walnut]]. |
| + | |||
| + | The area is divided in two by a river. The Farm, Gourmand Frog, Parrot Express, and Shipwreck are to the right, with the Pond, Birdie's Hut, Green Whack-A-Mole, Qi's Walnut Room, Tiger Slime Grove, and Colored Crystals Puzzle to the left. | ||
| − | Island | + | Island West contains 878 plantable tiles. |
===The Farm=== | ===The Farm=== | ||
There is a large area where crops can be planted. Initially it is covered in logs, stones, and weeds just like the Stardew Valley farm is when the player first arrives. Sprinklers can be placed here and fruit trees can be planted. [[Crow]]s won't spawn on this farm either, so [[Scarecrow]]s aren't necessary. Just like with the [[Greenhouse]], crops from any season can be grown on the Ginger Island farm regardless of the season. | There is a large area where crops can be planted. Initially it is covered in logs, stones, and weeds just like the Stardew Valley farm is when the player first arrives. Sprinklers can be placed here and fruit trees can be planted. [[Crow]]s won't spawn on this farm either, so [[Scarecrow]]s aren't necessary. Just like with the [[Greenhouse]], crops from any season can be grown on the Ginger Island farm regardless of the season. | ||
| − | There is a sleeping hut that the parrots will build in exchange for 20 [[Golden Walnut]]s. It's a 4 room house with a kitchen and one [[Tropical Bed]] per farmer on the save file. It also comes with a shipping bin. Once the house has been created, the parrots will build a mailbox for an additional 5 [[Golden Walnut]]s and a | + | There is a sleeping hut that the parrots will build in exchange for 20 [[Golden Walnut]]s. It's a 4 room house with a kitchen and one [[Tropical Bed]] per farmer on the save file. It also comes with a shipping bin. Once the house has been created, the parrots will build a mailbox for an additional 5 [[Golden Walnut]]s and a [[Farm Obelisk]] for 20 [[Golden Walnut]]s. |
| − | === | + | ===Gourmand Frog=== |
| − | + | After the parrots repair the sleeping hut, a cave appears in the upper right-hand corner of the map. In it is the Gourmand Frog who will reminisce about days when specific crops were growing on the farm and asks you to grow them. Once they're grown, you can return to him and he will award you with [[Golden Walnut]]s. | |
| − | + | {{Collapse|Solution|content=This is a farming quest.<br />You have to plant Melon, Wheat and Garlic crops (1 of each) in your Island's farm, and make them grow to the harvest state (do not harvest), and then talk to the Gourmand Frog again.<br />He will award 5 Golden Walnuts for each type of crop. He won't take the crop.}} | |
| − | |||
| + | ===Birdie's Shack=== | ||
On the west side of the beach there is a shack which is where [[Birdie]] lives. Upon meeting her she will give the player the quest [[Quests#The Pirate's Wife|"The Pirate's Wife"]]. After the quest is complete, she no longer has any quests, but will speak with you. | On the west side of the beach there is a shack which is where [[Birdie]] lives. Upon meeting her she will give the player the quest [[Quests#The Pirate's Wife|"The Pirate's Wife"]]. After the quest is complete, she no longer has any quests, but will speak with you. | ||
| − | + | ===Green Whack-a-Mole=== | |
| − | |||
| − | |||
There is also a green pickle-like "mole" moving from hole to hole, which can be "whacked" with the watering can for 1 [[Golden Walnut]]. | There is also a green pickle-like "mole" moving from hole to hole, which can be "whacked" with the watering can for 1 [[Golden Walnut]]. | ||
| − | On the southeast part of the beach, below the farm area, there is also a shipwreck, which the player can enter to collect a [[Golden Walnut]]. | + | ===Shipwreck=== |
| + | On the southeast part of the beach, below the farm area, there is also a shipwreck, which the player can enter to collect a [[Golden Walnut]]. It is unclear if this shipwreck is related to [[Leo]], [[Birdie]], or the pirates in the Pirate's Cove. | ||
| + | |||
| + | ===Tiger Slime Grove=== | ||
| + | North of the pond is a small grove. Mahogany trees will grow there, and several Tiger Slimes will spawn. | ||
===Colored Crystals Puzzle=== | ===Colored Crystals Puzzle=== | ||
| Line 224: | Line 230: | ||
If failed the game will start at round 1. | If failed the game will start at round 1. | ||
| − | === | + | ===[[Qi's Walnut Room]]=== |
| − | + | A room accessible by getting a total of 100 [[Golden Walnut]]s. Inside is a Perfection Tracker, a Special Order Board, and a Vending Machine that sells items in exchange for [[Qi Gem]]s. | |
| − | |||
| − | === | + | ===The Beach=== |
| − | + | On the southwest side of the beach there are tide pools where Sea Urchins and Coral can spawn. The southeast features mussel rocks which can be mined for mussels (and 5 hidden [[Golden Walnut]]s). | |
| − | |||
==Transportation== | ==Transportation== | ||
Revision as of 22:40, 10 January 2021
This page or section contains unmarked spoilers from update 1.6 of Stardew Valley. Players may want to avoid or be cautious toward reading this article/section. |
| Ginger Island | |
 | |
 | |
| Occupants: | |
| Article Stub
This article is a stub and is missing information. You can help Stardew Valley Wiki by expanding it! |
Ginger Island is an island in the Fern Islands archipelago which can be accessed after repairing the boat in the backroom of Willy’s Fish Shop and buying tickets, which in turn is accessed after completing the Community Center.
Ginger Island is the only island available to visit in the archipelago, though other islands can be seen from the boat on the way there.
The player can return to Stardew Valley at any time for free by entering the boat on the southern beach. They will usually arrive back inside the Fish Shop, except on festival days when the path back to the Farm may be blocked, in which case the player will be deposited on the Bus Stop instead.
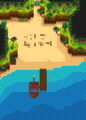
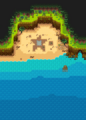
Island South

The area where the player first lands; contains the dock, a small beach, and a warp location for a Warp Totem: Island or Island Obelisk.
Beach Resort
After the other areas of the island have been unlocked, a beach resort can be built for 20 Golden Walnuts. From then on a subset of villagers from Pelican Town will visit each non-raining day.
The player can open/close the resort the next following day with the toggle located between the two doors of the changing room.
Bar
After opening the beach resort, Gus will run a bar on the days when he visits.
| Image | Name | Description | Price |
|---|---|---|---|
| Piña Colada | Drink in moderation. | ||
| Beer | Drink in moderation. | ||
| Pale Ale | Drink in moderation. | ||
| Mead | A fermented beverage made from honey. Drink in moderation. | ||
| Cranberry Candy | It's sweet enough to mask the bitter fruit. | ||
| Mango Wine | Drink in moderation. | ||
| Tropical Curry Recipe | A recipe to make Tropical Curry |
Island Southeast

This area is unlocked by building the Island Beach Resort, which clears the debris east of the dock. It contains a star-shaped tide pool, a large rock offshore, and a hidden pirate's cove.
Pirate Cove
There is a hidden entrance on right side of Island Southeast that leads to the Pirate Cove. It can be accessed at any time once Island Southeast is available, and on non-rainy and even-numbered days of the month there are visiting pirates.
When pirates are visiting, the player can play Darts to win Golden Walnuts. (There are no rewards after the first three games.) There is also a bar where the player will be given Mead once a day if they are wearing a Pirate Hat or an Eye Patch.
Pirate Cove Fishing The player can enter the cave at any time to fish in the pool to the southeast. It is the only place in the game where Stingrays can be caught.
Note:
- This is the only place in the game where you can catch the Stringray.
- When catching the Gourmand Statue, it will initially appear as a present box when emerging from the water.
- It is only possible to catch the Super Cucumber near the bottom of the cove, since these tiles have a higher fishing zones assignments. (The other two items can be caught anywhere.)
Mermaid

On rainy days a Mermaid will appear on the large rock by the shore. If the player places Flute Blocks and tunes them to play the Mermaid's song, she will reward them with 5 Golden Walnuts.
To play the Mermaid's song, place Flute Block on top or below each set of stones on the shore, then tune each block by the amount of stones. A large stone symbolizes 5, and a small stone symbolizes 1. After tuning all 5 blocks, simply run past each one left-to-right.
| General (All) | ||||
|---|---|---|---|---|
| Block 1 | Block 2 | Block 3 | Block 4 | Block 5 |
 |
 |
 |
 |
 |
| 2 Clicks | 11 Clicks | 9 Clicks | 5 Clicks | 7 Clicks |
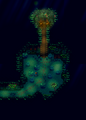
Island East

This area is reached by walking East from the dock on Island South. It contains a jungle, and a hut where a boy named Leo lives with a talking parrot. This parrot will give you hints as to how many Golden Walnuts you have left to find in areas. Outside of the hut is a Banana Shrine.
- Fiddlehead Ferns can spawn here to be foraged.
Gem Birds
A hidden path to the East in the jungle leads to an area with a shrine and several pedestals. The entrance is one square south of the parrot express kiosk and all the way to the east. Each pedestal has an image carved in stone in front of it that corresponds to a section of the island. Interacting with the shrine shows the following message:
"When dark clouds cry, begin your quest
To seek the fabled gem-birds four
Each day, one north, south, east, or west
Arrange their gifts upon my door"
Each day that it's raining on the island, a gem-bird will appear in one cardinal direction of the island:
- South: Just above and to the left of the docks
- East: Middle of area, near the path
- North: Right and up from Island Trader
- West: Just right of the pond
Approaching the bird will cause it to fly away, leaving behind a gem that matches the bird color: aquamarine, topaz, amethyst, emerald, or ruby). (Note: The gems for each area are randomized per game.) The gem should be placed on the pedestal that matches the location where the bird was found. The arrangement of the pictures and pedestals corresponds to the traditional compass rose, with north at the top. When all 4 pedestals have been filled the shrine will activate and give the player 5 Golden Walnuts.
Note:
- The weather on the island does not correspond to the weather in Stardew Valley. TV weather forecasts will show the daily forecast for Ginger Island also once the area has been unlocked.
- A Rain Totem can be used while on the island in order to force the birds to appear.
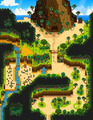
Island North

This area includes everything reached by walking north from the docks on Island South.

Island Trader
The Island Trader becomes available after the player trades 10 Golden Walnuts with a parrot to unlock the stand. It is run by the Island Trader who is a blue-bird merchant. Similar to a few other merchants, it only barters in exchange for other items and has a rotating stock of island-themed items.
The Island Trader exclusively trades for Foraging items such as Pineapple Seeds, Banana Saplings, Mango Saplings, Taro Tubers, and Golden Coconuts. There are also exclusive Furniture items such as Tropical TV, Jungle Torch, Tropical Chair, Wild Double Bed, Tropical Bed, Tropical Double Bed, 'Volcano' Photo, and Oceanic Rug. The Trader also offers the Galaxy Soul item on the last day of the month for 10 Radioactive Bars. (Galaxy Souls are available after killing at least 50 monsters exclusive to Qi's Challenges)
Dig Site
On the left side is a broken bridge which can be repaired by parrots in exchange for ten Golden Walnuts. Once repaired, it leads to an area similar to the Mountain Quarry. Rocks, Bone Nodes, Clay Nodes, and mahogany tree seeds have a chance of spawning every day.
To the right of the stairs north of the Dig Site is the Ginger Island Mushroom Cave. Initially, there is a boulder blocking the entrance, with someone behind it calling for help. Placing any bomb will remove the large boulder and free Professor Snail, thus also unlocking the Island Field Office. There is a chance of new mushrooms spawning every day in the cave. Unlike the farm's cave, mushrooms grow directly on the ground, so players can benefit from the botanist profession.

Island Field Office
On the North Side of the Island resides the Island Field Office Tent, where the player may donate fossils. Until Professor Snail is rescued from the nearby cave, the office remains empty with no interactable elements. After the rescue, you can donate fossils to him and answer the Island Survey on the wall in return for Golden Walnuts.
| Rewards |
|---|
|

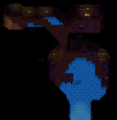
Volcano Dungeon
At the farthest north is a volcano dungeon with ten levels, eight of which are randomly generated similar to the Skull Cavern. The fifth level has a shop, and at the tenth and last level is the Forge, where tools and weapons can be upgraded using Cinder Shards.
In order to access the dungeon, a watering can is required to make a path through the lava. This path does not persist between days and must be remade to cross again. After the player reaches the Forge and unlocks the door needed to exit (left of the Forge, right of the starting area), a parrot will perch near the lava river offering to unlock a permanent bridge in exchange for Golden Walnuts.
The lava river in the starting area can be followed to the left to find a hidden exit. The exit leads to the river north of the dig site, where the player can find 2 Golden Walnuts.
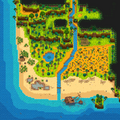
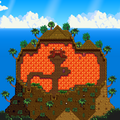
Island West

This area includes everything reached by walking west from the docks on Island South. The entrance to this area is initially blocked by a sleeping turtle, which can be woken by giving a nearby parrot 10 Golden Walnuts. This parrot will only appear after the first parrot in Leo's house has received its own Golden Walnut.
The area is divided in two by a river. The Farm, Gourmand Frog, Parrot Express, and Shipwreck are to the right, with the Pond, Birdie's Hut, Green Whack-A-Mole, Qi's Walnut Room, Tiger Slime Grove, and Colored Crystals Puzzle to the left.
Island West contains 878 plantable tiles.
The Farm
There is a large area where crops can be planted. Initially it is covered in logs, stones, and weeds just like the Stardew Valley farm is when the player first arrives. Sprinklers can be placed here and fruit trees can be planted. Crows won't spawn on this farm either, so Scarecrows aren't necessary. Just like with the Greenhouse, crops from any season can be grown on the Ginger Island farm regardless of the season.
There is a sleeping hut that the parrots will build in exchange for 20 Golden Walnuts. It's a 4 room house with a kitchen and one Tropical Bed per farmer on the save file. It also comes with a shipping bin. Once the house has been created, the parrots will build a mailbox for an additional 5 Golden Walnuts and a Farm Obelisk for 20 Golden Walnuts.
Gourmand Frog
After the parrots repair the sleeping hut, a cave appears in the upper right-hand corner of the map. In it is the Gourmand Frog who will reminisce about days when specific crops were growing on the farm and asks you to grow them. Once they're grown, you can return to him and he will award you with Golden Walnuts.
| Solution |
|---|
| This is a farming quest. You have to plant Melon, Wheat and Garlic crops (1 of each) in your Island's farm, and make them grow to the harvest state (do not harvest), and then talk to the Gourmand Frog again. He will award 5 Golden Walnuts for each type of crop. He won't take the crop. |
Birdie's Shack
On the west side of the beach there is a shack which is where Birdie lives. Upon meeting her she will give the player the quest "The Pirate's Wife". After the quest is complete, she no longer has any quests, but will speak with you.
Green Whack-a-Mole
There is also a green pickle-like "mole" moving from hole to hole, which can be "whacked" with the watering can for 1 Golden Walnut.
Shipwreck
On the southeast part of the beach, below the farm area, there is also a shipwreck, which the player can enter to collect a Golden Walnut. It is unclear if this shipwreck is related to Leo, Birdie, or the pirates in the Pirate's Cove.
Tiger Slime Grove
North of the pond is a small grove. Mahogany trees will grow there, and several Tiger Slimes will spawn.
Colored Crystals Puzzle

This puzzle is found in a cave northeast of the Tiger Slime Grove.
Upon entering the cave, click on the lion to initiate a game of Simon Says. The game gets faster every round(5 rounds). Winning the game yields three Golden Walnuts.
If failed the game will start at round 1.
Qi's Walnut Room
A room accessible by getting a total of 100 Golden Walnuts. Inside is a Perfection Tracker, a Special Order Board, and a Vending Machine that sells items in exchange for Qi Gems.
The Beach
On the southwest side of the beach there are tide pools where Sea Urchins and Coral can spawn. The southeast features mussel rocks which can be mined for mussels (and 5 hidden Golden Walnuts).
Transportation
Parrot Express
There is a transportation system on the island that can be unlocked by paying the parrots. As more areas of the island are unlocked, they are automatically added to the list of destinations. The locations with parrot travel are: Volcano, Farm, Dig Site, Jungle, and Docks.
When you select a location, an animation is shown of the player walking into a small structure that two parrots then lift with vines. The player then appears in the selected location with no animation.
Images
Island North
Island East
Island South
Island West
Island South-East
Island South-East Cave
Island Volcano Forge


Trivia
- Colored Gems in the cave puzzle are reminiscent of Singing Stones, a piece of furniture obtained by donating 21 minerals to the museum.
- There's a pair of pirates fighting in Pirate Cove that are a reference to the Mario Bros.
| Locations | |
|---|---|
| Locations | Backwoods • Beach • Bus Stop • Calico Desert • Cindersap Forest • Farm • Farm Cave • Farm Pond • Graveyard • Ginger Island • Mastery Cave • Minecart • Mines • Mountain • Mutant Bug Lair • Pelican Town • Quarry • Quarry Mine • Railroad • Secret Woods • Sewers • Skull Cavern • Summit • Tunnel • Volcano Dungeon • Witch's Swamp |